android base
调节调试窗口字体:
https://blog.csdn.net/qq_32452623/article/details/52403725
1、单元测试(未代码验证)
报出如下错误日志打印:java.lang.RuntimeException: Method setUp in android.test.AndroidTestCase not mocked. See http://g.co/androidstudio/not-mocked for details.at android.test.AndroidTestCase.setUp(AndroidTestCase.java)at junit.framework.TestCase.runBare(TestCase.java:139)at junit.framework.TestResult$1.protect(TestResult.java:122)at junit.framework.TestResult.runProtected(TestResult.java:142)at junit.framework.TestResult.run(TestResult.java:125)at junit.framework.TestCase.run(TestCase.java:129)at junit.framework.TestSuite.runTest(TestSuite.java:252)at junit.framework.TestSuite.run(TestSuite.java:247)at org.junit.internal.runners.JUnit38ClassRunner.run(JUnit38ClassRunner.java:86)at org.junit.runner.JUnitCore.run(JUnitCore.java:137)at com.intellij.junit4.JUnit4IdeaTestRunner.startRunnerWithArgs(JUnit4IdeaTestRunner.java:68)at com.intellij.rt.execution.junit.IdeaTestRunner$Repeater.startRunnerWithArgs(IdeaTestRunner.java:51)at com.intellij.rt.execution.junit.JUnitStarter.prepareStreamsAndStart(JUnitStarter.java:242)at com.intellij.rt.execution.junit.JUnitStarter.main(JUnitStarter.java:70)at sun.reflect.NativeMethodAccessorImpl.invoke0(Native Method)at sun.reflect.NativeMethodAccessorImpl.invoke(NativeMethodAccessorImpl.java:62)at sun.reflect.DelegatingMethodAccessorImpl.invoke(DelegatingMethodAccessorImpl.java:43)at java.lang.reflect.Method.invoke(Method.java:498)at com.intellij.rt.execution.application.AppMainV2.main(AppMainV2.java:131)Process finished with exit code -12、存储方式
ram:运行内存
rom:内部存储 /data/data/package_name
sd: 外部存储
3、QQ登录案例(本地存储 文件存储密码)
private void writeData() { //用文件存储密码 try { File file = new File("/data/data/com.gordon.junit/cache/pwd.txt"); FileOutputStream fos = new FileOutputStream(file); //账号和密码 String userName = "gordon"; String passWord = "****"; fos.write((userName+"&"+passWord).getBytes()); fos.close(); Toast.makeText(this,"success",Toast.LENGTH_SHORT).show(); } catch (FileNotFoundException e) { e.printStackTrace(); Toast.makeText(this,"FileNotFoundException",Toast.LENGTH_SHORT).show(); } catch (IOException e) { e.printStackTrace(); Toast.makeText(this,"IOException",Toast.LENGTH_SHORT).show(); } }读取数据
private void readData() { File file = new File("/data/data/com.gordon.junit/cache/pwd.txt"); API可替换File file = new File(this.getCacheDir(),"pwd.txt"); API可替换File file = new File(getFilesDir(),"pwd.txt"); try { BufferedReader br = new BufferedReader(new InputStreamReader(new FileInputStream(file))); String s = br.readLine(); String[] split = s.split("&"); Toast.makeText(this,"userName"+split[0],Toast.LENGTH_SHORT).show(); br.close(); } catch (FileNotFoundException e) { e.printStackTrace(); } catch (IOException e) { e.printStackTrace(); } }输入框密文显示密码
4、context 上下文
文件读写权限
5、QQ登录之API方式
读文件API文件默认在files目录下 public void qqLoginRead() { try { FileInputStream fis = this.openFileInput("config.txt"); BufferedReader br = new BufferedReader(new InputStreamReader(fis)); String s = br.readLine(); String[] split = s.split("&"); String userName = split[0]; } catch (FileNotFoundException e) { e.printStackTrace(); } catch (IOException e) { e.printStackTrace(); } }写文件API public void qqLoginWrite() { try { FileOutputStream fos = this.openFileOutput("config.txt", 0); //账号和密码 String userName = "gordon"; String passWord = "****"; fos.write((userName+"&"+passWord).getBytes()); fos.close(); } catch (FileNotFoundException e) { e.printStackTrace(); } catch (IOException e) { e.printStackTrace(); } }6、QQ登录之流方式
文件在cache目录下
API可替换File file = new File(this.getCacheDir(),"pwd.txt");文件在files目录下
API可替换File file = new File(getFilesDir(),"pwd.txt");7、QQ登录之SD卡存储方式
写SD卡
public void sdCardWrite() { File file = new File("/mnt/sdcard/waibu.txt"); try { FileOutputStream fos = new FileOutputStream(file); String userName = "gordon"; String passWord = "****"; fos.write((userName+"&"+passWord).getBytes()); fos.close(); } catch (FileNotFoundException e) { e.printStackTrace(); } catch (IOException e) { e.printStackTrace(); } }读SD卡
public void sdCardRead() { File file = new File("/mnt/sdcard/waibu.txt"); try { FileInputStream fis = new FileInputStream(file); BufferedReader br = new BufferedReader(new InputStreamReader(fis)); String s = br.readLine(); String[] split = s.split("&"); String userName = split[0]; } catch (FileNotFoundException e) { e.printStackTrace(); } catch (IOException e) { e.printStackTrace(); } }读写SD卡时需要在AndroidManifest.xml文件加权限
8、SD卡使用问题
1 判断是否有sd卡
public void checkSdCard() { String state = Environment.getExternalStorageState(); if(Environment.MEDIA_MOUNTED.equals(state)) { //插入了SD卡 }else if(Environment.MEDIA_UNMOUNTED.equals(state)) { //拔出了SD卡 } }2 sd卡路径不是/mnt/sdcard 或者是/storage
public void getSdCardAddress() { File file = Environment.getExternalStorageDirectory(); String address = file.getAbsolutePath(); }3 可用空间等
public void getSdCardFreeSpace() { File file = Environment.getExternalStorageDirectory(); long freeSpace = file.getFreeSpace(); //格式化大小 String formatFileSize = Formatter.formatFileSize(this, freeSpace); }9、QQ登录之SharedPreference
SharedPreference文件保存目录在/data/data/package_name/shared_
prefs
写文件:底层是map集合的方式存储数据
/** * 1 获取sp * 2 拿到编辑器 * 3 设置要存储的数据 * 4 提交 */ public void qqLoginSPWrite() { SharedPreferences sp = this.getSharedPreferences("config", 0); SharedPreferences.Editor edit = sp.edit(); edit.putString("qq","5057"); edit.putString("pwd", "5057"); edit.commit(); }读文件:
public void qqLoginSPRead() { SharedPreferences sp = this.getSharedPreferences("config", 0); sp.getString("qq","123"); }用途:
1 存储密码 配置信息
2 自动添加后缀.xml
10、生成xml和解析
特点:
1 用标签存储数据
2 跨平台读取数据
生成xml文件:
/** * 1 创建序列化器 * 2 设置参数 * 3 生成文件 */ public void xmlWrite() { XmlSerializer serializer = Xml.newSerializer(); try { FileOutputStream fos = this.openFileOutput("student.xml", 0); serializer.setOutput(fos,"UTF-8"); //生成xml文件 serializer.startDocument("UTF-8", true); //根标签 serializer.startTag(null, "stu"); //姓名 serializer.startTag(null, "name"); serializer.text("gordon"); serializer.endTag(null, "name"); //学号 serializer.startTag(null, "number"); serializer.text("110"); serializer.endTag(null, "number"); serializer.endTag(null, "stu"); serializer.endDocument(); fos.close(); } catch (FileNotFoundException e) { e.printStackTrace(); } catch (IOException e) { e.printStackTrace(); } }解析xml文件:
解析xml文件的方式:
1 sax基于事件
2 dom&dom4j 用dom树解析
3 pull类似sax(效率高) android使用
/** * 1 创建解析器 * 2 设置参数 * 3 解析 */ public void xmlRead() { try { XmlPullParser parser = Xml.newPullParser(); FileInputStream fis = null; fis = openFileInput("student.xml"); parser.setInput(fis,"UTF-8"); int type = parser.getEventType(); String name = null; String number = null; while (type != XmlPullParser.END_DOCUMENT) { String tag = parser.getName(); switch (type){ case XmlPullParser.START_TAG: if("name".equals(tag)) { name = parser.nextText(); System.out.println(name); }else if("number".equals(tag)) { number = parser.nextText(); System.out.println(number); } break; default: break; } type = parser.next(); } fis.close(); //在此view设置数据 } catch (FileNotFoundException e) { e.printStackTrace(); } catch (XmlPullParserException e) { e.printStackTrace(); } catch (IOException e) { e.printStackTrace(); } }11、帧动画
12、国际化
13、Android数据存储方式 5种(按照数据存储的位置划分)
14、Sqlite数据库
轻量级、开源的、微小型数据库
创建文件:
public void createFiles() throws IOException { //1 在内存中创建一个指向d盘的文件对象 File file = new File("D:\\file.txt"); //2 在硬盘上创建文件并写入内容 FileOutputStream fos = new FileOutputStream(file); fos.write("hello".getBytes()); fos.close(); }创建数据库:
public class MyDbOpenHelper extends SQLiteOpenHelper{ public MyDbOpenHelper(Context context, String name, SQLiteDatabase.CursorFactory factory, int version) { super(context, name, factory, version); } public MyDbOpenHelper(Context context, String name, SQLiteDatabase.CursorFactory factory, int version, DatabaseErrorHandler errorHandler) { super(context, name, factory, version, errorHandler); } @Override public void onCreate(SQLiteDatabase db) { } @Override public void onUpgrade(SQLiteDatabase db, int oldVersion, int newVersion) { }}1 创建一个类MyDbOpenHelper 继承 SQLiteOpenHelper
2 重写其构造方法
public MyDbOpenHelper(Context context) { super(context, "student.db", null, 1); }3 在view中调用
1 在内存中创建数据库帮助类的对象 MyDbOpenHelper helper = new MyDbOpenHelper(this); 2 在磁盘上创建数据库文件 helper.getWritableDatabase();此时会在package_name/databases/下生成 student.db和student.db-journal两个文件
4 创建数据库表
第一次创建数据库的时候调用,适合初始化数据库的表
不检查类型和长度如:name varchar(20)
@Override public void onCreate(SQLiteDatabase db) { db.execSQL("create table stu(_id integer primary key autoincrement, name varchar(20), number varchar(20))"); }只有当数据库版本升级后才会调用以下方法
如将版本号变成2 public MyDbOpenHelper(Context context) { super(context, "student.db", null, 2); }此时会调用如下方法 @Override public void onUpgrade(SQLiteDatabase db, int oldVersion, int newVersion) {可修改数据库的表,如增加列 }问题:
1、此数据库不能降级 3->1,会出错
2、数据库版本号必须>=1(无效的参数异常)
5 操作数据库表(增、删、改、查)
sql语句:
增
insert into stu(‘name’, ‘name’) values(‘林青霞’, ‘100’)
查
select * from stu
改
update stu set name=‘liuyifei’ while
删
delete from stu while id=1
public void insert() { MyDbOpenHelper helper = new MyDbOpenHelper(this); SQLiteDatabase db = helper.getWritableDatabase(); db.execSQL("insert into stu('name', 'number') values (?, ?)", new Object[]{"gordon", "110"}); db.close(); } public void delete() { MyDbOpenHelper helper = new MyDbOpenHelper(this); SQLiteDatabase db = helper.getWritableDatabase(); db.execSQL("delete from stu"); db.close(); } public void update() { MyDbOpenHelper helper = new MyDbOpenHelper(this); SQLiteDatabase db = helper.getWritableDatabase(); db.execSQL("update stu set name=?", new String[]{"gordon1"}); db.close(); } public void query() { MyDbOpenHelper helper = new MyDbOpenHelper(this); SQLiteDatabase db = helper.getWritableDatabase(); Cursor cursor = db.rawQuery("select * from stu", null); while (cursor.moveToNext()) { String _id = cursor.getString(0);//0: _id 1: name } db.close(); }6 api操作数据库:
public void apiInsert() { MyDbOpenHelper helper = new MyDbOpenHelper(this); SQLiteDatabase db = helper.getWritableDatabase(); ContentValues values = new ContentValues(); values.put("name", "xiaoshen"); long id = db.insert("stu", null, values); if (id == -1) { //插入失败 }else { } db.close(); } public void apiDelete() { MyDbOpenHelper helper = new MyDbOpenHelper(this); SQLiteDatabase db = helper.getWritableDatabase(); int id = db.delete("stu", null, null); if(id == 0) { //删除失败 }else { } db.close(); } public void apiUpdate() { MyDbOpenHelper helper = new MyDbOpenHelper(this); SQLiteDatabase db = helper.getWritableDatabase(); ContentValues values = new ContentValues(); values.put("name", "nimei"); int id = db.update("stu", values, null, null); if(id == 0) { //更新失败 }else { } db.close(); } /** * table 表名 * columns 要查询的列 * selection 查询条件 * selectionArgs 查询条件的占位符 * groupBy 分组 * having 条件 * orderBy 排序 */ public void apiQuery() { MyDbOpenHelper helper = new MyDbOpenHelper(this); //加锁线程安全 SQLiteDatabase db = helper.getWritableDatabase(); //未加锁效率高 //SQLiteDatabase readDb = helper.getReadableDatabase(); Cursor cursor = db.query("stu", new String[]{"name", "num", "_id"}, null, null, null, null, null); while (cursor.moveToNext()) { String _id = cursor.getString(0);//0: _id 1: name } db.close(); }7 操作命令行进行增删改查
cmd
8 数据库事务
修改数据库要么同时成功,要么同时失败
public void shiwu() { MyDbOpenHelper helper = new MyDbOpenHelper(this); SQLiteDatabase db = helper.getWritableDatabase(); try { db.beginTransaction(); ContentValues values = new ContentValues(); values.put("name", 0+1000000); db.update("stu", values, "name=?", new String[]{"kehu"}); ContentValues values1 = new ContentValues(); values1.put("name", 1000000-1000000); db.update("stu", values1, "name=?", new String[]{"yinhang"}); db.setTransactionSuccessful(); }catch (Exception e){ e.printStackTrace(); }finally { db.endTransaction(); } db.close(); }15、ListView
16、网络编程
HTTP协议:GETRequest URL:http://localhost:8080/web/LoginServlet?qq=123&pwd=asdRequest Method:GETStatus Code:200 OKccept:text/html,application/xhtml+xml,application/xml;q=0.9,image/webp,*/*;q=0.8Accept-Encoding:gzip, deflate, sdchAccept-Language:zh-CN,zh;q=0.8Connection:keep-aliveCookie:JSESSIONID=63630741907F82A937A9C96CCB43868EHost:localhost:8080Referer:http://localhost:8080/web/login.jspUpgrade-Insecure-Requests:1User-Agent:Mozilla/5.0 (Windows NT 6.1; WOW64) AppleWebKit/537.36 (KHTML, like Gecko) Chrome/51.0.2704.106 Safari/537.36POSTRequest URL:http://localhost:8080/web/LoginServletRequest Method:POSTqq=123&pwd=ASDStatus Code:200 OKRemote Address:[::1]:8080Accept:text/html,application/xhtml+xml,application/xml;q=0.9,image/webp,*/*;q=0.8Accept-Encoding:gzip, deflateAccept-Language:zh-CN,zh;q=0.8Cache-Control:max-age=0Connection:keep-aliveContent-Length:14Content-Type:application/x-www-form-urlencodedCookie:JSESSIONID=63630741907F82A937A9C96CCB43868EHost:localhost:8080Origin:http://localhost:8080Referer:http://localhost:8080/web/login.jspUpgrade-Insecure-Requests:1User-Agent:Mozilla/5.0 (Windows NT 6.1; WOW64) AppleWebKit/537.36 (KHTML, like Gecko) Chrome/51.0.2704.106 Safari/537.361 打开tomcat服务器
2 webapps目录下zhbj查看图片
http://192.168.91.1:8080/zhbj/10008/1452327318UU92.jpg
3 点击检查->Network
4 访问一个网页
5 查看其请求头等信息
17、网络通信
1 写一个url
2 用这个url打开http连接
3 设置请求参数
4 获取状态码
2xx 响应成功 3xx重定向 4xx资源错误 5xx服务器错误
5 获取服务器返回的二进制输入流
注:在AndroidManifest.xml 添加网络权限
直接操作流访问网络
public void openUrl() { try { //1 URL url = new URL("https://www.baidu.com"); //2 打开http HttpURLConnection conn = (HttpURLConnection)url.openConnection(); //3 设置请求参数(默认是get) conn.setRequestMethod("GET"); conn.setConnectTimeout(3000); //4 获取状态码 int code = conn.getResponseCode(); if(code == 200) { //5 获取服务器返回的二进制输入流 InputStream is = conn.getInputStream(); //6 把流转换为位图对象 Bitmap bitmap = BitmapFactory.decodeStream(is); //7 显示在view }else { //请求失败 } } catch (MalformedURLException e) { e.printStackTrace(); } catch (IOException e) { e.printStackTrace(); } }图片内存大小计算:
宽高4=12808004
在windows下大小为603kb
android4.4在主线程操作网络异常(2.3.2无)
获取当前线程名
String currentThreadName = Thread.currentThread().getName();开启子线程
new Thread() { @Override public void run() { super.run(); } }.start();18、消息机制编写步骤
//1 在主线程中创建Handler private Handler mHandler = new Handler() { @Override public void handleMessage(Message msg) { super.handleMessage(msg); //3 在handlerMessage()中修改UI switch (msg.what) { case 1: String s = String.valueOf(msg.obj); break; default: break; } } }; public void start() { new Thread() { @Override public void run() { super.run(); for (int i = 0; i < 101; i++) { try { Thread.sleep(1000); } catch (InterruptedException e) { e.printStackTrace(); } //2 在子线程中用handler发消息 Message message = new Message(); message.obj = i; mHandler.sendMessage(message); } } }.start(); }19、将流转换为文字(操作字符串–工具类—01)
public class StringUtils { /** * 从流转换为字符串 * @param is 输入流 * @return null 失败 */ public static String parseStream2Str(InputStream is) { ByteArrayOutputStream baos = new ByteArrayOutputStream(); int len = -1; byte[] buffer = new byte[1024*8]; String str = null; try { while ((len = is.read(buffer)) != -1) { baos.write(buffer, 0, len); str = new String(baos.toByteArray()); } return str; } catch (IOException e) { e.printStackTrace(); return null; } }}对比:
//2.0 在子线程中用handler发消息 Message message = new Message(); message.obj = i; mHandler.sendMessage(message); //2.1 从消息池中获取消息(效率高) Message msg = Message.obtain(); msg.obj = "string"; msg.what = 2;(区别哪个发送的) mHandler.sendMessage(msg);Handler MessageQueue Message Looper关系:
任何带有界面的操作系统都运行在一个死循环中
用户操作时,用Handler发送一个消息给系统的MessageQueue消息队列,所有的消息在消息队列中排队,looper轮询器不断从消息队列中取出消息,给Handler的HandlerMessage方法,然后在这个方法中更新ui
20、Handler之api方式
public class ToastUtils { public void showToastInAnyThread(final Activity context, final String msg) { context.runOnUiThread(new Runnable() { @Override public void run() { Toast.makeText(context, msg, Toast.LENGTH_SHORT).show(); } }); }}21、常见数据适配器
public void setArrayAdapter() { /** * 1 context * 2 listview 条目布局文件 * 3 参2布局文件中的控件 * 4 string数组,data */ lvArrayAdapter.setAdapter(new ArrayAdapter(MainActivity.this, R.layout.array_adapter_list_item, R.id.tv_text, str)); } 22、复杂ListView
23、访问网络
在values目录下创建一个config.xml文件
<?xml version="1.0" encoding="utf-8"?> http://www.baidu.com 网络请求工具类
public class NetService { public static List requestNetwork(Context context) { try { String path = context.getResources().getString(R.string.networkIp); //1// URL url = new URL("https://www.baidu.com"); URL url = new URL(path); //2 打开http HttpURLConnection conn = (HttpURLConnection)url.openConnection(); //3 设置请求参数(默认是get) conn.setRequestMethod("GET"); conn.setConnectTimeout(3000); //4 获取状态码 int code = conn.getResponseCode(); if(code == 200) { //5 获取服务器返回的二进制输入流 InputStream is = conn.getInputStream(); //解析xml文件 //7 显示在view }else { //请求失败 } } catch (MalformedURLException e) { e.printStackTrace(); } catch (IOException e) { e.printStackTrace(); } return null; }} 24、展示图片
SmartImageView(开源框架)
https://github.com/JackCho/SmartImageView
25、自定义控件 SmartImageView
package widget;import android.content.Context;import android.graphics.Bitmap;import android.graphics.BitmapFactory;import android.os.Handler;import android.os.Message;import android.support.annotation.Nullable;import android.util.AttributeSet;import java.io.InputStream;import java.net.HttpURLConnection;import java.net.URL;/** * author: Gordon * created on: 2017/12/5 23:11 * description: */public class SmartImageView extends android.support.v7.widget.AppCompatImageView { private static final int MSG_SUCC = 0; private static final int MSG_ERR = 1; private static final int MSG_ERR_CODE = 2; public SmartImageView(Context context) { super(context); } public SmartImageView(Context context, @Nullable AttributeSet attrs) { super(context, attrs); } public SmartImageView(Context context, @Nullable AttributeSet attrs, int defStyleAttr) { super(context, attrs, defStyleAttr); } private Handler mHandler = new Handler() { @Override public void handleMessage(Message msg) { super.handleMessage(msg); switch (msg.what) { case MSG_SUCC: //7 显示在view(在主线程中) setImageBitmap((Bitmap) msg.obj); break; case MSG_ERR: Bitmap bitmap = BitmapFactory.decodeResource(getResources(), R.drawable.ic_launcher_foreground); setImageBitmap(bitmap); break; case MSG_ERR_CODE: break; } } }; public void setImageURL(final String path) { new Thread() { @Override public void run() { super.run(); //获取网络数据 URL url = null; try { url = new URL(path); //2 打开http HttpURLConnection conn = (HttpURLConnection)url.openConnection(); //3 设置请求参数(默认是get) conn.setRequestMethod("GET"); conn.setConnectTimeout(3000); //4 获取状态码 int code = conn.getResponseCode(); if(code == 200) { //5 获取服务器返回的二进制输入流 InputStream is = conn.getInputStream(); //6 把流转换为位图对象 Bitmap bitmap = BitmapFactory.decodeStream(is); Message message = Message.obtain(); message.obj = bitmap; message.what = MSG_SUCC; mHandler.sendMessage(message); //7 显示在view(在主线程中) }else { //请求失败 Message errorMessage = Message.obtain(); errorMessage.obj = code; errorMessage.what = MSG_ERR_CODE; mHandler.sendMessage(errorMessage); } } catch (Exception e) { e.printStackTrace(); mHandler.sendEmptyMessage(MSG_ERR); } } }.start(); }}26、http之get/post请求提交数据到服务器
/** * GET: */ private void requestNetWorkByGet(String userName, String passWord) { String path = "http://192.168.3.100:8080/web/Login?userName=+" + userName + "&passWord" + passWord; //获取网络数据 URL url = null; try { url = new URL(path); //2 打开http HttpURLConnection conn = (HttpURLConnection)url.openConnection(); //3 设置请求参数(默认是get) conn.setRequestMethod("GET"); conn.setConnectTimeout(3000); conn.setReadTimeout(3000); //4 获取状态码 int code = conn.getResponseCode(); if(code == 200) { //5 获取服务器返回的二进制输入流 InputStream is = conn.getInputStream(); String textByGet = StringUtils.parseStream2String(is); //handler主线程显示数据 } } catch (Exception e) { e.printStackTrace(); } }/** * POST: */ private void requestNetWorkByPost(String userName, String passWord) { String path = "http://192.168.3.100:8080/web/Login"; //获取网络数据 URL url = null; try { url = new URL(path); //2 打开http HttpURLConnection conn = (HttpURLConnection)url.openConnection(); //3 设置请求参数(默认是get) conn.setRequestMethod("POST"); conn.setConnectTimeout(3000); conn.setReadTimeout(3000); //3.1 多了两个请求头 String text = "userName=" + userName + "&passWord = " + passWord; conn.setRequestProperty("Content-Length", String.valueOf(text.length())); conn.setRequestProperty("Content-Type", "application/x-www-form-urlencoded"); //3.2 用二进制输入流提交数据 conn.setDoOutput(true);//声明要给服务器提交数据了 conn.getOutputStream().write(text.getBytes()); //4 获取状态码 int code = conn.getResponseCode(); if(code == 200) { //5 获取服务器返回的二进制输入流 InputStream is = conn.getInputStream(); String textByPost = StringUtils.parseStream2String(is); //handler主线程显示数据 } } catch (Exception e) { e.printStackTrace(); } }27、中文乱码问题
客户端和服务端所用的编码方式不同
28、开源框架httpclient向服务器提交数据
6.0之前移除了httpclient
/** * 开源框架httpclient向服务器提交数据GET */ private void requestNetWorkByHttpClientGet(String userName, String passWord) { String path = "http://192.168.3.100:8080/web/Login?userName=+" + userName + "&passWord" + passWord; //1 打开浏览器 HttpClient client = new DefaultHttpClient(); //2 输入网址 HttpGet url = new HttpGet(path); //3 回车 HttpResponse response = client.execute(url); //获取状态行 StatusLine statusLine = response.getStatusLine(); //获取状态码 int code = statusLine.getStatusCode(); if(code == 200) { HttpEntity entity = response.getEntity(); InputStream is = entity.getContent(); String textByPost = StringUtils.parseStream2String(is); } else { } }/** * 开源框架httpclient向服务器提交数据POST */ private void requestNetWorkByHttpClientPost(String userName, String passWord) { String path = "http://192.168.3.100:8080/web/Login"; //1 打开浏览器 HttpClient client = new DefaultHttpClient(); //2 输入网址 HttpPost url = new HttpPost(path); //发送post数据 List parameters = new ArrayList<>(); parameters.add(new BasicNameValuePair("userName", userName)); parameters.add(new BasicNameValuePair("passWord", passWord)); UrlEncodedFormEntity requestEntity = new UrlEncodedFormEntity(parameters, "utf-8"); url.setEntity(requestEntity); //3 回车 HttpResponse response = client.execute(url); //获取状态行 StatusLine statusLine = response.getStatusLine(); //获取状态码 int code = statusLine.getStatusCode(); if(code == 200) { HttpEntity entity = response.getEntity(); InputStream is = entity.getContent(); String textByPost = StringUtils.parseStream2String(is); } else { } } 29、开源框架Asynchttpclient向服务器提交数据
/** * 开源框架Asynchttpclient向服务器提交数据GET */ private void requestNetWorkByAsyncHttpClient(String userName, String passWord) { String path = "http://192.168.3.100:8080/web/Login?userName=+" + userName + "&passWord" + passWord; AsyncHttpClient client = new AsyncHttpClient(); client.get(path, new AsyncHttpResponseHandler() { @Override public void onSuccess(int statusCode, Header[] headers, byte[] responseBody) { String str = new String(responseBody); } @Override public void onFailure(int statusCode, Header[] headers, byte[] responseBody, Throwable error) { } }); } /** * 开源框架Asynchttpclient向服务器提交数据POST */ private void requestNetWorkByAsyncHttpClientPost(String userName, String passWord) { String path = "http://192.168.3.100:8080/web/Login"; AsyncHttpClient client = new AsyncHttpClient(); //设置post数据 RequestParams params = new RequestParams(); params.put("userName", userName); params.put("passWord", passWord); client.post(path, params, new AsyncHttpResponseHandler() { @Override public void onSuccess(int statusCode, Header[] headers, byte[] responseBody) { } @Override public void onFailure(int statusCode, Header[] headers, byte[] responseBody, Throwable error) { } }); }30、上传任意文件
(注:) Header[]导包一直不成功,未解决
public void onSuccess(int i, org.apache.http.Header[] headers, byte[] bytes) { }`/** * 1 创建对象 * 2 设置要上传的文件 * 3 调用post方法上传 */public void upload(String url) { //1 创建对象 AsyncHttpClient client = new AsyncHttpClient(); //2 设置要上传的文件 RequestParams params = new RequestParams(); String filePath = "/mnt/sdcard/12.txt"; File file = new File(filePath); try { params.put("file", file); } catch (FileNotFoundException e) { e.printStackTrace(); } //3 调用post方法上传 client.post(url, params, new AsyncHttpResponseHandler() { @Override public void onProgress(int bytesWritten, int totalSize) { super.onProgress(bytesWritten, totalSize); pbProgressBar.setMax(totalSize); pbProgressBar.setProgress(bytesWritten); } @Override public void onStart() { super.onStart(); } @Override public void onFinish() { super.onFinish(); } @Override public void onSuccess(int i, org.apache.http.Header[] headers, byte[] bytes) { } @Override public void onFailure(int i, org.apache.http.Header[] headers, byte[] bytes, Throwable throwable) { } });}31、多线程下载private static int threadCount = 3;private static String path = "http://192.168.25.76:8080/download/123.mp4";/** * 多线程下载: * 1 获取服务器资源大小 * 2 开启多个线程下载服务器对应的一块资源 * 3 每个线程干完活,整个服务器资源下载完毕 */public void multiThreadDownLoad() { try { URL url = new URL(path); //2 打开http HttpURLConnection conn = (HttpURLConnection)url.openConnection(); //3 设置请求参数(默认是get) conn.setRequestMethod("GET"); conn.setConnectTimeout(3000); conn.setReadTimeout(3000); //4 获取状态码 int code = conn.getResponseCode(); // 1 获取服务器资源大小 int fileLength = 0; if(code == 200) { fileLength = conn.getContentLength(); //创建一个空文件 RandomAccessFile raf = new RandomAccessFile("D:\\DOWNLOAD.tmp", "rw"); raf.setLength(fileLength); raf.close(); } //2 开启多个线程下载服务器对应的一块资源 int blockSize = fileLength / threadCount; for (int threadId = 0; threadId < threadCount; threadId++) { int startIndex = threadId*blockSize; int endIndex = (threadId+1)*blockSize-1; //最后一个线程,修正结束位置 if(threadId == threadCount - 1) { endIndex = fileLength - 1; } new DownLoadThread(startIndex, endIndex, threadId).start(); } } catch (Exception e) { e.printStackTrace(); }}/** * 获取文件名 * @return */static String getFilePath() { int index = path.lastIndexOf("/") + 1; return "D:\\" + path.substring(index);}static class DownLoadThread extends Thread { int startIndex; int endIndex; int threadId; public DownLoadThread(int startIndex, int endIndex, int threadId) { super(); this.startIndex = startIndex; this.endIndex = endIndex; this.threadId = threadId; } @Override public void run() { super.run(); //获取网络数据 URL url = null; try { url = new URL(path); //2 打开http HttpURLConnection conn = (HttpURLConnection)url.openConnection(); //3 设置请求参数(默认是get) conn.setRequestMethod("GET"); conn.setConnectTimeout(3000); conn.setReadTimeout(3000); //重要,设置要请求的数据范围 conn.setRequestProperty("Range", "bytes="+startIndex+"-"+endIndex); //4 获取状态码 int code = conn.getResponseCode(); if(code == 206) { //5 获取服务器返回的二进制输入流 InputStream is = conn.getInputStream(); //每个线程下载的文件 RandomAccessFile raf = new RandomAccessFile(getFilePath(), "wr"); int len = -1; byte[] buffer = new byte[1024 * 8]; //重要:定位到每个线程开始写的位置 raf.seek(startIndex); while ((len = is.read(buffer)) != -1) { raf.write(buffer, 0, len); } raf.close(); } //3 每个线程干完活,整个服务器资源下载完毕 } catch (Exception e) { e.printStackTrace(); } }}32、多线程下载原理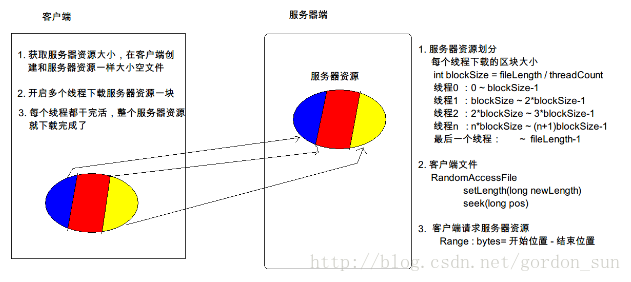33、断点下载原理
断点时存储下载的位置,下一次下载前从上一次断点的位置开始下载
int lastDownPos += len;34、多线程断点下载
private static int threadCount = 3; private static String path = "http://192.168.25.76:8080/download/123.mp4"; /** * 多线程下载: * 1 获取服务器资源大小 * 2 开启多个线程下载服务器对应的一块资源 * 3 每个线程干完活,整个服务器资源下载完毕 */ public void multiThreadDownLoad() { try { URL url = new URL(path); //2 打开http HttpURLConnection conn = (HttpURLConnection)url.openConnection(); //3 设置请求参数(默认是get) conn.setRequestMethod("GET"); conn.setConnectTimeout(3000); conn.setReadTimeout(3000); //4 获取状态码 int code = conn.getResponseCode(); // 1 获取服务器资源大小 int fileLength = 0; if(code == 200) { fileLength = conn.getContentLength(); //创建一个空文件 RandomAccessFile raf = new RandomAccessFile("D:\\DOWNLOAD.tmp", "rw"); raf.setLength(fileLength); raf.close(); } //2 开启多个线程下载服务器对应的一块资源 int blockSize = fileLength / threadCount; for (int threadId = 0; threadId < threadCount; threadId++) { int startIndex = threadId*blockSize; int endIndex = (threadId+1)*blockSize-1; //最后一个线程,修正结束位置 if(threadId == threadCount - 1) { endIndex = fileLength - 1; } new DownLoadThread(startIndex, endIndex, threadId).start(); } } catch (Exception e) { e.printStackTrace(); } } /** * 获取文件名 * @return */ static String getFilePath() { int index = path.lastIndexOf("/") + 1; return "D:\\" + path.substring(index); } /** * 获取断点进度的临时文件 * @return */ static String getTmpFilePath(int threadId) { return getFilePath()+threadId+".txt"; } static class DownLoadThread extends Thread { int startIndex; int endIndex; int threadId; //断点位置 int lastDownPos; public DownLoadThread(int startIndex, int endIndex, int threadId) { super(); this.startIndex = startIndex; this.endIndex = endIndex; this.threadId = threadId; lastDownPos = startIndex;//初始化 } @Override public void run() { super.run(); File tmpFile = new File(getTmpFilePath(threadId)); if(tmpFile != null && tmpFile.length() > 0) { try { FileInputStream fis = new FileInputStream(tmpFile); BufferedReader br = new BufferedReader(new InputStreamReader(fis)); String str = br.readLine(); //下载起始位置 startIndex = Integer.valueOf(str); lastDownPos = startIndex; br.close(); } catch (FileNotFoundException e) { e.printStackTrace(); } catch (IOException e) { e.printStackTrace(); } } //获取网络数据 URL url = null; try { url = new URL(path); //2 打开http HttpURLConnection conn = (HttpURLConnection)url.openConnection(); //3 设置请求参数(默认是get) conn.setRequestMethod("GET"); conn.setConnectTimeout(3000); conn.setReadTimeout(3000); //重要,设置要请求的数据范围 conn.setRequestProperty("Range", "bytes="+startIndex+"-"+endIndex); //4 获取状态码 int code = conn.getResponseCode(); if(code == 206) { //5 获取服务器返回的二进制输入流 InputStream is = conn.getInputStream(); //每个线程下载的文件 RandomAccessFile raf = new RandomAccessFile(getFilePath(), "wr"); int len = -1; byte[] buffer = new byte[1024 * 8]; //重要:定位到每个线程开始写的位置 raf.seek(startIndex); while ((len = is.read(buffer)) != -1) { raf.write(buffer, 0, len); //断点:存储断点的位置 lastDownPos += len; RandomAccessFile rwd = new RandomAccessFile(getTmpFilePath(threadId), "rwd"); rwd.write(String.valueOf(lastDownPos).getBytes()); rwd.close(); } raf.close(); } //3 每个线程干完活,整个服务器资源下载完毕 boolean isDelete = tmpFile.delete(); } catch (Exception e) { e.printStackTrace(); } } }35、移植java项目到android
自定义进度条<?xml version="1.0" encoding="utf-8"?> ProgressBar pb = (ProgressBar) View.inflate(this, R.layout.progressbar, null); LinearLayout linearLayout = new LinearLayout(this); linearLayout.addView(pb); linearLayout.removeAllViews();36、开源框架进行多线程断点下载(xUtils)
HttpUtils 进行文件下载
public class MainActivity extends AppCompatActivity { @Override protected void onCreate(Bundle savedInstanceState) { super.onCreate(savedInstanceState); setContentView(R.layout.activity_main); EditText etPath = (EditText) findViewById(R.id.et_path); final TextView tvPb = (TextView) findViewById(R.id.tv_pb); final ProgressBar pb = (ProgressBar) findViewById(R.id.pb); Button btDownload = (Button) findViewById(R.id.bt_download); final String url = etPath.getText().toString().trim(); btDownload.setOnClickListener(new View.OnClickListener() { @Override public void onClick(View v) { HttpUtils httpUtils = new HttpUtils(); httpUtils.download(url, "/mnt/sdcard/gui.exe", false, new RequestCallBack() { @Override public void onSuccess(ResponseInfo responseInfo) { File file = responseInfo.result; String path = file.getAbsolutePath(); } @Override public void onFailure(HttpException e, String s) { } @Override public void onStart() { super.onStart(); } @Override public void onLoading(long total, long current, boolean isUploading) { super.onLoading(total, current, isUploading); pb.setMax((int)total); pb.setProgress((int) current); int precent = (int) (current * 100 / total); tvPb.setText(precent+"%"); } }); } }); }} 37、意图设置action
public void callPhone(View view) { //1 创建意图对象 Intent intent = new Intent(); //2 设置动作 intent.setAction(Intent.ACTION_CALL); //3 设置数据 intent.setData(Uri.parse("tel://10086")); //4 打开电话拨号界面 startActivity(intent); }添加拨打电话的权限注:在6.0之前没有问题,但是在6.0之后如果没有进行权限处理会报错12-12 21:37:10.340 6763-6763/com.gordon.jcday06 E/AndroidRuntime: FATAL EXCEPTION: main Process: com.gordon.jcday06, PID: 6763 java.lang.IllegalStateException: Could not execute method for android:onClick at android.support.v7.app.AppCompatViewInflater$DeclaredOnClickListener.onClick(AppCompatViewInflater.java:293) at android.view.View.performClick(View.java:5646) at android.view.View$PerformClick.run(View.java:22459) at android.os.Handler.handleCallback(Handler.java:761) at android.os.Handler.dispatchMessage(Handler.java:98) at android.os.Looper.loop(Looper.java:156) at android.app.ActivityThread.main(ActivityThread.java:6523) at java.lang.reflect.Method.invoke(Native Method) at com.android.internal.os.ZygoteInit$MethodAndArgsCaller.run(ZygoteInit.java:942) at com.android.internal.os.ZygoteInit.main(ZygoteInit.java:832) Caused by: java.lang.reflect.InvocationTargetException at java.lang.reflect.Method.invoke(Native Method) at android.support.v7.app.AppCompatViewInflater$DeclaredOnClickListener.onClick(AppCompatViewInflater.java:288) at android.view.View.performClick(View.java:5646) at android.view.View$PerformClick.run(View.java:22459) at android.os.Handler.handleCallback(Handler.java:761) at android.os.Handler.dispatchMessage(Handler.java:98) at android.os.Looper.loop(Looper.java:156) at android.app.ActivityThread.main(ActivityThread.java:6523) at java.lang.reflect.Method.invoke(Native Method) at com.android.internal.os.ZygoteInit$MethodAndArgsCaller.run(ZygoteInit.java:942) at com.android.internal.os.ZygoteInit.main(ZygoteInit.java:832) Caused by: java.lang.SecurityException: Permission Denial: starting Intent { act=android.intent.action.CALL dat=tel:xxxxxxxxxxxxx cmp=com.android.server.telecom/.components.UserCallActivity } from ProcessRecord{e27260f 6763:com.gordon.jcday06/u0a129} (pid=6763, uid=10129) requires android.permission.CALL_PHONE at android.os.Parcel.readException(Parcel.java:1665) at android.os.Parcel.readException(Parcel.java:1618) at android.app.ActivityManagerProxy.startActivity(ActivityManagerNative.java:3097) at android.app.Instrumentation.execStartActivity(Instrumentation.java:1539) at android.app.Activity.startActivityForResult(Activity.java:4391) at android.support.v4.app.BaseFragmentActivityApi16.startActivityForResult(BaseFragmentActivityApi16.java:54) at android.support.v4.app.FragmentActivity.startActivityForResult(FragmentActivity.java:67) at android.app.Activity.startActivityForResult(Activity.java:4335) at android.support.v4.app.FragmentActivity.startActivityForResult(FragmentActivity.java:720) at android.app.Activity.startActivity(Activity.java:4697) at android.app.Activity.startActivity(Activity.java:4665) at com.gordon.jcday06.MainActivity.callPhone(MainActivity.java:25) at java.lang.reflect.Method.invoke(Native Method) at android.support.v7.app.AppCompatViewInflater$DeclaredOnClickListener.onClick(AppCompatViewInflater.java:288) at android.view.View.performClick(View.java:5646) at android.view.View$PerformClick.run(View.java:22459) at android.os.Handler.handleCallback(Handler.java:761) at android.os.Handler.dispatchMessage(Handler.java:98) at android.os.Looper.loop(Looper.java:156) at android.app.ActivityThread.main(ActivityThread.java:6523) at java.lang.reflect.Method.invoke(Native Method) at com.android.internal.os.ZygoteInit$MethodAndArgsCaller.run(ZygoteInit.java:942) at com.android.internal.os.ZygoteInit.main(ZygoteInit.java:832) 解决方法:package com.gordon.jcday06;import android.Manifest;import android.content.Context;import android.content.Intent;import android.content.pm.PackageManager;import android.net.Uri;import android.support.annotation.NonNull;import android.support.v4.app.ActivityCompat;import android.support.v4.content.ContextCompat;import android.support.v7.app.AppCompatActivity;import android.os.Bundle;import android.view.View;import android.widget.Button;import android.widget.Toast;public class MainActivity extends AppCompatActivity { @Override protected void onCreate(Bundle savedInstanceState) { super.onCreate(savedInstanceState); setContentView(R.layout.activity_main); Button callPhone = (Button) findViewById(R.id.call_phone); callPhone.setOnClickListener(new View.OnClickListener() { @Override public void onClick(View v) { if(ContextCompat.checkSelfPermission(MainActivity.this, Manifest.permission.CALL_PHONE) != PackageManager.PERMISSION_GRANTED) { ActivityCompat.requestPermissions(MainActivity.this, new String[]{Manifest.permission.CALL_PHONE}, 1); } else { callPhone(); } } }); } public void callPhone() { //1 创建意图对象 Intent intent = new Intent(); //2 设置动作 intent.setAction(Intent.ACTION_CALL); //3 设置数据 intent.setData(Uri.parse("tel://10086")); //4 打开电话拨号界面 startActivity(intent); } @Override public void onRequestPermissionsResult(int requestCode, @NonNull String[] permissions, @NonNull int[] grantResults) { super.onRequestPermissionsResult(requestCode, permissions, grantResults); switch (requestCode) { case 1: if(grantResults.length > 0 && grantResults[0] == PackageManager.PERMISSION_GRANTED) { callPhone(); } else { Toast.makeText(this, "You denied the permission", Toast.LENGTH_SHORT).show(); } break; default: } }}38、开启一个activity(隐式意图)
public void secondActivity(View view) { Intent intent = new Intent(); intent.setAction("ni mei a"); startActivity(intent); } //注:必须定义category 如果清单文件设置了data,在代码中一定要设置data public void secondActivity(View view) { Intent intent = new Intent(); intent.setAction("ni mei a"); intent.setData(Uri.parse("suibian://")); startActivity(intent); } 注:data和type不能共存 intent.setData(Uri.parse("suibian://")); intent.setType("text/nihao");显式意图 public void secondActivity(View view) { Intent intent = new Intent(this, ThirdActivity.class); startActivity(intent); }39、显式与隐式区别
显式:
隐式:可以跳到其他应用界面
40、 Intent跳转时传递数据(不可传递object类型)
数据类型:
八大基本类型
Serializable
Parcelable
bundle
Intent
第1页传入数据 public void secondClick(View view) { Intent intent = new Intent(MainActivity.this, SecondActivity.class); intent.putExtra("name", "goudan"); intent.putExtra("age", 16); startActivity(intent); }第2页获取的数据 Intent intent = getIntent(); String name = intent.getStringExtra("name"); int age = intent.getIntExtra("age", 20);Bundle数据: Intent intent = new Intent(MainActivity.this, SecondActivity.class); Bundle bundle = new Bundle(); bundle.putString("name", "gordon"); bundle.putString("age", "20"); intent.putExtra("b", bundle); startActivity(intent);获取的数据 Intent intent = getIntent(); Bundle bundle = intent.getBundleExtra("b"); String name = bundle.getString("name"); String age = bundle.getString("age");41、
URI : 统一资源标识符
URL :统一资源定位符 是URI的子集
42、activity销毁时传递数据
//1 销毁时传递数据 public void startActivityForResult(Intent intent) { startActivityForResult(intent, 1); } //3 等待返回的数据 @Override protected void onActivityResult(int requestCode, int resultCode, Intent data) { super.onActivityResult(requestCode, resultCode, data); String phoneNum = data.getStringExtra("phoneNum"); etNum.setText(phoneNum); }ConstactActivity.java
//2 返回的数据Intent intent = new Intent();intent.putExtra("phoneNum", constactNumber[position]);setResult(10, intent);finish();43、activity的生命周期
onCreate
onStart
onResume
onPause
onStop
onDestroy
开启:onCreate onStart onResume
关闭:onPause onStop onDestroy
最小化:onPause onStop
最大化:onRestart onStart onResume
44、透明界面
45、横竖屏切换的生命周期
onPasue onStop onDestroy
onCreate onStart onResume
固定屏幕朝向
android:screenOrientation="landscape" 横屏android:screenOrientation="portrait" 竖屏android:screenOrientation="sensor"不敏感屏幕朝向
android:configChanges="orientation|keyboard|screenSize"46、任务栈
1 标准模式
2 单一顶部模式:开启目标activity,系统会去任务栈的顶部查找,如果栈顶有复用,如果没有则创建新的
android:launchMode="singleTop"应用:系统浏览器书签
3 单一任务模式
开启目标activity,系统会去整个任务栈查找,如果找到这个activity存在就清理这个activity上面的所有activity,如果没有就在栈顶创建一个实例对象
4 单一实例模式
开启目标activity,系统为这个activity单独创建任务栈
应用:系统来电界面
47、广播接收者
第1步:清单文件注册 第2步:public class SDReceiver extends BroadcastReceiver { @Override public void onReceive(Context context, Intent intent) { // TODO: This method is called when the BroadcastReceiver is receiving // an Intent broadcast. String action = intent.getAction(); if("android.intent.action.MEDIA_MOUNTED".equals(action)) { } else if("android.intent.action.MEDIA_UNMOUNTED".equals(action)) { } throw new UnsupportedOperationException("Not yet implemented"); }}48、服务
Intent intent = new Intent(this, BgService.class); startService(intent);49、线程和进程
50、服务的生命周期
@Override public void onCreate() { super.onCreate(); } @Override public int onStartCommand(Intent intent, int flags, int startId) { return super.onStartCommand(intent, flags, startId); } @Override public void onDestroy() { super.onDestroy(); }服务可以被开启多次,每次开启执行onStartCommand方法
08-01 go
08-02 服务的生命周期之start
public class MyService extends Service { public MyService() { } @Override public IBinder onBind(Intent intent) { // TODO: Return the communication channel to the service. throw new UnsupportedOperationException("Not yet implemented"); } @Override public void onCreate() { super.onCreate(); System.out.println("onCreate..."); } @Override public int onStartCommand(Intent intent, int flags, int startId) { System.out.println("onStartCommand..."); return super.onStartCommand(intent, flags, startId); } @Override public void onDestroy() { super.onDestroy(); System.out.println("onDestroy..."); }}停止服务: stopService(intent);开启服务: intent = new Intent(this, MyService.class); startService(intent);1、长期运行在后台2、服务可以被多次开启,每次开启都调用onStartCommand3、服务只能被停止一次,多次停止无效08-03 服务的生命周期之bind
/** * bindServiceIntent, * conn, activity and service bind * falg, BIND_AUTO_CREATE 连接时如果有服务对象就复用,没有创建新的服务对象 */ private void bindService() { Intent bindServiceIntent = new Intent(this, MyBindService.class); bindService(bindServiceIntent, new MyConn(),BIND_AUTO_CREATE); } private class MyConn implements ServiceConnection { @Override public void onServiceConnected(ComponentName name, IBinder service) { } @Override public void onServiceDisconnected(ComponentName name) { } }08-04 绑定服务调方法
public class MyBindService extends Service { public MyBindService() { } @Override public int onStartCommand(Intent intent, int flags, int startId) { System.out.println("MyBindService:onStartCommand..."); return super.onStartCommand(intent, flags, startId); } @Override public IBinder onBind(Intent intent) { System.out.println("绑定服务成功后调用onBind..."); return null; } @Override public boolean onUnbind(Intent intent) { System.out.println("服务解绑前调用onBind..."); return super.onUnbind(intent); } @Override public void onCreate() { super.onCreate(); System.out.println("MyBindService:onCreate..."); } @Override public void onDestroy() { super.onDestroy(); System.out.println("MyBindService:onDestroy..."); }}绑定服务:onCreateonBind解绑服务:onUnbindonDestroy不能长期运行在后台只能被绑定一次,多次绑定无效只能被解绑一次,多次解绑抛出异常 private void unbindService() { unbindService(conn); } /** * bindServiceIntent, * conn, activity and service bind * falg, BIND_AUTO_CREATE 连接时如果有服务对象就复用,没有创建新的服务对象 */ private void bindService() { bindServiceIntent = new Intent(this, MyBindService.class); conn = new MyConn(); bindService(bindServiceIntent, conn,BIND_AUTO_CREATE); } private class MyConn implements ServiceConnection { @Override public void onServiceConnected(ComponentName name, IBinder service) { } @Override public void onServiceDisconnected(ComponentName name) { } }activity和service是同生共死,此时如果activity先销毁会抛出异常,一定要在onDestroy()中解绑服务08-05 绑定服务调服务里的方法
1、绑定服务2、在服务里创建内部类,调用服务里的方法 public void methodInService() { System.out.println("我是服务里的方法"); } public class ServiceConnClass extends Binder { public void playMusic() { methodInService(); } } 3、在onBind() 返回 @Override public IBinder onBind(Intent intent) { return new ServiceConnClass(); }4、activity的conn里的 private class MyConn implements ServiceConnection { @Override public void onServiceConnected(ComponentName name, IBinder service) { MyBindServiceCall.ServiceConnClass mService = (MyBindServiceCall.ServiceConnClass)service; //调用,在其他需要调用的地方 mService.playMusic(); } @Override public void onServiceDisconnected(ComponentName name) { } }通过服务里的内部类,调用服务里的方法08-06 采用日志观察绑定服务调用方法的流程
08-07 绑定服务抽取接口
1、绑定service Intent intent = new Intent(this, ThirdActivityConnService.class); conn = new MyConn(); bindService(intent, conn,BIND_AUTO_CREATE);2、定义内部类 public void zhuanqian() { System.out.println("赚钱"); } private class InnerService extends Binder implements IThirdActivityConnService { @Override public void qianshouMM() { zhuanqian(); } public void xiSangNa() { System.out.println("洗桑拿"); } }3、定义接口public interface IThirdActivityConnService { void qianshouMM();}4、强转,调接口中的方法 private class MyConn implements ServiceConnection { @Override public void onServiceConnected(ComponentName name, IBinder service) { mService = (IThirdActivityConnService)service; } @Override public void onServiceDisconnected(ComponentName name) { } }08-08 混合方式开启服务
08-09 MediaPlayer 简单介绍
08-10 音乐播放器
08-11 start开启远程服务
远程服务package cn.nubia.remoteserviceaidldemo;import android.app.Service;import android.content.Intent;import android.os.IBinder;public class RemoteService extends Service { public RemoteService() { } @Override public IBinder onBind(Intent intent) { return null; } @Override public void onCreate() { super.onCreate(); System.out.println("远程服务 onCreate..."); } @Override public int onStartCommand(Intent intent, int flags, int startId) { System.out.println("远程服务 onStartCommand..."); return super.onStartCommand(intent, flags, startId); } @Override public void onDestroy() { super.onDestroy(); System.out.println("远程服务 onDestroy..."); }}注册清单文件: 本地服务 Button startService = (Button) findViewById(R.id.start_server_service); startService.setOnClickListener(new View.OnClickListener() { @Override public void onClick(View v) { startServerService(); } }); Button stopService = (Button) findViewById(R.id.stop_server_service); stopService.setOnClickListener(new View.OnClickListener() { @Override public void onClick(View v) { stopServerService(); } }); private void stopServerService() { stopService(intent); } private void startServerService() { intent = new Intent(); intent.setAction("chu.lian"); startService(intent); } 点击本地服务报错2018-10-02 21:58:16.144 13783-13783/? E/AndroidRuntime: FATAL EXCEPTION: main Process: cn.nubia.localserviceaidldemo, PID: 13783 java.lang.IllegalArgumentException: Service Intent must be explicit: Intent { act=chu.lian } at android.app.ContextImpl.validateServiceIntent(ContextImpl.java:1644) at android.app.ContextImpl.startServiceCommon(ContextImpl.java:1685) at android.app.ContextImpl.startService(ContextImpl.java:1657) at android.content.ContextWrapper.startService(ContextWrapper.java:644) at cn.nubia.localserviceaidldemo.MainActivity.startServerService(MainActivity.java:40) at cn.nubia.localserviceaidldemo.MainActivity.access$000(MainActivity.java:9) at cn.nubia.localserviceaidldemo.MainActivity$1.onClick(MainActivity.java:21) at android.view.View.performClick(View.java:6291) at android.view.View$PerformClick.run(View.java:24931) at android.os.Handler.handleCallback(Handler.java:808) at android.os.Handler.dispatchMessage(Handler.java:101) at android.os.Looper.loop(Looper.java:166) at android.app.ActivityThread.main(ActivityThread.java:7425) at java.lang.reflect.Method.invoke(Native Method) at com.android.internal.os.Zygote$MethodAndArgsCaller.run(Zygote.java:245) at com.android.internal.os.ZygoteInit.main(ZygoteInit.java:921) 解决办法:必须指定具体的包名 private void startServerService() { intent = new Intent(); intent.setAction("chu.lian"); intent.setPackage("cn.nubia.remoteserviceaidldemo"); startService(intent); }08-12 bind绑定远程服务
多次解绑服务抛出异常2018-10-02 22:26:22.855 22936-22936/cn.nubia.localserviceaidldemo E/AndroidRuntime: FATAL EXCEPTION: main Process: cn.nubia.localserviceaidldemo, PID: 22936 java.lang.IllegalArgumentException: connection is null at android.app.ContextImpl.unbindService(ContextImpl.java:1815) at android.content.ContextWrapper.unbindService(ContextWrapper.java:697) at cn.nubia.localserviceaidldemo.MainActivity.unbindServerService(MainActivity.java:72) at cn.nubia.localserviceaidldemo.MainActivity.access$300(MainActivity.java:12) at cn.nubia.localserviceaidldemo.MainActivity$4.onClick(MainActivity.java:48) at android.view.View.performClick(View.java:6291) at android.view.View$PerformClick.run(View.java:24931) at android.os.Handler.handleCallback(Handler.java:808) at android.os.Handler.dispatchMessage(Handler.java:101) at android.os.Looper.loop(Looper.java:166) at android.app.ActivityThread.main(ActivityThread.java:7425) at java.lang.reflect.Method.invoke(Native Method) at com.android.internal.os.Zygote$MethodAndArgsCaller.run(Zygote.java:245) at com.android.internal.os.ZygoteInit.main(ZygoteInit.java:921)package cn.nubia.localserviceaidldemo;import android.content.ComponentName;import android.content.Intent;import android.content.ServiceConnection;import android.os.IBinder;import android.support.v7.app.AppCompatActivity;import android.os.Bundle;import android.view.View;import android.widget.Button;public class MainActivity extends AppCompatActivity { private Intent intent; private MyConn conn; @Override protected void onCreate(Bundle savedInstanceState) { super.onCreate(savedInstanceState); setContentView(R.layout.activity_main); Button startService = (Button) findViewById(R.id.start_server_service); startService.setOnClickListener(new View.OnClickListener() { @Override public void onClick(View v) { startServerService(); } }); Button stopService = (Button) findViewById(R.id.stop_server_service); stopService.setOnClickListener(new View.OnClickListener() { @Override public void onClick(View v) { stopServerService(); } }); Button bindService = (Button) findViewById(R.id.bind_server_service); bindService.setOnClickListener(new View.OnClickListener() { @Override public void onClick(View v) { bindServerService(); } }); Button unbindService = (Button) findViewById(R.id.unbind_server_service); unbindService.setOnClickListener(new View.OnClickListener() { @Override public void onClick(View v) { unbindServerService(); } }); intent = new Intent(); intent.setAction("chu.lian"); intent.setPackage("cn.nubia.remoteserviceaidldemo"); } private void stopServerService() { stopService(intent); } private void startServerService() { startService(intent); } private void bindServerService() { conn = new MyConn(); bindService(intent, conn,BIND_AUTO_CREATE); } private void unbindServerService() { unbindService(conn); } public class MyConn implements ServiceConnection { @Override public void onServiceConnected(ComponentName name, IBinder service) { } @Override public void onServiceDisconnected(ComponentName name) { } }}08-13 调用远程组件里的方法
1、在远程服务中创建接口package cn.nubia.remoteserviceaidldemo;interface IRemoteService { void eat(); void drink(); void wan(); void le();}2、远程服务中内部类实现接口 private class RemoteServiceInner extends Binder implements IRemoteService { @Override public void eat() { eatone(); } @Override public void drink() { drinkone(); } @Override public void wan() { wanone(); } @Override public void le() { leone(); } }3、在onBind 返回 内部类 @Override public IBinder onBind(Intent intent) { System.out.println("远程服务 onBind..."); Toast.makeText(this, "远程服务 onBind...", Toast.LENGTH_SHORT).show(); return new RemoteServiceInner(); } 4、在远程服务端创建aidl文件,将服务端的接口文件改名为IRemoteService.aidlpackage cn.nubia.remoteserviceaidldemo;interface IRemoteService { void eat(); void drink(); void wan(); void le();}5、aidl 在本地获取远程服务对象08-14 aidl编写步骤
android studio中aidl文件的位置:https://blog.csdn.net/glen1943/article/details/517770311、在远程服务端将.java接口,改为.aidl2、去掉权限修饰符3、找到.aidl对应的.java文件,路径:generated/source/aidl/debug/和java相同的包名4、修改内部类继承Stub private class RemoteServiceInner extends IRemoteService.Stub { @Override public void eat() { eatone(); } @Override public void drink() { drinkone(); } @Override public void wan() { wanone(); } @Override public void le() { leone(); } }5、在另一个apk调用远程服务的方法创建和远程服务一样的包将远程服务的.aidl文件复制到创建的包中android studio 需要创建在main下创建与java同级的文件夹并且包名相同(客户端)6、强转 public class MyConn implements ServiceConnection { @Override public void onServiceConnected(ComponentName name, IBinder service) { iRemoteService = IRemoteService.Stub.asInterface(service); } @Override public void onServiceDisconnected(ComponentName name) { } }7、调方法 Button callDrink = (Button) findViewById(R.id.call_drink); callDrink.setOnClickListener(new View.OnClickListener() { @Override public void onClick(View v) { try { iRemoteService.drink(); } catch (RemoteException e) { e.printStackTrace(); } } });08-15 远程服务应用场景
1、android源码2、手机制造厂商的服务3、 超级大的公司写远程服务给其他程序员用08-16 支付宝
1、创建一个服务AlipayService.java2、在清单文件中添加隐示意图的action 3、创建内部类继承Binder实现接口 @Override public IBinder onBind(Intent intent) { return new AlipayServiceInner(); } private class AlipayServiceInner extends Binder implements IAlipayService { @Override public int logoinAlipay(String userName, String passWord, String sfzh) { if (userName.equals("gordon") && passWord.equals("123456") && sfzh.equals("610302xxxx")) { return 1; } else { return 0; } } }4、另一个应用Wkings调用支付宝接口logoinAlipay()开启远程服务:隐示意图开启服务 intent = new Intent(); intent.setAction("android.intent.action.PAY"); intent.setPackage("cn.nubia.alipay"); startService(intent);5、在Alipay中,创建.aidl,在main下创建java的同级目录aidl6、将内部类继承修改为 private class AlipayServiceInner extends IAlipayService.Stub { @Override public int logoinAlipay(String userName, String passWord, String sfzh) { if (userName.equals("gordon") && passWord.equals("123456") && sfzh.equals("610302xxxx")) { return 1; } else { return 0; } } }7、删除接口文件远程服务端目录客户端1、绑定服务开启 private void startAlipay() { startService(intent); conn = new WkingsServiceConnection(); bindService(intent, conn, BIND_AUTO_CREATE); } public class WkingsServiceConnection implements ServiceConnection { @Override public void onServiceConnected(ComponentName name, IBinder service) { } @Override public void onServiceDisconnected(ComponentName name) { } }2、将Alipay的整个aidl包拷贝到Wkings main目录下3、拿到远程接口对象 public class WkingsServiceConnection implements ServiceConnection { @Override public void onServiceConnected(ComponentName name, IBinder service) { iAlipayService = IAlipayService.Stub.asInterface(service); } @Override public void onServiceDisconnected(ComponentName name) { } }4、调方法 private void loginAlipay() { try { int state = iAlipayService.logoinAlipay("gordon", "123456", "610302xxxx"); if(state == 0) { Toast.makeText(this, "账号不存在", Toast.LENGTH_SHORT).show(); } else if (state == 1) { Toast.makeText(this, "登录成功", Toast.LENGTH_SHORT).show(); } } catch (RemoteException e) { e.printStackTrace(); } }09-02 内容提供者的概念
数据库的创建java中创建普通文件:1、在内存中创建一个指向d盘的文件对象File file = new File("D:\suibian.txt");2、在硬盘上创建文件并写入内容FileOutputStream fos = new FileOutputStream(file);fos.write("hehe".getBytes());fos.close();sqlite数据库:1、在内存中创建数据库帮助类的对象2、在磁盘上创建数据库文件09-03 数据库的复习
package cn.nubia.contentproviderdemo;import android.content.Context;import android.database.sqlite.SQLiteDatabase;import android.database.sqlite.SQLiteOpenHelper;public class BankDbOpenHelper extends SQLiteOpenHelper { /** * @param context * */ public BankDbOpenHelper(Context context) { //super(context, name, factory, version); super(context, "bank.db", null, 1); } /** * 第一次创建数据库时调用,做初始化 * @param db */ @Override public void onCreate(SQLiteDatabase db) { db.execSQL("create table account(_id integer primary key autoincrement, name varchar(20),money varchar(20))"); } @Override public void onUpgrade(SQLiteDatabase db, int oldVersion, int newVersion) { }}2、调用 BankDbOpenHelper helper = new BankDbOpenHelper(this); helper.getWritableDatabase();创建数据库成功路径:data/data/包名/databases/bank.db
09-04 内容提供者的原理
-rw-rw--- 不可读不可写09-05 内容提供者的编写步骤
1、创建一个类继承ContentProvider package cn.nubia.contentproviderdemo;import android.content.ContentProvider;import android.content.ContentValues;import android.database.Cursor;import android.net.Uri;public class BankProvider extends ContentProvider { public BankProvider() { } @Override public boolean onCreate() { // TODO: Implement this to initialize your content provider on startup. return false; } @Override public String getType(Uri uri) { // TODO: Implement this to handle requests for the MIME type of the data // at the given URI. throw new UnsupportedOperationException("Not yet implemented"); } @Override public Uri insert(Uri uri, ContentValues values) { // TODO: Implement this to handle requests to insert a new row. throw new UnsupportedOperationException("Not yet implemented"); } @Override public int delete(Uri uri, String selection, String[] selectionArgs) { // Implement this to handle requests to delete one or more rows. throw new UnsupportedOperationException("Not yet implemented"); } @Override public int update(Uri uri, ContentValues values, String selection, String[] selectionArgs) { // TODO: Implement this to handle requests to update one or more rows. throw new UnsupportedOperationException("Not yet implemented"); } @Override public Cursor query(Uri uri, String[] projection, String selection, String[] selectionArgs, String sortOrder) { // TODO: Implement this to handle query requests from clients. throw new UnsupportedOperationException("Not yet implemented"); }}2、在清单文件中配置authorities暗号上半句 在onCreate中初始化 @Override public boolean onCreate() { mHelper = new BankDbOpenHelper(getContext()); db = mHelper.getWritableDatabase(); return false; }增: @Override public Uri insert(Uri uri, ContentValues values) { int code = matcher.match(uri); if (code == URI_SUCC) { long id = db.insert("account", null, values); return Uri.parse("id:" + id); } else { throw new IllegalArgumentException("无权操作"); } } user 调用另一个程序中的内容提供者内容解析器调用内容提供者修改数据库 //1 获取内容解析器 ContentResolver resolver = getContentResolver(); //2 指定URI Uri uri = Uri.parse("content://tian.wang.gai.di.hu/bao.ta.zhen.he.yao"); //3 操作数据库 ContentValues values = new ContentValues(); values.put("name","gordon"); values.put("money",1000000); Uri id = resolver.insert(uri, values);异常:如果只创建了user没有内容提供者2018-10-03 16:20:46.900 3486-3486/cn.nubia.user E/AndroidRuntime: FATAL EXCEPTION: main Process: cn.nubia.user, PID: 3486 java.lang.IllegalArgumentException: Unknown URI content://tian.wang.gai.di.hu/bao.ta.zhen.he.yao at android.content.ContentResolver.insert(ContentResolver.java:1553) at cn.nubia.user.MainActivity$1.onClick(MainActivity.java:31) at android.view.View.performClick(View.java:6291) at android.view.View$PerformClick.run(View.java:24931) at android.os.Handler.handleCallback(Handler.java:808) at android.os.Handler.dispatchMessage(Handler.java:101) at android.os.Looper.loop(Looper.java:166) at android.app.ActivityThread.main(ActivityThread.java:7425) at java.lang.reflect.Method.invoke(Native Method) at com.android.internal.os.Zygote$MethodAndArgsCaller.run(Zygote.java:245) at com.android.internal.os.ZygoteInit.main(ZygoteInit.java:921)09-06 虚拟短信
new Thread(){ @Override public void run() { try { Thread.sleep(5000); } catch (InterruptedException e) { e.printStackTrace(); } ContentResolver resolver = getContentResolver(); Uri uri = Uri.parse("content://sms/"); ContentValues values = new ContentValues(); values.put("address","95533"); values.put("read",0); values.put("type",1); values.put("body","我是测试短信"); values.put("data", System.currentTimeMillis()); resolver.insert(uri,values); } }.start(); 09-07 利用内容提供者查询数据库
@Override public Cursor query(Uri uri, String[] projection, String selection, String[] selectionArgs, String sortOrder) { int code = matcher.match(uri); if (code == URI_SUCC_ACCOUNT) { Cursor cursor = db.query("account", projection, selection, selectionArgs, null, null, sortOrder); return cursor; } else { throw new IllegalArgumentException("无权查询"); } }09-08 利用内容提供者修改数据库
@Override public int update(Uri uri, ContentValues values, String selection, String[] selectionArgs) { int code = matcher.match(uri); if (code == URI_SUCC_ACCOUNT) { int id = db.update("account", values, selection, selectionArgs); return id; } else { return 0; } }09-09 利用内容提供者删除数据库
@Override public int delete(Uri uri, String selection, String[] selectionArgs) { int code = matcher.match(uri); if (code == URI_SUCC_ACCOUNT) { int id = db.delete("account", selection, selectionArgs); return id; } else { return 0; } }user:package cn.nubia.user;import android.content.ContentResolver;import android.content.ContentValues;import android.database.Cursor;import android.net.Uri;import android.support.v7.app.AppCompatActivity;import android.os.Bundle;import android.view.View;import android.widget.Button;import android.widget.Toast;public class MainActivity extends AppCompatActivity { @Override protected void onCreate(Bundle savedInstanceState) { super.onCreate(savedInstanceState); setContentView(R.layout.activity_main); Button insertDb = (Button) findViewById(R.id.insert_db); insertDb.setOnClickListener(new View.OnClickListener() { @Override public void onClick(View v) { //1 获取内容解析器 ContentResolver resolver = getContentResolver(); //2 指定URI Uri uri = Uri.parse("content://tian.wang.gai.di.hu/account"); //3 操作数据库 ContentValues values = new ContentValues(); values.put("name", "gordon"); values.put("money", 1000000); Uri id = resolver.insert(uri, values); Toast.makeText(MainActivity.this, uri.toString() + ",id:" + id, Toast.LENGTH_SHORT).show(); } }); Button delteDb = (Button) findViewById(R.id.delte_db); delteDb.setOnClickListener(new View.OnClickListener() { @Override public void onClick(View v) { //1 获取内容解析器 ContentResolver resolver = getContentResolver(); //2 指定URI Uri uri = Uri.parse("content://tian.wang.gai.di.hu/account"); //3 操作数据库 int id = resolver.delete(uri, "name=?", new String[]{"gordon"}); } }); Button updateDb = (Button) findViewById(R.id.update_db); updateDb.setOnClickListener(new View.OnClickListener() { @Override public void onClick(View v) { //1 获取内容解析器 ContentResolver resolver = getContentResolver(); //2 指定URI Uri uri = Uri.parse("content://tian.wang.gai.di.hu/account"); //3 操作数据库 ContentValues values = new ContentValues(); values.put("money", 1); resolver.update(uri, values, "_id=?", new String[]{"1"}); } }); Button queryDb = (Button) findViewById(R.id.query_db); queryDb.setOnClickListener(new View.OnClickListener() { @Override public void onClick(View v) { //1 获取内容解析器 ContentResolver resolver = getContentResolver(); //2 指定URI Uri uri = Uri.parse("content://tian.wang.gai.di.hu/account"); //3 操作数据库 Cursor cursor = resolver.query(uri, new String[]{"name", "money"}, null, null, null); while (cursor.moveToNext()) { //String name = cursor.getString(0); String name = cursor.getString(cursor.getColumnIndex("name")); String money = cursor.getString(cursor.getColumnIndex("money")); } } }); }}ContentProvider:package cn.nubia.contentproviderdemo;import android.content.ContentProvider;import android.content.ContentValues;import android.content.UriMatcher;import android.database.Cursor;import android.database.sqlite.SQLiteDatabase;import android.net.Uri;public class BankProvider extends ContentProvider { //暗号下半句 static UriMatcher matcher = new UriMatcher(UriMatcher.NO_MATCH); private static final int URI_SUCC_ACCOUNT = 4; /** * authority:暗号上半句,在清单文件中配置 * path:暗号下半句 * code:匹配码 如果匹配成功 1,不匹配:默认-1 */ static { //推荐使用表名 matcher.addURI("tian.wang.gai.di.hu", "account", URI_SUCC_ACCOUNT); } private BankDbOpenHelper mHelper; private SQLiteDatabase db; public BankProvider() { } @Override public boolean onCreate() { mHelper = new BankDbOpenHelper(getContext()); db = mHelper.getWritableDatabase(); return false; } @Override public String getType(Uri uri) { // TODO: Implement this to handle requests for the MIME type of the data // at the given URI. throw new UnsupportedOperationException("Not yet implemented"); } /** * @param uri content://tian.wang.gai.di.hu/bao.ta.zhen.he.yao * @param values * @return */ @Override public Uri insert(Uri uri, ContentValues values) { int code = matcher.match(uri); if (code == URI_SUCC_ACCOUNT) { long id = db.insert("account", null, values); return Uri.parse("id:" + id); } else { throw new IllegalArgumentException("无权增加"); } } @Override public int delete(Uri uri, String selection, String[] selectionArgs) { int code = matcher.match(uri); if (code == URI_SUCC_ACCOUNT) { int id = db.delete("account", selection, selectionArgs); return id; } else { return 0; } } @Override public int update(Uri uri, ContentValues values, String selection, String[] selectionArgs) { int code = matcher.match(uri); if (code == URI_SUCC_ACCOUNT) { int id = db.update("account", values, selection, selectionArgs); return id; } else { return 0; } } @Override public Cursor query(Uri uri, String[] projection, String selection, String[] selectionArgs, String sortOrder) { int code = matcher.match(uri); if (code == URI_SUCC_ACCOUNT) { Cursor cursor = db.query("account", projection, selection, selectionArgs, null, null, sortOrder); return cursor; } else { throw new IllegalArgumentException("无权查询"); } }}BankDbOpenHelper:package cn.nubia.contentproviderdemo;import android.content.Context;import android.database.sqlite.SQLiteDatabase;import android.database.sqlite.SQLiteOpenHelper;public class BankDbOpenHelper extends SQLiteOpenHelper { /** * @param context * */ public BankDbOpenHelper(Context context) { //super(context, name, factory, version); super(context, "bank.db", null, 1); } /** * 第一次创建数据库时调用,做初始化 * @param db */ @Override public void onCreate(SQLiteDatabase db) { db.execSQL("create table account(_id integer primary key autoincrement, name varchar(20),money varchar(20))"); } @Override public void onUpgrade(SQLiteDatabase db, int oldVersion, int newVersion) { }}09-10 _getType方法
返回的数据类型vnd.android.cursor.item 单行数据vnd.android.cursor.dir/ 多行数据09-11 学习内容提供者的目的
09-12 短信数据库的表结构&URI
09-13 利用内容提供者读取系统短信
09-14 备份短信
09-15 插入短信
09-16 利用内容提供者操作多张表
09-17 通讯录表结构&URI
09-18 读取通讯录联系人
09-19 插入通讯录联系人
09-20 内容观察者原理
09-21 内容观察者编写步骤
09-22 短信窃听器
项目一:手机安全卫士-MobileSecurityGuard
快捷键:Ctrl+alt+f:生成全局变量Ctrl+d:复制一行1. Ctrl+P 查看参数1. Ctrl+G同时按下Ctrl+G快捷键弹出快速定位框,在框中输入行数点击OK即可快速切换到对应的行数,如图2.17所示。2. Ctrl+E同时按下Ctrl+E快捷键,弹出最近打开文件列表,可以快速选择最近曾经打开的文件3. Ctrl+/选中某一行,同时按下Ctrl+/快捷键可以注释这一行,如图2.19所示。4. Ctrl+F同时按下Ctrl+F快捷键,将在编辑页的顶部弹出类内快速搜索栏,可以快速定位类内的某个单词,支持联想查找输入prote,将会高亮显示protected,同时注意到搜索栏中有三个复选框,选中第一个Match Case复选框将会对大小写敏感。5. Ctrl+R:Ctrl+F快捷键常和Ctrl+R快捷键使用,用来快速查找并全部替换先使用快捷键Ctrl+F搜索出所有protected,然后使用快捷键Ctrl+R弹出替换栏,在替换栏输入框中输入替换后的单词并点击Replace all按钮即可将类中所有的protected替换成public,十分快捷。不过,在实际开发中要谨慎使用,避免引入不容易察觉的问题。6. Ctrl+J同时按下Ctrl和J快捷键,弹出快捷代码框对于一些常用的代码Android Studio中进行了封装,直接选中即可快速生成,在开发中十分实用,这里以打印log和弹出Toast为例。首先按下Ctrl+J快捷键,弹出如图2.24所示的快捷代码框,然后直接输入logd这一快捷代码的“命令”,如图2.25所示。打印Log需要TAG,在类的最上方输入快捷代码logt,即可快速生成一个TAG,如图2.27所示。同样,先输入Ctrl+J键,弹出快捷代码框,然后直接输入toast,如图2.29所示。按下Enter键,或者有了Toast以后按下Ta快速生成了一行Toast语句,在引号中输入要Toast显示的信息即可,是不是十分快捷方便?7. Ctrl+F12:在类中方法比较多的情况下,同时按下Ctrl和F12键可以快速查看类中所有的方法,弹出这个框的同时可以直接输入想要搜索的方法,进行快速匹配。1. Ctrl+Alt+T选中一块代码,同时按下Ctrl、Alt和T键,弹出“包裹”弹出框,选择需要包裹的类型即可包裹选中的代码,2. Ctrl+Alt+L对当前类的所有代码进行格式化2. Ctrl+Alt+V此快捷键可以快速声明一个变量,本地变量赋值3. Ctrl+Alt+H点中某一个方法按下这个快捷键,在左边栏上弹出此方法的调用关系,此快捷键在开发中十分常用。4. Ctrl+Alt+O这个快捷键可以自动导包或删除无用的包,这时候按下快捷键即可自动删除这些无用的包1. Ctrl+Shift+/和Ctrl+/类似,都是实现注释代码的功能,Ctrl+Shift+/实现代码块的注释,再次按下这个快捷键将反注释掉这部分代码这个快捷键在开发中经常使用,可以通过关键字快速搜索需要的信息,选中第一个复选框对大小写敏感。点击右边的标签即可查看关键字的预览3. Ctrl+Shift+加号/减号若方法是收起的,同时按下Ctrl+Shift+加号会将方法展开,相反,若方法是展开的,同时按下Ctrl+Shift+减号则会收起方法1.Alt+Insert同时按下Alt和Insert键,弹出快速代码生成框,有构造方法、getter/setter方法、toString方法等 Android Studio快速代码生成框这里以生成构造方法为例,选择Constructor选项可以看出,自动生成了包含两个属性的构造方法,很是方便快捷,生成getter/setter方法和生成构造方法比较类似,同样选中这两个属性并按下快捷键,选中Getter and Setter,如图2.52所示。选择OK键即生成这两个属性的getter和setter方法2. Alt+鼠按下Alt键并结合鼠标可以同时选中多 Android Studio多行选中上图中一次选中了多行,此时可以进行多行编辑3. Ctrl+鼠标左键此快捷键可以查看鼠标选中的类或方法MSG 01-06 闪屏界面开发
1展示品牌,logo2初始化数据3合法性校验 检测是否有网络 检测是否已经登录4检测版本更新<?xml version="1.0" encoding="utf-8"?> -->隐藏ActionBar MSG 01-07 修改应用名称和图标
android:icon="@mipmap/heima"android:label="@string/app_name"MSG 01-08 版本信息获取和展示
在app/build.gradleandroid { compileSdkVersion 26 defaultConfig { applicationId "cn.nubia.mobilesecurityguard" minSdkVersion 15 targetSdkVersion 26 versionCode 1 versionName "1.0" testInstrumentationRunner "android.support.test.runner.AndroidJUnitRunner" }PackageManager packageManager = getPackageManager();PackageInfo packageInfo = packageManager.getPackageInfo(getPackageName(), 0);versionName = packageInfo.versionName;MSG 01-09 渐变动画
private void startAlphaAnim(View view) { AlphaAnimation alphaAnimation = new AlphaAnimation(0.5f, 1); alphaAnimation.setDuration(3000); view.startAnimation(alphaAnimation); }MSG 01-10 版本升级流程
MSG 01-11 版本升级服务器
{“versionName”:“nubia X20”, “versionCode”:910, “updateInfo”:“fix a big bug”}
部署tomcat服务器:
webapps/ROOT/update.json
MSG 01-12 使用okhttputils获取网络数据
MSG 01-13 JsonObject解析
MSG 01-14 判断版本更新、升级对话框
private void showUpdateDialog() { AlertDialog.Builder builder = new AlertDialog.Builder(this); builder.setTitle("版本更新"); builder.setMessage(updateInfo); builder.setPositiveButton("立即更新", new DialogInterface.OnClickListener() { @Override public void onClick(DialogInterface dialog, int which) { } }); builder.setNegativeButton("忽略更新", new DialogInterface.OnClickListener() { @Override public void onClick(DialogInterface dialog, int which) { //延迟2秒,进入主界面 enterActivity(); } }); builder.show(); }MSG 01-15 跳到主界面
private void enterActivity() { startActivity(new Intent(this, HomeActivity.class)); finish(); }MSG 动画
rlRoot = (RelativeLayout) findViewById(R.id.rl_root); startAlphaAnim(rlRoot); private void startAlphaAnim(View view) { AlphaAnimation alphaAnimation = new AlphaAnimation(0.5f, 1); alphaAnimation.setDuration(3000); view.startAnimation(alphaAnimation); }MSG 01-16 使用okhttp下载文件
6.0之后下载文件需要动态权限,如果没有赋予报错:下载失败java.io.FileNotFoundException: /storage/emulated/0/MSGuard.apk (Permission denied) private void isPermissioned () { if (ContextCompat.checkSelfPermission(this, Manifest.permission.WRITE_EXTERNAL_STORAGE) != PackageManager.PERMISSION_GRANTED) { //申请WRITE_EXTERNAL_STORAGE权限 ActivityCompat.requestPermissions(this, new String[]{Manifest.permission.WRITE_EXTERNAL_STORAGE}, 0); } } @Override public void onRequestPermissionsResult(int requestCode, String[] permissions, int[] grantResults) { super.onRequestPermissionsResult(requestCode, permissions, grantResults); doNext(requestCode,grantResults); } private void doNext(int requestCode, int[] grantResults) { if (requestCode == 0) { if (grantResults[0] == PackageManager.PERMISSION_GRANTED) { // Permission Granted downloadApk(); } else { // Permission Denied mHandler.sendEmptyMessageDelayed(0, 2000); } } } private void downloadApk() { System.out.println("正在下载新版本!"); System.out.println("downloadApk新版本路径在:" + Environment.getExternalStorageDirectory().getAbsolutePath()); OkHttpUtils.get().url(downloadApkUrl).build().execute(new FileCallBack(Environment.getExternalStorageDirectory().getAbsolutePath(), "MSGuard.apk") { @Override public void onError(Call call, Exception e, int id) { System.out.println("下载失败" + e); } @Override public void onResponse(File response, int id) { System.out.println("下载完成!"); Toast.makeText(SplashActivity.this, "新版本下载成功!路径为:" + Environment.getExternalStorageDirectory().getAbsolutePath().toString(), Toast.LENGTH_SHORT).show(); } }); }MSG 01-17 apk打包
详见文件
MSG 01-18 跳到系统安装界面
//https://blog.csdn.net/itxiaolong3/article/details/72868199 private void installApk(File response) { Intent intent = new Intent(Intent.ACTION_VIEW); intent.setDataAndType(Uri.fromFile(response), "application/vnd.android.package-archive"); startActivity(intent); }6.0后报错:https://blog.csdn.net/qq_36961698/article/details/78436478 --------- beginning of crash09-12 21:12:15.187 15753-15753/cn.nubia.mobilesecurityguard E/AndroidRuntime: FATAL EXCEPTION: main Process: cn.nubia.mobilesecurityguard, PID: 15753 android.os.FileUriExposedException: file:///storage/emulated/0/MSGuard.apk exposed beyond app through Intent.getData() at android.os.StrictMode.onFileUriExposed(StrictMode.java:1975) at android.net.Uri.checkFileUriExposed(Uri.java:2363) at android.content.Intent.prepareToLeaveProcess(Intent.java:9975) at android.content.Intent.prepareToLeaveProcess(Intent.java:9929) at android.app.Instrumentation.execStartActivity(Instrumentation.java:1622) at android.app.Activity.startActivityForResult(Activity.java:4751) at android.support.v4.app.BaseFragmentActivityApi16.startActivityForResult(BaseFragmentActivityApi16.java:54) at android.support.v4.app.FragmentActivity.startActivityForResult(FragmentActivity.java:67) at android.app.Activity.startActivityForResult(Activity.java:4691) at android.support.v4.app.FragmentActivity.startActivityForResult(FragmentActivity.java:720) at android.app.Activity.startActivity(Activity.java:5112) at android.app.Activity.startActivity(Activity.java:5080) at cn.nubia.mobilesecurityguard.SplashActivity.installApk(SplashActivity.java:181) at cn.nubia.mobilesecurityguard.SplashActivity.access$700(SplashActivity.java:34) at cn.nubia.mobilesecurityguard.SplashActivity$5.onResponse(SplashActivity.java:172) at cn.nubia.mobilesecurityguard.SplashActivity$5.onResponse(SplashActivity.java:161) at com.zhy.http.okhttp.OkHttpUtils$3.run(OkHttpUtils.java:186) at android.os.Handler.handleCallback(Handler.java:808) at android.os.Handler.dispatchMessage(Handler.java:101) at android.os.Looper.loop(Looper.java:166) at android.app.ActivityThread.main(ActivityThread.java:7425) at java.lang.reflect.Method.invoke(Native Method) at com.android.internal.os.Zygote$MethodAndArgsCaller.run(Zygote.java:245) at com.android.internal.os.ZygoteInit.main(ZygoteInit.java:921)修改:https://blog.csdn.net/qq_36961698/article/details/78436478报错:org.gradle.api.tasks.TaskExecutionException: Execution failed for task ':app:instantRunMainApkResourcesDebug'.at org.gradle.api.internal.tasks.execution.ExecuteActionsTaskExecuter.executeActions(ExecuteActionsTaskExecuter.java:100)at org.gradle.api.internal.tasks.execution.ExecuteActionsTaskExecuter.execute(ExecuteActionsTaskExecuter.java:70)at org.gradle.api.internal.tasks.execution.OutputDirectoryCreatingTaskExecuter.execute(OutputDirectoryCreatingTaskExecuter.java:51)at org.gradle.api.internal.tasks.execution.SkipUpToDateTaskExecuter.execute(SkipUpToDateTaskExecuter.java:62)at org.gradle.api.internal.tasks.execution.ResolveTaskOutputCachingStateExecuter.execute(ResolveTaskOutputCachingStateExecuter.java:54)at org.gradle.api.internal.tasks.execution.ValidatingTaskExecuter.execute(ValidatingTaskExecuter.java:60)at org.gradle.api.internal.tasks.execution.SkipEmptySourceFilesTaskExecuter.execute(SkipEmptySourceFilesTaskExecuter.java:97)at org.gradle.api.internal.tasks.execution.CleanupStaleOutputsExecuter.execute(CleanupStaleOutputsExecuter.java:87)at org.gradle.api.internal.tasks.execution.ResolveTaskArtifactStateTaskExecuter.execute(ResolveTaskArtifactStateTaskExecuter.java:52)at org.gradle.api.internal.tasks.execution.SkipTaskWithNoActionsExecuter.execute(SkipTaskWithNoActionsExecuter.java:52)at org.gradle.api.internal.tasks.execution.SkipOnlyIfTaskExecuter.execute(SkipOnlyIfTaskExecuter.java:54)at org.gradle.api.internal.tasks.execution.ExecuteAtMostOnceTaskExecuter.execute(ExecuteAtMostOnceTaskExecuter.java:43)at org.gradle.api.internal.tasks.execution.CatchExceptionTaskExecuter.execute(CatchExceptionTaskExecuter.java:34)at org.gradle.execution.taskgraph.DefaultTaskGraphExecuter$EventFiringTaskWorker$1.run(DefaultTaskGraphExecuter.java:248)at org.gradle.internal.progress.DefaultBuildOperationExecutor$RunnableBuildOperationWorker.execute(DefaultBuildOperationExecutor.java:336)at org.gradle.internal.progress.DefaultBuildOperationExecutor$RunnableBuildOperationWorker.execute(DefaultBuildOperationExecutor.java:328)at org.gradle.internal.progress.DefaultBuildOperationExecutor.execute(DefaultBuildOperationExecutor.java:199)at org.gradle.internal.progress.DefaultBuildOperationExecutor.run(DefaultBuildOperationExecutor.java:110)at org.gradle.execution.taskgraph.DefaultTaskGraphExecuter$EventFiringTaskWorker.execute(DefaultTaskGraphExecuter.java:241)at org.gradle.execution.taskgraph.DefaultTaskGraphExecuter$EventFiringTaskWorker.execute(DefaultTaskGraphExecuter.java:230)at org.gradle.execution.taskgraph.DefaultTaskPlanExecutor$TaskExecutorWorker.processTask(DefaultTaskPlanExecutor.java:123)at org.gradle.execution.taskgraph.DefaultTaskPlanExecutor$TaskExecutorWorker.access$200(DefaultTaskPlanExecutor.java:79)at org.gradle.execution.taskgraph.DefaultTaskPlanExecutor$TaskExecutorWorker$1.execute(DefaultTaskPlanExecutor.java:104)at org.gradle.execution.taskgraph.DefaultTaskPlanExecutor$TaskExecutorWorker$1.execute(DefaultTaskPlanExecutor.java:98)at org.gradle.execution.taskgraph.DefaultTaskExecutionPlan.execute(DefaultTaskExecutionPlan.java:626)at org.gradle.execution.taskgraph.DefaultTaskExecutionPlan.executeWithTask(DefaultTaskExecutionPlan.java:581)at org.gradle.execution.taskgraph.DefaultTaskPlanExecutor$TaskExecutorWorker.run(DefaultTaskPlanExecutor.java:98)at org.gradle.internal.concurrent.ExecutorPolicy$CatchAndRecordFailures.onExecute(ExecutorPolicy.java:63)at org.gradle.internal.concurrent.ManagedExecutorImpl$1.run(ManagedExecutorImpl.java:46)at java.util.concurrent.ThreadPoolExecutor.runWorker(ThreadPoolExecutor.java:1142)at java.util.concurrent.ThreadPoolExecutor$Worker.run(ThreadPoolExecutor.java:617)at org.gradle.internal.concurrent.ThreadFactoryImpl$ManagedThreadRunnable.run(ThreadFactoryImpl.java:55)at java.lang.Thread.run(Thread.java:745)Caused by: org.gradle.tooling.BuildException: Exception while generating InstantRun main resources APKat com.android.build.gradle.internal.scope.BuildElements$ExecutorBasedScheduler$transform$2.invoke(BuildElements.kt:133)at com.android.build.gradle.internal.scope.BuildElements$ExecutorBasedScheduler$transform$2.invoke(BuildElements.kt:110)at kotlin.sequences.SequencesKt___SequencesKt$onEach$1.invoke(_Sequences.kt:1260)at kotlin.sequences.TransformingSequence$iterator$1.next(Sequences.kt:148)at kotlin.sequences.FilteringSequence$iterator$1.calcNext(Sequences.kt:108)at kotlin.sequences.FilteringSequence$iterator$1.hasNext(Sequences.kt:132)at kotlin.sequences.TransformingSequence$iterator$1.hasNext(Sequences.kt:152)at kotlin.sequences.SequencesKt___SequencesKt.toCollection(_Sequences.kt:633)at kotlin.sequences.SequencesKt___SequencesKt.toMutableList(_Sequences.kt:663)at kotlin.sequences.SequencesKt___SequencesKt.toList(_Sequences.kt:654)at com.android.build.gradle.internal.scope.BuildElements$ExecutorBasedScheduler.transform(BuildElements.kt:140)at com.android.build.gradle.internal.scope.BuildElements$ExecutorBasedScheduler.into(BuildElements.kt:115)at com.android.build.gradle.internal.scope.BuildElementActionScheduler.into(BuildElementActionScheduler.kt:32)at com.android.build.gradle.tasks.ir.InstantRunMainApkResourcesBuilder.doFullTaskAction(InstantRunMainApkResourcesBuilder.kt:77)at sun.reflect.NativeMethodAccessorImpl.invoke0(Native Method)at sun.reflect.NativeMethodAccessorImpl.invoke(NativeMethodAccessorImpl.java:62)at sun.reflect.DelegatingMethodAccessorImpl.invoke(DelegatingMethodAccessorImpl.java:43)at java.lang.reflect.Method.invoke(Method.java:498)at org.gradle.internal.reflect.JavaMethod.invoke(JavaMethod.java:73)at org.gradle.api.internal.project.taskfactory.StandardTaskAction.doExecute(StandardTaskAction.java:46)at org.gradle.api.internal.project.taskfactory.StandardTaskAction.execute(StandardTaskAction.java:39)at org.gradle.api.internal.project.taskfactory.StandardTaskAction.execute(StandardTaskAction.java:26)at org.gradle.api.internal.AbstractTask$TaskActionWrapper.execute(AbstractTask.java:780)at org.gradle.api.internal.AbstractTask$TaskActionWrapper.execute(AbstractTask.java:747)at org.gradle.api.internal.tasks.execution.ExecuteActionsTaskExecuter$1.run(ExecuteActionsTaskExecuter.java:121)at org.gradle.internal.progress.DefaultBuildOperationExecutor$RunnableBuildOperationWorker.execute(DefaultBuildOperationExecutor.java:336)at org.gradle.internal.progress.DefaultBuildOperationExecutor$RunnableBuildOperationWorker.execute(DefaultBuildOperationExecutor.java:328)at org.gradle.internal.progress.DefaultBuildOperationExecutor.execute(DefaultBuildOperationExecutor.java:199)at org.gradle.internal.progress.DefaultBuildOperationExecutor.run(DefaultBuildOperationExecutor.java:110)at org.gradle.api.internal.tasks.execution.ExecuteActionsTaskExecuter.executeAction(ExecuteActionsTaskExecuter.java:110)at org.gradle.api.internal.tasks.execution.ExecuteActionsTaskExecuter.executeActions(ExecuteActionsTaskExecuter.java:92)... 32 moreCaused by: java.io.IOException: Exception while generating InstantRun main resources APKat com.android.build.gradle.tasks.ir.InstantRunMainApkResourcesBuilder.processSplit(InstantRunMainApkResourcesBuilder.kt:106)at com.android.build.gradle.tasks.ir.InstantRunMainApkResourcesBuilder$doFullTaskAction$1.invoke(InstantRunMainApkResourcesBuilder.kt:76)at com.android.build.gradle.tasks.ir.InstantRunMainApkResourcesBuilder$doFullTaskAction$1.invoke(InstantRunMainApkResourcesBuilder.kt:51)at com.android.build.gradle.internal.scope.BuildElements$ExecutorBasedScheduler$transform$$inlined$forEach$lambda$1.call(BuildElements.kt:121)at com.android.build.gradle.internal.scope.BuildElements$ExecutorBasedScheduler$transform$$inlined$forEach$lambda$1.call(BuildElements.kt:110)at java.util.concurrent.ForkJoinTask$AdaptedCallable.exec(ForkJoinTask.java:1424)at java.util.concurrent.ForkJoinTask.doExec(ForkJoinTask.java:289)at java.util.concurrent.ForkJoinTask.externalAwaitDone(ForkJoinTask.java:326)at java.util.concurrent.ForkJoinTask.doJoin(ForkJoinTask.java:391)at java.util.concurrent.ForkJoinTask.join(ForkJoinTask.java:719)at com.android.ide.common.internal.WaitableExecutor.waitForAllTasks(WaitableExecutor.java:215)at com.android.build.gradle.internal.scope.BuildElements$ExecutorBasedScheduler.transform(BuildElements.kt:125)... 52 moreCaused by: com.android.ide.common.process.ProcessException: Failed to execute aaptat com.android.builder.core.AndroidBuilder.processResources(AndroidBuilder.java:809)at com.android.builder.core.AndroidBuilder.processResources(AndroidBuilder.java:797)at com.android.build.gradle.internal.transforms.InstantRunSplitApkBuilder.generateSplitApkResourcesAp(InstantRunSplitApkBuilder.java:375)at com.android.build.gradle.tasks.ir.InstantRunMainApkResourcesBuilder.processSplit(InstantRunMainApkResourcesBuilder.kt:91)... 63 moreSuppressed: java.lang.RuntimeException: Some file processing failed, see logs for detailsat com.android.builder.internal.aapt.QueuedResourceProcessor.waitForAll(QueuedResourceProcessor.java:121)at com.android.builder.internal.aapt.QueuedResourceProcessor.end(QueuedResourceProcessor.java:141)at com.android.builder.internal.aapt.v2.QueueableAapt2.close(QueueableAapt2.java:104)at kotlin.io.CloseableKt.closeFinally(Closeable.kt:63)at com.android.build.gradle.tasks.ir.InstantRunMainApkResourcesBuilder.processSplit(InstantRunMainApkResourcesBuilder.kt:88)... 63 moreCaused by: java.util.concurrent.ExecutionException: java.util.concurrent.ExecutionException: com.android.builder.internal.aapt.v2.Aapt2Exception: AAPT2 error: check logs for detailsat com.google.common.util.concurrent.AbstractFuture.getDoneValue(AbstractFuture.java:503)at com.google.common.util.concurrent.AbstractFuture.get(AbstractFuture.java:482)at com.google.common.util.concurrent.AbstractFuture$TrustedFuture.get(AbstractFuture.java:79)at com.android.builder.internal.aapt.AbstractAapt.link(AbstractAapt.java:34)at com.android.builder.core.AndroidBuilder.processResources(AndroidBuilder.java:807)... 66 moreCaused by: java.util.concurrent.ExecutionException: com.android.builder.internal.aapt.v2.Aapt2Exception: AAPT2 error: check logs for detailsat com.google.common.util.concurrent.AbstractFuture.getDoneValue(AbstractFuture.java:503)at com.google.common.util.concurrent.AbstractFuture.get(AbstractFuture.java:462)at com.google.common.util.concurrent.AbstractFuture$TrustedFuture.get(AbstractFuture.java:79)at com.android.builder.internal.aapt.v2.QueueableAapt2.lambda$makeValidatedPackage$1(QueueableAapt2.java:166)at java.util.concurrent.ThreadPoolExecutor.runWorker(ThreadPoolExecutor.java:1142)at java.util.concurrent.ThreadPoolExecutor$Worker.run(ThreadPoolExecutor.java:617)... 1 moreCaused by: com.android.builder.internal.aapt.v2.Aapt2Exception: AAPT2 error: check logs for detailsat com.android.builder.png.AaptProcess$NotifierProcessOutput.handleOutput(AaptProcess.java:443)at com.android.builder.png.AaptProcess$NotifierProcessOutput.err(AaptProcess.java:395)at com.android.builder.png.AaptProcess$ProcessOutputFacade.err(AaptProcess.java:312)at com.android.utils.GrabProcessOutput$1.run(GrabProcessOutput.java:104)AndroidManifest.xml中将provider放在application标签外了错误: Process: cn.nubia.mobilesecurityguard, PID: 27974 java.lang.NullPointerException: Attempt to invoke virtual method 'android.content.res.XmlResourceParser android.content.pm.ProviderInfo.loadXmlMetaData(android.content.pm.PackageManager, java.lang.String)' on a null object reference at android.support.v4.content.FileProvider.parsePathStrategy(FileProvider.java:584) at android.support.v4.content.FileProvider.getPathStrategy(FileProvider.java:558) at android.support.v4.content.FileProvider.getUriForFile(FileProvider.java:400) at cn.nubia.mobilesecurityguard.SplashActivity.installApkFile(SplashActivity.java:194) at cn.nubia.mobilesecurityguard.SplashActivity.access$700(SplashActivity.java:37) at cn.nubia.mobilesecurityguard.SplashActivity$5.onResponse(SplashActivity.java:175) at cn.nubia.mobilesecurityguard.SplashActivity$5.onResponse(SplashActivity.java:164) at com.zhy.http.okhttp.OkHttpUtils$3.run(OkHttpUtils.java:186) at android.os.Handler.handleCallback(Handler.java:808) at android.os.Handler.dispatchMessage(Handler.java:101) at android.os.Looper.loop(Looper.java:166) at android.app.ActivityThread.main(ActivityThread.java:7425) at java.lang.reflect.Method.invoke(Native Method) at com.android.internal.os.Zygote$MethodAndArgsCaller.run(Zygote.java:245) at com.android.internal.os.ZygoteInit.main(ZygoteInit.java:921)09-12 21:44:47.478 27974-27974/cn.nubia.mobilesecurityguard I/Process: Sending signal. PID: 27974 SIG: 9https://blog.csdn.net/qq_31588719/article/details/77224049报错2: --------- beginning of crash09-16 12:15:19.304 4554-4554/cn.nubia.mobilesecurityguard E/AndroidRuntime: FATAL EXCEPTION: main Process: cn.nubia.mobilesecurityguard, PID: 4554 java.lang.StringIndexOutOfBoundsException: length=19; index=20 at java.lang.String.substring(String.java:1939) at android.support.v4.content.FileProvider$SimplePathStrategy.getUriForFile(FileProvider.java:721) at android.support.v4.content.FileProvider.getUriForFile(FileProvider.java:401) at cn.nubia.mobilesecurityguard.SplashActivity.installApkFile1(SplashActivity.java:207) at cn.nubia.mobilesecurityguard.SplashActivity.access$700(SplashActivity.java:37) at cn.nubia.mobilesecurityguard.SplashActivity$5.onResponse(SplashActivity.java:176) at cn.nubia.mobilesecurityguard.SplashActivity$5.onResponse(SplashActivity.java:164) at com.zhy.http.okhttp.OkHttpUtils$3.run(OkHttpUtils.java:186) at android.os.Handler.handleCallback(Handler.java:808) at android.os.Handler.dispatchMessage(Handler.java:101) at android.os.Looper.loop(Looper.java:166) at android.app.ActivityThread.main(ActivityThread.java:7425) at java.lang.reflect.Method.invoke(Native Method) at com.android.internal.os.Zygote$MethodAndArgsCaller.run(Zygote.java:245) at com.android.internal.os.ZygoteInit.main(ZygoteInit.java:921)09-16 12:15:19.319 4554-4554/cn.nubia.mobilesecurityguard I/Process: Sending signal. PID: 4554 SIG: 9未解决MSG 01-19 下载进度更新
private void downloadApk() { System.out.println("正在下载新版本!"); //展示下载进度 showDownloadProgress(); System.out.println("downloadApk新版本路径在:" + Environment.getExternalStorageDirectory().getAbsolutePath()); OkHttpUtils.get().url(downloadApkUrl).build().execute(new FileCallBack(Environment.getExternalStorageDirectory().getAbsolutePath(), "MSGuard.apk") { @Override public void onError(Call call, Exception e, int id) { System.out.println("下载失败" + e); } @Override public void onResponse(File response, int id) { System.out.println("下载完成!"); Toast.makeText(SplashActivity.this, "新版本下载成功!路径为:" + Environment.getExternalStorageDirectory().getAbsolutePath().toString(), Toast.LENGTH_SHORT).show(); //跳到系统安装界面 String path = Environment.getExternalStorageDirectory().getAbsolutePath(); //installApkFile2(SplashActivity.this,path); } @Override public void inProgress(float progress, long total, int id) { super.inProgress(progress, total, id); //progress: //total: int precent = (int) ((progress*100)/total); progressDialog.setProgress(precent); } }); } private void showDownloadProgress() { progressDialog = new ProgressDialog(this); progressDialog.setProgressStyle(ProgressDialog.STYLE_HORIZONTAL); progressDialog.setTitle("正在下载,请稍候..."); progressDialog.show(); }下载完成progressDialog..dimiss()MSG 01-20 签名冲突
包名相同且签名相同才属于同一个应用测试时需要打同样签名的包MSG 01-21 细节处理 取消弹窗、取消安装
如果弹窗被取消,用户点击返回键或弹窗外侧 //监听弹窗被取消的事件(点击返回键或弹窗外侧) builder.setOnCancelListener(new DialogInterface.OnCancelListener() { @Override public void onCancel(DialogInterface dialog) { enterActivity(); } });立即更新,取消安装时 private void installApkFile(Context context, String filePath) { Intent intent = new Intent(Intent.ACTION_VIEW); if (Build.VERSION.SDK_INT >= Build.VERSION_CODES.N) { intent.setFlags(Intent.FLAG_GRANT_READ_URI_PERMISSION); Uri contentUri = FileProvider.getUriForFile(context, "cn.nubia.mobilesecurityguard.fileprovider", new File(filePath)); intent.setDataAndType(contentUri, "application/vnd.android.package-archive"); } else { intent.setDataAndType(Uri.fromFile(new File(filePath)), "application/vnd.android.package-archive"); intent.setFlags(Intent.FLAG_ACTIVITY_NEW_TASK); } **startActivityForResult(intent, 0);** } @Override protected void onActivityResult(int requestCode, int resultCode, Intent data) { super.onActivityResult(requestCode, resultCode, data); System.out.println("requestCode = " + requestCode); System.out.println("用户取消了安装!"); finish(); }MSG 02-02 主界面头布局
<?xml version="1.0" encoding="utf-8"?> MSG 02-03 启动logo旋转动画
/** * 动画: 属性、补间 * 属性动画,绕Y旋转 */ private void startLogoAnimal() { //ivLogo.setRotationY(180); /** * 1 执行动画的对象 * 2 要修改的属性 * 3 可变参数,值得变化范围 */ ObjectAnimator animator = ObjectAnimator.ofFloat(ivLogo, "rotationY", 0, 360); animator.setDuration(2000); //无限循环 animator.setRepeatCount(ObjectAnimator.INFINITE); //正向执行一次后逆向执行一次 animator.setRepeatMode(ObjectAnimator.REVERSE); animator.start(); }MSG 02-04 跑马灯效果
android:ellipsize="marquee" android:focusable="true" android:focusableInTouchMode="true" android:singleLine="true"MSG 02-05 自定义控件的三个构造方法
//开发者,通过代码创建一个对象时会走 public FocusedTextView(Context context) { this(context, null); System.out.println("构造方法1"); } //当控件有属性时,由系统底层调用 public FocusedTextView(Context context, @Nullable AttributeSet attrs) { this(context, attrs, -1); System.out.println("构造方法2"); } //当控件配有样式时 public FocusedTextView(Context context, @Nullable AttributeSet attrs, int defStyleAttr) { super(context, attrs, defStyleAttr); System.out.println("构造方法3"); initView(); }MSG 02-06 自定义有焦点的textview
1、写一个自定义控件继承TextView /** * android:ellipsize="marquee" android:focusable="true" android:focusableInTouchMode="true" android:singleLine="true" */ private void initView() { setEllipsize(TextUtils.TruncateAt.MARQUEE); setFocusable(true); setFocusableInTouchMode(true); setSingleLine(); } //当前的TextView是否有焦点 @Override public boolean isFocused() { //return super.isFocused(); return true; }2、xml中替换TextView MSG 02-07 首页GridView填充数据
private String[] titles = new String[] { "手机防盗", "通讯卫士", "软件管理", "进程管理", "流量统计", "手机杀毒", "缓存清理", "高级工具" }; private Integer[] icons = new Integer[] { R.drawable.sjfd, R.drawable.srlj, R.drawable.rjgj, R.drawable.jcgl, R.drawable.lltj, R.drawable.sjsd, R.drawable.hcql, R.drawable.cygj }; private String[] descs = new String[] { "远程定位手机", "全面拦截骚扰", "管理您的软件", "管理运行进程", "流量一目了然", "病毒无处藏身", "系统快如火箭", "工具大全" };1、将包含数据封装对象在集合中private ArrayList mList;2、创建对象public class HomeInfo { public String title; public String des; public int imageId;}3、创建适配器 class HomeAdapter extends BaseAdapter { @Override public int getCount() { return mList.size(); } //返回条目对象 @Override public HomeInfo getItem(int position) { return mList.get(position); } @Override public long getItemId(int position) { return position; } @Override public View getView(int position, View convertView, ViewGroup parent) { View view = View.inflate(HomeActivity.this, R.layout.item_home, null); ImageView ivIcon = (ImageView) view.findViewById(R.id.iv_image); TextView tvTitle = (TextView) view.findViewById(R.id.tv_title); TextView tvDes = (TextView) view.findViewById(R.id.tv_des); HomeInfo info = mList.get(position); ivIcon.setImageResource(info.imageId); tvTitle.setText(info.title); tvDes.setText(info.des); return view; } }4、初始化数据 private void initData() { mList = new ArrayList<>(); for (int i = 0; i < titles.length; i++) { HomeInfo homeInfo = new HomeInfo(); homeInfo.title = titles[i]; homeInfo.des = descs[i]; homeInfo.imageId = icons[i]; mList.add(homeInfo); } gvHome.setAdapter(new HomeAdapter()); } MSG 02-08 状态选择器
1、在drawable下创建状态选择器home_item_selector.xml<?xml version="1.0" encoding="utf-8"?>按下去的状态 2、settings按钮监听点击事件1、 MSG 02-09 9patch图的使用
android studio 修改 9 patch图 MSG 02-10 设置中心页面开发
Intent intent = new Intent(getApplicationContext(), SettingActivity.class); startActivity(intent);xml MSG 02-11 抽取标题栏样式
1、在styles.xml中,抽取样式 2、用法 MSG 02-12 设置页面条目布局开发
MSG 02-13 自定义组合控件—填充布局对象
1、将如上的relativeLayout布局单独抽取xml<?xml version="1.0" encoding="utf-8"?> 2、由于上面的跟布局是RelativeLayout,定义类继承RelativeLayoutpublic class SettingItemView extends RelativeLayout { public SettingItemView(Context context) { this(context, null); } public SettingItemView(Context context, AttributeSet attrs) { this(context, attrs, -1); } public SettingItemView(Context context, AttributeSet attrs, int defStyleAttr) { super(context, attrs, defStyleAttr); initView(); }两种方法实现添加布局 private void initView() { //给当前空布局添加布局对象 方法1 //参三:null加载的控件没有父控件 View view = View.inflate(getContext(), R.layout.setting_item_view, null); addView(view); //给当前空布局添加布局对象 方法2 //2 参三,以本类为父类SettingItemView this 在加载布局时,以当前类为父类 View view2 = View.inflate(getContext(), R.layout.setting_item_view, this); }}MSG 02-14 自定义组合控件-修改标题和背景
View view = View.inflate(getContext(), R.layout.setting_item_view, null); tvTitle = view.findViewById(R.id.tv_title); ivToggle = view.findViewById(R.id.iv_toggle);设置title //公开一个方法,修改标题 public void setTitle(String title) { tvTitle.setText(title); }在需要用到的地方autoUpdateSetting = (SettingItemView) findViewById(R.id.auto_update_setting); harassmentInterceptionSetting = (SettingItemView) findViewById(R.id.Harassment_interception_setting);设置值 autoUpdateSetting.setTitle("自动更新设置"); autoUpdateSetting.setBackgroundResource(R.drawable.first_selector); harassmentInterceptionSetting.setTitle("骚扰拦截设置"); autoUpdateSetting.setBackgroundResource(R.drawable.last_selector);MSG 02-15 自定义组合控件-开关控制
1、在自定义组合控件类中定义一个boolean //标记当前开关状态 private boolean isOpen; //当前开关的状态 public boolean isToggleOn() { return isOpen; } //修改当前开关状态,开关图片 public void setToggleOn(boolean isOpen) { this.isOpen = isOpen; if(isOpen) { ivToggle.setImageResource(R.drawable.on); } else { ivToggle.setImageResource(R.drawable.off); } } //开关 方法1 public void toggle() { if(isOpen) { setToggleOn(false); } else { setToggleOn(true); } }//开关 方法2public void toggle() { //setToggleOn(!isOpen); }点击事件1、public class SettingActivity extends AppCompatActivity implements View.OnClickListener2、 autoUpdateSetting = (SettingItemView) findViewById(R.id.auto_update_setting); harassmentInterceptionSetting = (SettingItemView) findViewById(R.id.harassment_interception_setting); autoUpdateSetting.setOnClickListener(this); harassmentInterceptionSetting.setOnClickListener(this);3、 @Override public void onClick(View v) { switch (v.getId()) { case R.id.auto_update_setting: System.out.println("点击自动更新设置"); autoUpdateSetting.toggle(); break; case R.id.harassment_interception_setting: System.out.println("点击骚扰拦截设置"); harassmentInterceptionSetting.toggle(); break; default: break; } }MSG 02-16 自动更新开关控制
更新开关状态存储 //初始化sp config = getSharedPreferences("config", MODE_PRIVATE); config.edit().putBoolean("auto_update_setting",autoUpdateSetting.isToggleOn()).commit();根据拿到的值 //根据sp的值,更新开关状态 boolean autoUpdateSettingBeforeState = config.getBoolean("auto_update_setting", true); boolean harassmentInterceptionSettingBeforeState = config.getBoolean("harassment_interception_setting", true); autoUpdateSetting.setToggleOn(autoUpdateSettingBeforeState); harassmentInterceptionSetting.setToggleOn(harassmentInterceptionSettingBeforeState);在闪屏界面判断是否开启了版本更新 SharedPreferences config = getSharedPreferences("config", MODE_PRIVATE); boolean isAutoUpdateSetting = config.getBoolean("auto_update_setting", true); if (isAutoUpdateSetting) { checkVersion(); }MSG 02-17 sp工具类封装
package cn.nubia.mobilesecurityguard.gordon_utils;import android.content.Context;import android.content.SharedPreferences;/** * SharedPreferences 封装类 */public class PrefUtils { /** * * @param context * @param fileName 存储的文件名 * @return */ private static SharedPreferences getSharedPreferencesObject(Context context, String fileName) { SharedPreferences sp = context.getSharedPreferences(fileName, Context.MODE_PRIVATE); return sp; } /** * 真值 * @param context * @param fileName 存储的文件名 * @param key * @param value */ public static void putBoolean(Context context, String fileName, String key, boolean value) { getSharedPreferencesObject(context, fileName).edit().putBoolean(key,value).commit(); } /** * * @param context * @param fileName 存储的文件名 * @param key * @param defValue */ public static boolean getBoolean(Context context, String fileName, String key, boolean defValue) { boolean value = getSharedPreferencesObject(context, fileName).getBoolean(key, defValue); return value; } /** * 整数 * @param context * @param fileName 存储的文件名 * @param key * @param value */ public static void putInt(Context context, String fileName, String key, int value) { getSharedPreferencesObject(context, fileName).edit().putInt(key,value).commit(); } /** * * @param context * @param fileName 存储的文件名 * @param key * @param defValue */ public static int getInt(Context context, String fileName, String key, int defValue) { int value = getSharedPreferencesObject(context, fileName).getInt(key, defValue); return value; } /** * 字符串 * @param context * @param fileName 存储的文件名 * @param key * @param value */ public static void putString(Context context, String fileName, String key, String value) { getSharedPreferencesObject(context, fileName).edit().putString(key,value).commit(); } /** * * @param context * @param fileName 存储的文件名 * @param key * @param defValue */ public static String getString(Context context, String fileName, String key, String defValue) { String value = getSharedPreferencesObject(context, fileName).getString(key, defValue); return value; }}MSG 02-18 自定义组合控件小结
MSG 02-19 自定义属性-attrs文件声明
1、在values目录下创建attrs.xml<?xml version="1.0" encoding="utf-8"?> 2、自定义命名空间 xmlns:nubia="http://schemas.android.com/apk/res-auto"3、布局中配置MSG 02-20 在布局文件中配置自定义属性
MSG 02-21 获取自定义属性并更新控件
public SettingItemView(Context context, AttributeSet attrs, int defStyleAttr) { super(context, attrs, defStyleAttr); initView(); //1 从AttributeSet中取出自定义属性 //2 根据自定义属性的值更新相关控件 String nubia_title = attrs.getAttributeValue(NAMESPACE, "nubia_title"); boolean nubia_show_toggle = attrs.getAttributeBooleanValue(NAMESPACE, "nubia_show_toggle", false); int nubia_background = attrs.getAttributeIntValue(NAMESPACE, "nubia_background", 0); setTitle(nubia_title); switch (nubia_background) { case 0: setBackgroundResource(R.drawable.first_selector); break; case 1: setBackgroundResource(R.drawable.middle_selector); break; case 2: setBackgroundResource(R.drawable.last_selector); break; } }MSG 02-22 自定义属性小结
MSG 02-23 总结
**MSG 03-02 自定义弹窗布局 **
自定义dialog布局dialog_set_pwd.xml<?xml version="1.0" encoding="utf-8"?> @TargetApi(Build.VERSION_CODES.LOLLIPOP) private void showSetDialog() { AlertDialog.Builder builder = new AlertDialog.Builder(this); builder.setView(R.layout.dialog_set_pwd); builder.show(); }MSG 03-03 弹窗布局控件获取并设置点击事件
@TargetApi(Build.VERSION_CODES.LOLLIPOP) private void showSetDialog() { AlertDialog.Builder builder = new AlertDialog.Builder(this); View view = View.inflate(this, R.layout.dialog_set_pwd, null); builder.setView(view); btDetermine = view.findViewById(R.id.bt_determine); btCancel = view.findViewById(R.id.bt_cancel); etInputPwd = view.findViewById(R.id.et_input_pwd); etPwdConfirm = view.findViewById(R.id.et_pwd_confirm); //根据build设置的数据,构造一个dialog final AlertDialog dialog = builder.create(); btDetermine.setOnClickListener(new View.OnClickListener() { @Override public void onClick(View view) { dialog.dismiss(); } }); btCancel.setOnClickListener(new View.OnClickListener() { @Override public void onClick(View view) { dialog.dismiss(); } }); builder.setOnCancelListener(new DialogInterface.OnCancelListener() { @Override public void onCancel(DialogInterface dialogInterface) { } }); //builder.show(); dialog.show(); }MSG 03-04 保存密码&输入密码弹窗
点击确认时,保存密码,SharedPreferences存储 String pwd = etInputPwd.getText().toString().trim(); String pwdConfirm = etPwdConfirm.getText().toString().trim(); if (TextUtils.isEmpty(pwd) || TextUtils.isEmpty(pwdConfirm)) { Toast.makeText(HomeActivity.this, "输入内容不能为空!", Toast.LENGTH_SHORT).show(); } else { if (pwd.equals(pwdConfirm)) { //保存密码 PrefUtils.putString(getApplicationContext(), GlobalConstants.SP_FILE, GlobalConstants.PREF_PASSWORD, pwd); //PrefUtils.putString(getApplicationContext(),GlobalConstants.SP_FILE,GlobalConstants.PREF_PASSWORD_CONFIRM,pwdConfirm); dialog.dismiss(); } else { Toast.makeText(HomeActivity.this, "输入密码不一致!", Toast.LENGTH_SHORT).show(); } }**MSG 03-05 MD5介绍 **
特点:1、可以将任何数据(字符串或文件)加密成32位长度的16进制字符串(0-f)2、不可逆,只能加密,无法解密,单向加密算法3、如果数据一样,那么计算出的md5就一定一样,如果不同,计算出的基本不同---哈希碰撞MSG 03-06 设置向导1页面布局
方法1: **MSG 06-12 dialog显示在屏幕下方 **
//修改dialog所在窗口window的位置 Window window = getWindow(); WindowManager.LayoutParams params = window.getAttributes(); params.gravity = Gravity.BOTTOM|Gravity.CENTER_HORIZONTAL; window.setAttributes(params);**MSG 06-13 给弹窗ListView设置数据 **
1、package cn.nubia.mobilesecurityguard.view;import android.app.Dialog;import android.content.Context;import android.view.Gravity;import android.view.View;import android.view.Window;import android.view.WindowManager;import android.widget.BaseAdapter;import android.widget.ListView;import cn.nubia.mobilesecurityguard.R;/** * 自定义dialog * 1、给dialog设置布局 * 2、需要清除标题栏 * 3、 */public class AddressDialog extends Dialog { private final ListView lvAddress; public AddressDialog(Context context) { super(context,R.style.AddressDialogStyle); setContentView(R.layout.address_dialog); //修改dialog所在窗口window的位置 Window window = getWindow(); WindowManager.LayoutParams params = window.getAttributes(); params.gravity = Gravity.BOTTOM|Gravity.CENTER_HORIZONTAL; window.setAttributes(params); lvAddress = findViewById(R.id.lv_address); } public void setAdapter(BaseAdapter adapter) { lvAddress.setAdapter(adapter); } public void setOnItemClickListener(AdapterView.OnItemClickListener listener) { lvAddress.setOnItemClickListener(listener); }}2、 private void showAddressStyleDialog() { //展示弹窗 AddressDialog dialog = new AddressDialog(SettingActivity.this); //给dialog设置布局 dialog.setAdapter(new AddressStyleAdapter()); dialog.setOnItemClickListener(new AdapterView.OnItemClickListener() { @Override public void onItemClick(AdapterView<?> parent, View view, int position, long id) { //1、记录当前被选中的条目的位置 PrefUtils.putInt(getApplicationContext(),GlobalConstants.SP_FILE, GlobalConstants.PREF_ADDRESS_STYLE, position); //2、取消弹窗 dialog.dismiss(); } }); dialog.show(); } private int[] mIcons = new int[]{ R.drawable.shape_address_normal, R.drawable.shape_address_normal, R.drawable.shape_address_normal, R.drawable.shape_address_normal, R.drawable.shape_address_normal, R.drawable.shape_address_normal }; private String[] titles = new String[]{ "半透明1", "半透明2", "半透明3", "半透明4", "半透明5", "半透明6" }; class AddressStyleAdapter extends BaseAdapter { @Override public int getCount() { return titles.length; } @Override public Object getItem(int position) { return null; } @Override public long getItemId(int position) { return position; } @Override public View getView(int position, View convertView, ViewGroup parent) { View view = View.inflate(SettingActivity.this, R.layout.item_address, null); ImageView ivIcon = view.findViewById(R.id.iv_icon); ImageView ivSelect = view.findViewById(R.id.iv_select); TextView tvTitle = view.findViewById(R.id.tv_title); ivIcon.setImageResource(mIcons[position]); tvTitle.setText(titles[position]); int pos = PrefUtils.getInt(getApplicationContext(),GlobalConstants.SP_FILE, GlobalConstants.PREF_ADDRESS_STYLE, 0); if (position == pos) { ivSelect.setVisibility(View.VISIBLE); } else { ivSelect.setVisibility(View.GONE); } return view; } }**MSG 06-14 点击条目、记录选中位置 **
代码如上**MSG 06-15 根据记录样式修改窗口布局背景 **
public void showToast(String text) { textView.setText(text); int pos = PrefUtils.getInt(mContext, GlobalConstants.SP_FILE, GlobalConstants.PREF_ADDRESS_STYLE, 0); textView.setBackgroundResource(mIcons[pos]); mWM.addView(textView, params); }**MSG 06-16 设置弹窗进入退出动画 **
1、在style.xml中设置样式 2、设置动画address_dialog_enter.xml<?xml version="1.0" encoding="utf-8"?>**MSG 07-02 黑名单数据库封装 **
1、创建数据库帮助类package cn.nubia.mobilesecurityguard.db;import android.content.Context;import android.database.sqlite.SQLiteDatabase;import android.database.sqlite.SQLiteOpenHelper;public class BlackNumberOpenHelper extends SQLiteOpenHelper { public BlackNumberOpenHelper(Context context) { super(context, "blacknumber.db",null,1); } @Override public void onCreate(SQLiteDatabase db) { //创建表 String sql = "create table blacknumber(_id integer primary key autoincrement," + " number varchar(30),mode integer)"; db.execSQL(sql); } @Override public void onUpgrade(SQLiteDatabase db, int oldVersion, int newVersion) { }}2、创建增删改查daopackage cn.nubia.mobilesecurityguard.db.dao;import android.content.ContentValues;import android.content.Context;import android.database.Cursor;import android.database.sqlite.SQLiteDatabase;import java.util.ArrayList;import cn.nubia.mobilesecurityguard.bean.BlackNumberInfo;import cn.nubia.mobilesecurityguard.db.BlackNumberOpenHelper;/** * 黑名单 */public class BlackNumberDao { private final BlackNumberOpenHelper helper; public BlackNumberDao(Context context) { helper = new BlackNumberOpenHelper(context); } public boolean insert(String number, int mode) { SQLiteDatabase db = helper.getWritableDatabase(); ContentValues values = new ContentValues(); values.put("number", number); values.put("mode", mode); //返回插入记录的id,-1表示失败 long insert = db.insert("blacknumber", null, values); db.close(); return insert != -1; } public boolean delete(String number) { SQLiteDatabase db = helper.getWritableDatabase(); //影响的行数,0表示未删除 int delete = db.delete("blacknumber", "number=?", new String[]{number}); db.close(); return delete > 0; } public boolean update(String number, int mode) { SQLiteDatabase db = helper.getWritableDatabase(); ContentValues values = new ContentValues(); //values.put("number", number); values.put("mode", mode); //影响的行数 int update = db.update("blacknumber", values, "number=?", new String[]{number}); db.close(); return update > 0; } //查询是否在数据库 public boolean query(String number) { SQLiteDatabase db = helper.getReadableDatabase(); Cursor cursor = db.query("blacknumber", new String[]{"number", "mode"}, "number=?", new String[]{number}, null, null, null); boolean isExit = false; if (cursor != null) { if (cursor.moveToNext()) { isExit = true; } cursor.close(); } db.close(); return isExit; } //查询某个号码的拦截模式 public int queryMode(String number) { SQLiteDatabase db = helper.getReadableDatabase(); Cursor cursor = db.query("blacknumber", new String[]{"mode"}, "number=?", new String[]{number}, null, null, null); int mode = -1; if (cursor != null) { if (cursor.moveToNext()) { mode = cursor.getInt(0); } cursor.close(); } db.close(); return mode; } //查询所有号码的集合 public ArrayList queryAllNumberAndMode() { SQLiteDatabase db = helper.getReadableDatabase(); Cursor cursor = db.query("blacknumber", new String[]{"number","mode"}, null, null, null, null, null); ArrayList list = new ArrayList<>(); if (cursor != null) { while (cursor.moveToNext()) { BlackNumberInfo info = new BlackNumberInfo(); String number = cursor.getString(0); int mode = cursor.getInt(1); info.number = number; info.mode = mode; list.add(info); } cursor.close(); } db.close(); return list; }}3、封装数据对象package cn.nubia.mobilesecurityguard.bean;public class BlackNumberInfo { public String number; public int mode;} **MSG 07-03 单例设计模式 **
将数据库dao改造成单例模式package cn.nubia.mobilesecurityguard.db.dao;import android.content.ContentValues;import android.content.Context;import android.database.Cursor;import android.database.sqlite.SQLiteDatabase;import java.util.ArrayList;import cn.nubia.mobilesecurityguard.bean.BlackNumberInfo;import cn.nubia.mobilesecurityguard.db.BlackNumberOpenHelper;/** * 黑名单-单例设计模式 * * 两种方式进行初始化: * 1、懒汉式:线程安全问题 1.给方法加同步锁 synchronized 2.创建对象的代码块加同步锁 * //2、公开方法,返回单例对象 * public static BlackNumberDao getInstance(Context context) { * if (mInstance == null) { * synchronized (BlackNumberDao.class) { * if (mInstance == null) { * mInstance = new BlackNumberDao(context); * } * } * } * return mInstance; * } * 2、饿汉式: * private static BlackNumberDao mInstance = new BlackNumberDao(); * */public class BlackNumberDao { private final BlackNumberOpenHelper helper; //3、声明一个静态对象 private static BlackNumberDao mInstance; //1、构造方法私有 private BlackNumberDao(Context context) { helper = new BlackNumberOpenHelper(context); } //2、公开方法,返回单例对象 public static BlackNumberDao getInstance(Context context) { if (mInstance == null) { synchronized (BlackNumberDao.class) { if (mInstance == null) { mInstance = new BlackNumberDao(context); } } } return mInstance; } public boolean insert(String number, int mode) { SQLiteDatabase db = helper.getWritableDatabase(); ContentValues values = new ContentValues(); values.put("number", number); values.put("mode", mode); //返回插入记录的id,-1表示失败 long insert = db.insert("blacknumber", null, values); db.close(); return insert != -1; } public boolean delete(String number) { SQLiteDatabase db = helper.getWritableDatabase(); //影响的行数,0表示未删除 int delete = db.delete("blacknumber", "number=?", new String[]{number}); db.close(); return delete > 0; } public boolean update(String number, int mode) { SQLiteDatabase db = helper.getWritableDatabase(); ContentValues values = new ContentValues(); //values.put("number", number); values.put("mode", mode); //影响的行数 int update = db.update("blacknumber", values, "number=?", new String[]{number}); db.close(); return update > 0; } //查询是否在数据库 public boolean query(String number) { SQLiteDatabase db = helper.getReadableDatabase(); Cursor cursor = db.query("blacknumber", new String[]{"number", "mode"}, "number=?", new String[]{number}, null, null, null); boolean isExit = false; if (cursor != null) { if (cursor.moveToNext()) { isExit = true; } cursor.close(); } db.close(); return isExit; } //查询某个号码的拦截模式 public int queryMode(String number) { SQLiteDatabase db = helper.getReadableDatabase(); Cursor cursor = db.query("blacknumber", new String[]{"mode"}, "number=?", new String[]{number}, null, null, null); int mode = -1; if (cursor != null) { if (cursor.moveToNext()) { mode = cursor.getInt(0); } cursor.close(); } db.close(); return mode; } //查询所有号码的集合 public ArrayList queryAllNumberAndMode() { SQLiteDatabase db = helper.getReadableDatabase(); Cursor cursor = db.query("blacknumber", new String[]{"number","mode"}, null, null, null, null, null); ArrayList list = new ArrayList<>(); if (cursor != null) { while (cursor.moveToNext()) { BlackNumberInfo info = new BlackNumberInfo(); String number = cursor.getString(0); int mode = cursor.getInt(1); info.number = number; info.mode = mode; list.add(info); } cursor.close(); } db.close(); return list; }} MSG 07-04 单元测试
package cn.nubia.mobilesecurityguard;import android.support.test.runner.AndroidJUnit4;import org.junit.Test;import org.junit.runner.RunWith;import cn.nubia.mobilesecurityguard.db.dao.BlackNumberDao;import static android.support.test.InstrumentationRegistry.getContext;/** * 黑名单测试: * */@RunWith(AndroidJUnit4.class)public class BlackNumerTest{ @Test public void testAdd() { BlackNumberDao dao = BlackNumberDao.getInstance(getContext()); dao.insert("110",0); }}MSG 07-05 给黑名单列表填充数据
package cn.nubia.mobilesecurityguard.activity;import android.support.v7.app.AppCompatActivity;import android.os.Bundle;import android.view.View;import android.widget.ListView;import java.util.ArrayList;import cn.nubia.mobilesecurityguard.R;import cn.nubia.mobilesecurityguard.adapter.BlackNumberAdapter;import cn.nubia.mobilesecurityguard.bean.BlackNumberInfo;import cn.nubia.mobilesecurityguard.db.dao.BlackNumberDao;public class BlackNumberActivity extends AppCompatActivity { private ListView lvAddNumber; private BlackNumberDao dao; private ArrayList list; @Override protected void onCreate(Bundle savedInstanceState) { super.onCreate(savedInstanceState); setContentView(R.layout.activity_black_number); initView(); initData(); } /** * 数据库查询放在子线程 */ private void initData() { dao = BlackNumberDao.getInstance(this); new Thread() { @Override public void run() { list = dao.queryAllNumberAndMode(); runOnUiThread(new Runnable() { @Override public void run() { BlackNumberAdapter blackNumberAdapter = new BlackNumberAdapter(BlackNumberActivity.this, list); lvAddNumber.setAdapter(blackNumberAdapter); } }); } }.start(); } private void initView() { lvAddNumber = findViewById(R.id.lv_add_number); }} MSG 07-06 Gradle刷新问题解决
MSG 07-07 ListView优化
package cn.nubia.mobilesecurityguard.adapter;import android.content.Context;import android.view.View;import android.view.ViewGroup;import android.widget.BaseAdapter;import android.widget.ImageView;import android.widget.TextView;import java.util.ArrayList;import java.util.List;import cn.nubia.mobilesecurityguard.R;import cn.nubia.mobilesecurityguard.bean.BlackNumberInfo;public class BlackNumberAdapter extends BaseAdapter { private ArrayList list; private Context context; public BlackNumberAdapter(Context context, ArrayList list) { this.list = list; this.context = context; } @Override public int getCount() { return list.size(); } @Override public BlackNumberInfo getItem(int position) { return (BlackNumberInfo) list.get(position); } @Override public long getItemId(int position) { return position; } @Override public View getView(int position, View convertView, ViewGroup parent) { ViewHolder holder = null; if (convertView == null) { convertView = View.inflate(context, R.layout.item_black_number, null); holder = new ViewHolder(); holder.tvNumber = convertView.findViewById(R.id.tv_number); holder.tvMode = convertView.findViewById(R.id.tv_mode); holder.ivDelete = convertView.findViewById(R.id.iv_delete); //将holder保存和当前布局绑定 convertView.setTag(holder); } else { holder = (ViewHolder) convertView.getTag(); } BlackNumberInfo info = getItem(position); holder.tvNumber.setText(info.number); switch (info.mode) { case 0: holder.tvMode.setText("拦截电话"); break; case 1: holder.tvMode.setText("拦截短信"); break; case 2: holder.tvMode.setText("拦截全部"); break; } return convertView; } public static class ViewHolder { public TextView tvNumber; public TextView tvMode; public ImageView ivDelete; }}MSG 07-08 加载中布局展示
使用: llLoading.setVisibility(View.VISIBLE); isFristUseDb = true; dao = BlackNumberDao.getInstance(this); new Thread() { @Override public void run() { if (isFristUseDb) { for (int i = 0; i < 1000; i++) { dao.insert("1" + i, 1); } isFristUseDb = false; } list = dao.queryAllNumberAndMode(); runOnUiThread(new Runnable() { @Override public void run() { BlackNumberAdapter blackNumberAdapter = new BlackNumberAdapter(BlackNumberActivity.this, list); lvAddNumber.setAdapter(blackNumberAdapter); llLoading.setVisibility(View.GONE); } }); } }.start();耗时: SystemClock.sleep(2000);MSG 07-09 自定义旋转进度条
MSG 07-10 include标签的使用
MSG 07-11 数据库分页查询sql语句
//分页查询 public ArrayList queryPartNumberAndMode(int index) { SQLiteDatabase db = helper.getReadableDatabase(); Cursor cursor = db.rawQuery("select number, mode from blacknumber limit ?,20", new String[]{index + ""}); ArrayList list = new ArrayList<>(); if (cursor != null) { while (cursor.moveToNext()) { BlackNumberInfo info = new BlackNumberInfo(); String number = cursor.getString(0); int mode = cursor.getInt(1); info.number = number; info.mode = mode; list.add(info); } cursor.close(); } db.close(); return list; MSG 07-12 判读ListView是否滑动到底
lvAddNumber.setOnScrollListener(new AbsListView.OnScrollListener() { @Override public void onScrollStateChanged(AbsListView view, int scrollState) { //滑动状态发生变化 if (scrollState == SCROLL_STATE_IDLE) { //当前显示最后一个条目的位置 int position = lvAddNumber.getLastVisiblePosition(); //当前显示的最后一条的位置等于集合总数的-1,就是滑动到底了 if (position == list.size() - 1) { Log.e("sunyang","滑动到底了,加载下一页数据"); initData(); } } } @Override public void onScroll(AbsListView view, int firstVisibleItem, int visibleItemCount, int totalItemCount) { } });MSG 07-13 加载下一页数据
private void initData() { llLoading.setVisibility(View.VISIBLE); isFristUseDb = true; SystemClock.sleep(2000); dao = BlackNumberDao.getInstance(this); new Thread() { @Override public void run() { if (isFristUseDb) { for (int i = 0; i < 100; i++) { dao.insert("1" + i, 1); } isFristUseDb = false; } 注意:在第一次加载时集合为空,会出现空指针 list = dao.queryPartNumberAndMode(list.size()); runOnUiThread(new Runnable() { @Override public void run() { BlackNumberAdapter blackNumberAdapter = new BlackNumberAdapter(BlackNumberActivity.this, list); lvAddNumber.setAdapter(blackNumberAdapter); llLoading.setVisibility(View.GONE); } }); } }.start(); }备注:在第一次加载时集合为空,会出现空指针,在开始时 private ArrayList list = new ArrayList<>();集合追加: moreList = dao.queryPartNumberAndMode(list.size()); list.addAll(moreList);不跳页面,加载数据 private void initData() { llLoading.setVisibility(View.VISIBLE); isFristUseDb = true; SystemClock.sleep(2000); dao = BlackNumberDao.getInstance(this); new Thread() { @Override public void run() { if (isFristUseDb) { for (int i = 0; i < 100; i++) { dao.insert("1" + i, 1); } isFristUseDb = false; } moreList = dao.queryPartNumberAndMode(list.size()); list.addAll(moreList); runOnUiThread(new Runnable() { @Override public void run() { if(blackNumberAdapter == null) { blackNumberAdapter = new BlackNumberAdapter(BlackNumberActivity.this, list); lvAddNumber.setAdapter(blackNumberAdapter); } else { //如果是从第二页开始,就进行数据刷新,不会跳页面 blackNumberAdapter.notifyDataSetChanged(); } llLoading.setVisibility(View.GONE); } }); } }.start(); } MSG 07-14 判读是否到达最后 一页
private void initView() { lvAddNumber = findViewById(R.id.lv_add_number); llLoading = findViewById(R.id.ll_loading); lvAddNumber.setOnScrollListener(new AbsListView.OnScrollListener() { @Override public void onScrollStateChanged(AbsListView view, int scrollState) { //滑动状态发生变化 if (scrollState == SCROLL_STATE_IDLE) { //当前显示最后一个条目的位置 int position = lvAddNumber.getLastVisiblePosition(); //当前显示的最后一条的位置等于集合总数的-1,就是滑动到底了 if (position == list.size() - 1) { Log.e("sunyang","滑动到底了,加载下一页数据"); //判断是否还有数据需要加载 if (list.size() < dao.getCount()) { initData(); } } else { Toast.makeText(BlackNumberActivity.this, "没有数据了", Toast.LENGTH_SHORT).show(); } } } @Override public void onScroll(AbsListView view, int firstVisibleItem, int visibleItemCount, int totalItemCount) { } }); }MSG 07-15 判断加载完成再加载下页数据
变量控制
更多相关文章
- mybatisplus的坑 insert标签insert into select无参数问题的解决
- python起点网月票榜字体反爬案例
- NPM 和webpack 的基础使用
- 【阿里云镜像】使用阿里巴巴DNS镜像源——DNS配置教程
- 读取android手机流量信息
- android 使用html5作布局文件: webview跟javascript交互
- 《Android开发从零开始》——25.数据存储(4)
- Android(安卓)多媒体扫描过程(Android(安卓)Media Scanner Proces
- Android系统配置数据库注释(settings.db)