android中九宫格布局的实现
16lz
2021-01-23
前段时间研究了下android中九宫格布局的实现。纵观现在的应用程序,九宫格是非常常见的一种布局方式。很多优秀的手机应用程序都采用了这一布局。下面就android中九宫格布局方式的实现和大家做一个简单的介绍。
首先是main.xml的布局方式如下:
- <?xmlversion="1.0"encoding="utf-8"?>
- <!--主界面的布局-->
- <RelativeLayout
- xmlns:android="http://schemas.android.com/apk/res/android"
- android:orientation="vertical"
- android:layout_width="fill_parent"
- android:layout_height="fill_parent"
- >
- <RelativeLayout
- android:id="@+id/MainActivityrlTwo"
- android:layout_width="fill_parent"
- android:layout_height="45dp"
- >
- </RelativeLayout>
- <GridView
- android:id="@+id/MainActivityGrid"
- android:layout_width="fill_parent"
- android:layout_height="wrap_content"
- android:numColumns="3"
- android:columnWidth="50dp"
- android:layout_below="@+id/MainActivityrlTwo"
- android:layout_marginTop="5dp"
- />
- <RelativeLayout
- android:id="@+id/MainActivityrlThree"
- android:layout_width="fill_parent"
- android:layout_height="60dp"
- android:layout_alignParentBottom="true"
- >
- <TextView
- android:id="@+id/tvLineBottom"
- android:layout_width="fill_parent"
- android:layout_height="wrap_content"
- android:text="@string/line_default"
- />
- <Button
- android:id="@+id/btmore_MainActivity"
- android:layout_alignParentRight="true"
- android:layout_alignParentBottom="true"
- android:layout_width="wrap_content"
- android:layout_height="wrap_content"
- android:text="More"
- />
- </RelativeLayout>
- </RelativeLayout>
--------------------------------------------------------------------------------------------------
其次就是每一格九宫格的布局方式:
- <?xmlversion="1.0"encoding="utf-8"?>
- <!--九宫格每一格的布局-->
- <LinearLayout
- xmlns:android="http://schemas.android.com/apk/res/android"
- android:orientation="vertical"
- android:layout_width="fill_parent"
- android:layout_height="fill_parent"
- >
- <ImageView
- android:id="@+id/MainActivityImage"
- android:layout_width="50dp"
- android:layout_height="50dp"
- android:layout_gravity="center_horizontal"
- />
- <TextView
- android:id="@+id/MainActivityText"
- android:layout_width="wrap_content"
- android:layout_height="wrap_content"
- android:layout_gravity="center_horizontal"
- android:textSize="18sp"
- android:lines="1"
- android:layout_marginTop="8dp"
- />
- </LinearLayout>
--------------------------------------------------------------------------------------------------
最后就是adapter的编写:
- publicclassImageAdapterextendsBaseAdapter{
- privateContextcontext;
- publicImageAdapter(Contextcontext){
- this.context=context;
- }
- privateInteger[]images={
- //九宫格图片的设置
- R.drawable.icon_1,
- R.drawable.icon_2,
- R.drawable.icon_3,
- R.drawable.icon_4,
- R.drawable.icon_5,
- R.drawable.icon_6,
- R.drawable.icon_7,
- R.drawable.icon_8,
- R.drawable.icon_9,
- };
- privateString[]texts={
- //九宫格图片下方文字的设置
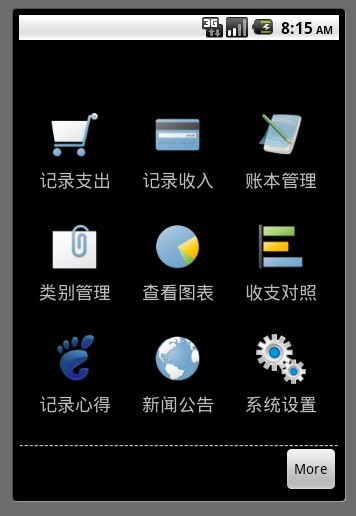
- "记录支出",
- "记录收入",
- "账本管理",
- "类别管理",
- "查看图表",
- "收支对照",
- "记录心得",
- "新闻公告",
- "系统设置",
- };
- //getthenumber
- @Override
- publicintgetCount(){
- returnimages.length;
- }
- @Override
- publicObjectgetItem(intposition){
- returnposition;
- }
- //getthecurrentselector'sidnumber
- @Override
- publiclonggetItemId(intposition){
- returnposition;
- }
- //createviewmethod
- @Override
- publicViewgetView(intposition,Viewview,ViewGroupviewgroup){
- ImgTextWrapperwrapper;
- if(view==null){
- wrapper=newImgTextWrapper();
- LayoutInflaterinflater=LayoutInflater.from(context);
- view=inflater.inflate(R.layout.item,null);
- view.setTag(wrapper);
- view.setPadding(15,15,15,15);//每格的间距
- }else{
- wrapper=(ImgTextWrapper)view.getTag();
- }
- wrapper.imageView=(ImageView)view.findViewById(R.id.MainActivityImage);
- wrapper.imageView.setBackgroundResource(images[position]);
- wrapper.textView=(TextView)view.findViewById(R.id.MainActivityText);
- wrapper.textView.setText(texts[position]);
- returnview;
- }
- }
- classImgTextWrapper{
- ImageViewimageView;
- TextViewtextView;
- }
--------------------------------------------------------------------------------------------------
当然最后的最后就是你得自己准备九张漂亮的图片啦!
九宫格的主界面大功告成!如果还有什么疑问可以留言哈…欢迎交流
本人QQ:523072842
更多相关文章
- [转]Android 实现TextView中文字链接的方式
- 从Android读取Unity assets下的图片并保存为Bitmap格式
- Android的FrameLayout布局介绍
- Android自己主动化測试解决方式
- android 所有布局属性和UI控件
- 转:LinearLayout布局
- 开机动画(闪动的ANDROID字样的动画图片)
- android自制的软件如何添加到打开方式
- android 相对布局 RelativeLayout