TP5+VUE+AXIOS项目搭建初试
16lz
2021-11-19
vue新手第一次尝试将tp5和vue结合起来,特此记录以备自己回顾,供跟我一样在摸索中前行的程序猿们参考;如果有不合理的地方,欢迎大神们指正!
php中文网的“vue+tp分离开发实时疫情动态地图”视频教程https://www.php.cn/course/1172.html 对这次学习有很大的指导作用,下面的记录中也有用到教程中的课程源码
一、TP5准备后台数据
1.application目录下新建six_products模块,mytestt控制器,index方法
这个方法通过外部API接口获取国外疫情数据,筛选出有用的部分,返回json格式的数据
public function index(){//通过外部接口获取国外疫情数据$ex_res1 = file_get_contents("http://api.tianapi.com/txapi/ncovabroad/index?key=6c6d319a9f3b53c53b375c56fbd39207");$ex_res = json_decode($ex_res1, true);$list = $ex_res['newslist'];$newList = [];if ($list != null) {foreach ($list as $k => $v) {$newList[$k]['name'] = $v['provinceName'];//国家名字$newList[$k]['currentConfirmedCount'] = $v['currentConfirmedCount'];//当前确诊人数$newList[$k]['confirmedCount'] = $v['confirmedCount'];//累计确诊人数$newList[$k]['deadCount'] = $v['deadCount'];//死亡人数$newList[$k]['curedCount'] = $v['curedCount'];//治愈人数}}//返回json数据return json($newList);}
二.后端跨域路由配置
1.找到TP5的route文件夹下的路由配置文件route.php,并打开
2.添加以下代码,配置跨域路由
//后端跨域路由配置Route::get('mytestt/index','six_products/mytestt/index')->allowCrossDomain();
三、前端通过AJAX(AXIOS)获取后端数据
1.引入axios,注册axios变量和后端域名变量
在前端的main.js文件中添加以下代码
import axios from 'axios'// 注册axios变量Vue.prototype.$axios = axios// 注册后端域名变量Vue.prototype.$host = 'https://test.cn/public/'
其中https://test.cn/public是后端的域名
2.通过axios读取数据,并显示出来(在前端的App.vue的<script></script>标签中填写以下代码,完整代码在末尾)
created () {this.$axios.get(this.$host + 'mytestt/index').then(res => {const data = res.datathis.curedCount = data[0].curedCountthis.deadCount = data[0].deadCountthis.currentConfirmedCount = data[0].currentConfirmedCountthis.confirmedCount = data[0].confirmedCountthis.update_time = data.update_timethis.country = data[0].name}).catch(res => {console.log(res)})},
上面代码中$axios.get()中的’mytestt/index’就是第二步设置的后端跨域路由地址,两个一定要正确对应起来
四、打包vue项目
在前端项目的terminal窗口执行cnpm run build命令,打包完成后会在项目根目录下生成一个dist文件夹,包含static文件下和index.html文件,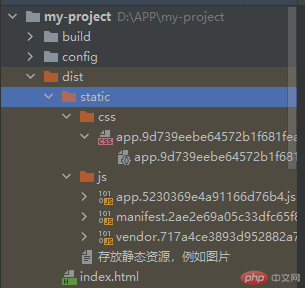
五、将打包好的vue前端文件放到tp5的项目中
(我放到了控制器的index方法中,据说也可以直接放到public目录下,具体参考:https://blog.csdn.net/qq236710052/article/details/107592387)
5.1 放Index.html文件
5.1.1 在TP5的application目录six_products模块下,新建mytestu控制器,index方法
<?phpnamespace app\six_products\controller;use think\Controller;class Mytestu extends Controller{public function index(){return $this->view->fetch();}}
5.1.2 在six_products模块下的view目录下新建mytestu文件夹,将前端打包好的dist文件夹下的index.html文件,直接放到刚才新建的mytestu文件夹下
5.2 放css和js文件,将css和js文件放在tp5项目的public/static/mytestu文件夹下
5.2.1 直接将前端打包好的dist文件夹下的css和js文件夹复制粘贴到public/static/mytestu文件夹下
5.3 修改前端index文件中的(six_products/view/mytestu/index.html)css和js文件引入路径
<!DOCTYPE html><html><head><meta charset=utf-8><meta name=viewport content="width=device-width,initial-scale=1"><title>my-project</title><link href=/public/static/mytestu/css/app.9d739eebe64572b1f681feaa09be9e07.css rel=stylesheet></head><body><div id=app></div><script type=text/javascript src=/public/static/mytestu/js/manifest.2ae2e69a05c33dfc65f8.js></script><script type=text/javascript src=/public/static/mytestu/js/vendor.717a4ce3893d952882a7.js></script><script type=text/javascript src=/public/static/mytestu/js/app.5230369e4a91166d76b4.js></script></body></html>
这样就完成了整个项目的搭建,在浏览器中输入
https://test.cn/public/six_products/mytestu/index访问的结果如下图
在此附上前端完整的App.vue文件代码:
<template><div id="app"><h3>{{country}}疫情</h3><p class="txt">来源:各地官方通报及权威媒体报道</p><p class="txt">更新:{{update_time}}</p><div class="flexbox"><div class="item"><div class="red bold">{{confirmedCount}}</div><div class="gray tittle">累计确诊</div></div><div class="item"><div class="red bold">{{currentConfirmedCount}}</div><div class="gray tittle">现确诊</div></div><div class="item"><div class="gray bold">{{deadCount}}</div><div class="gray tittle">死亡</div></div><div class="item"><div class="green bold">{{curedCount}}</div><div class="gray tittle">治愈</div></div></div></div></template><script>export default {name: 'App',data () {return {country: '美国',update_time: '',confirmedCount: 0,currentConfirmedCount: 0,deadCount: 0,curedCount: 0}},created () {this.$axios.get(this.$host + 'mytestt/index').then(res => {const data = res.datathis.curedCount = data[0].curedCountthis.deadCount = data[0].deadCountthis.currentConfirmedCount = data[0].currentConfirmedCountthis.confirmedCount = data[0].confirmedCountthis.update_time = data.update_timethis.country = data[0].name}).catch(res => {console.log(res)})},methods: {}}</script><style>#app {font-family: 'Avenir', Helvetica, Arial, sans-serif;-webkit-font-smoothing: antialiased;-moz-osx-font-smoothing: grayscale;text-align: center;color: #2c3e50;margin-top: 60px;}</style><style scoped>.txt {font-size: 14px;color: grey;}.flexbox {margin-bottom: 10px;width: 100%;height: 80px;background-color: lightgray;border-radius: 5px;display: flex;justify-content: center;align-items: center;}.item {flex-direction: column;display: flex;width: 80px;height: 80px;margin: 0 50px;/* border:1px solid red; */justify-content: center;align-items: center;}.red {color: #cc0000}.green {color: #42B983;}.gray {color: gray}.tittle {font-size: 14px;}.bold {font-weight: 600;font-size: 18px;}</style>
更多相关文章
- 纯静态文件打包部署预览链接,来自于vue的cli官方文件,使用的是yarn
- ROS2中使用Gtes示例
- NPM包管理工具、webpack模块打包器体验
- java获取文件路径
- UNIX传统文件系统s5fs的实现
- php生成PDF文件的方法
- PHP基础:引入命名空间、文件上传和分页
- Spring Boot 实现配置文件加解密原理
- 如何在 Linux 下快速找到被删除的文件?