ASP.NET MVC重写的实例教程
在ASP.NET MVC中来实现主题的切换一般有两种方式,一种是通过切换皮肤的css和js引用,一种就是通过重写视图引擎。通过重写视图引擎的方式更加灵活,因为我不仅可以在不同主题下面布局和样式不一样,还可以让不同的主题下面显示的数据条目不一致,就是说可以在某些主题下面添加一下个性化的东西。
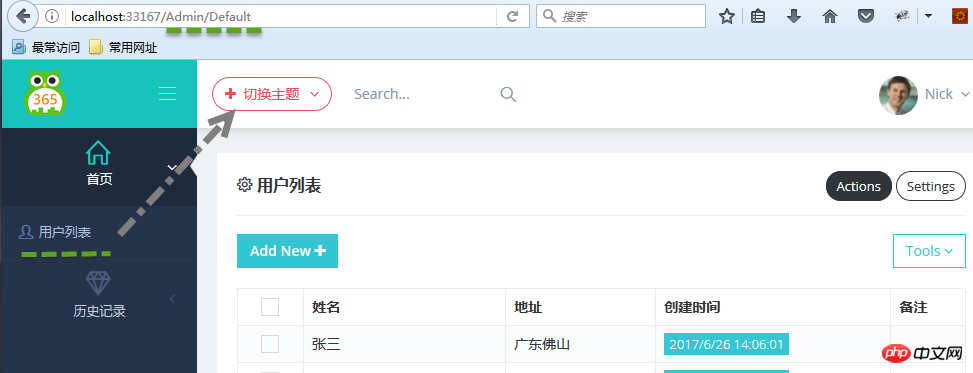
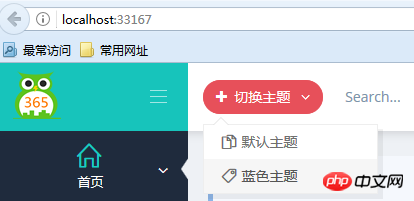
本篇我将通过重写视图引擎的方式来进行演示,在这之前,我假设你已经具备了MVC的一些基础,我们先来看下效果:
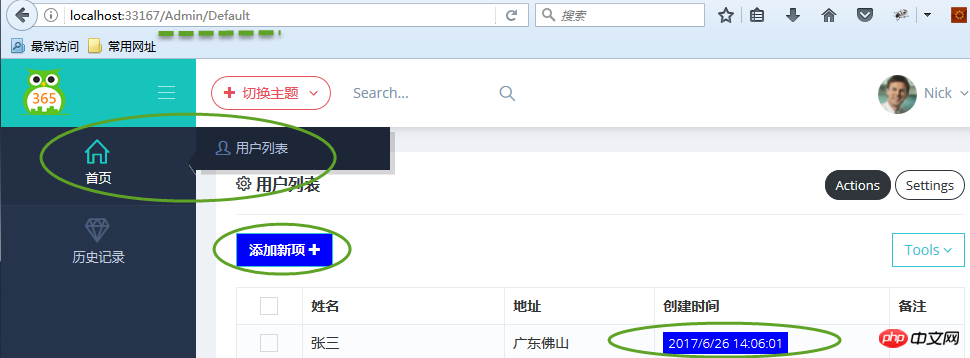
系统登录后是默认主题,当我们点击切换主题之后,左侧菜单栏的布局变了,右侧内容的样式也变了,而地址栏是不变的。界面UI用的metronic,虽然官网是收费的,但是在天朝,总是可以找到免费的。官方地址:http://keenthemes.com/preview/metronic/
在这里,我使用了分区域、分模块(按独立的业务功能划分)的方式,一个模块就是一个独立的dll,在这里Secom.Emx.Admin和Secom.Emx.History就是两个独立的模块,并分别创建了区域Admin和History。
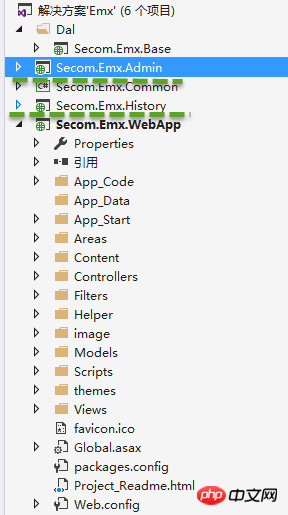

你会发现Secom.Emx.Admin模型下面的Areas目录和Secom.Emx.WebApp中的目录是一模一样的,其实我最初不想在模块项目中添加任何的View,但是为了方便独立部署还是加了。
右键单击项目Secom.Emx.Admin,选择“属性”——“生成事件”添加如下代码:
xcopy /e/r/y $(ProjectDir)Areas\Admin\Views $(SolutionDir)Secom.Emx.WebApp\Areas\Admin\Views
这命令很简单,其实就是当编译项目Secom.Emx.Admin的时候,将项目中的Views复制到Secom.Emx.WebApp项目的指定目录下。

区域配置文件我放置到了Secom.Emx.WebApp中,其实你完全可以独立放置到一个类库项目中,因为注册区域路由的后,项目最终会寻找bin目录下面所有继承了AreaRegistration类的,然后让WebApp引用这个类库项目,Secom.Emx.WebApp项目添加Secom.Emx.Admin、Secom.Emx.History的引用。
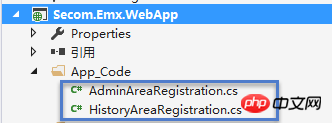
AdminAreaRegistration代码如下:
using System.Web.Mvc;namespace Secom.Emx.WebApp{ public class AdminAreaRegistration : AreaRegistration { public override string AreaName { get { return "Admin"; } } public override void RegisterArea(AreaRegistrationContext context) { context.MapRoute( "Admin_default", "Admin/{controller}/{action}/{id}", new { action = "Index", id = UrlParameter.Optional }, namespaces:new string[1] { "Secom.Emx.Admin.Areas.Admin.Controllers" } ); } }}注意命名空间和后面添加的 namespaces:new string[1] { "Secom.Emx.Admin.Areas.Admin.Controllers" },这个命名空间就是独立模块Secom.Emx.Admin下面的控制器所在的命名空间。
HistoryAreaRegistration代码如下:
using System.Web.Mvc;namespace Secom.Emx.WebApp{ public class HistoryAreaRegistration : AreaRegistration { public override string AreaName { get { return "History"; } } public override void RegisterArea(AreaRegistrationContext context) { context.MapRoute( "History_default", "History/{controller}/{action}/{id}", new { action = "Index", id = UrlParameter.Optional }, namespaces:new string[1] { "Secom.Emx.History.Areas.History.Controllers" } ); } }}我们先看下RazorViewEngine的原始构造函数如下:
public RazorViewEngine(IViewPageActivator viewPageActivator) : base(viewPageActivator) { AreaViewLocationFormats = new[] { "~/Areas/{2}/Views/{1}/{0}.cshtml", "~/Areas/{2}/Views/{1}/{0}.vbhtml", "~/Areas/{2}/Views/Shared/{0}.cshtml", "~/Areas/{2}/Views/Shared/{0}.vbhtml" }; AreaMasterLocationFormats = new[] { "~/Areas/{2}/Views/{1}/{0}.cshtml", "~/Areas/{2}/Views/{1}/{0}.vbhtml", "~/Areas/{2}/Views/Shared/{0}.cshtml", "~/Areas/{2}/Views/Shared/{0}.vbhtml" }; AreaPartialViewLocationFormats = new[] { "~/Areas/{2}/Views/{1}/{0}.cshtml", "~/Areas/{2}/Views/{1}/{0}.vbhtml", "~/Areas/{2}/Views/Shared/{0}.cshtml", "~/Areas/{2}/Views/Shared/{0}.vbhtml" }; ViewLocationFormats = new[] { "~/Views/{1}/{0}.cshtml", "~/Views/{1}/{0}.vbhtml", "~/Views/Shared/{0}.cshtml", "~/Views/Shared/{0}.vbhtml" }; MasterLocationFormats = new[] { "~/Views/{1}/{0}.cshtml", "~/Views/{1}/{0}.vbhtml", "~/Views/Shared/{0}.cshtml", "~/Views/Shared/{0}.vbhtml" }; PartialViewLocationFormats = new[] { "~/Views/{1}/{0}.cshtml", "~/Views/{1}/{0}.vbhtml", "~/Views/Shared/{0}.cshtml", "~/Views/Shared/{0}.vbhtml" }; FileExtensions = new[] { "cshtml", "vbhtml", }; }然后新建CustomRazorViewEngine继承自RazorViewEngine,对View的路由规则进行了重写,既然可以重写路由规则,那意味着,你可以任意定义规则,然后遵守自己定义的规则就可以了。需要注意的是,要注意路由数组中的顺序,查找视图时,是按照前后顺序依次查找的,当找到了视图就立即返回,不会再去匹配后面的路由规则。为了提升路由查找效率,我这里删除了所有vbhtml的路由规则,因为我整个项目中都采用C#语言。
using System.Web.Mvc;namespace Secom.Emx.WebApp.Helper{ public class CustomRazorViewEngine : RazorViewEngine { public CustomRazorViewEngine(string theme) { if (!string.IsNullOrEmpty(theme)) { AreaViewLocationFormats = new[] { //themes "~/themes/"+theme+"/views/Areas/{2}/{1}/{0}.cshtml", "~/themes/"+theme+"/Shared/{0}.cshtml" "~/Areas/{2}/Views/{1}/{0}.cshtml", "~/Areas/{2}/Views/Shared/{0}.cshtml" }; AreaMasterLocationFormats = new[] { //themes "~/themes/"+theme+"/views/Areas/{2}/{1}/{0}.cshtml", "~/themes/"+theme+"/views/Areas/{2}/Shared/{0}.cshtml", "~/themes/"+theme+"/views/Shared/{0}.cshtml", "~/Areas/{2}/Views/{1}/{0}.cshtml", "~/Areas/{2}/Views/Shared/{0}.cshtml" }; AreaPartialViewLocationFormats = new[] { //themes "~/themes/"+theme+"/views/Shared/{0}.cshtml", "~/Areas/{2}/Views/{1}/{0}.cshtml", "~/Areas/{2}/Views/Shared/{0}.cshtml" }; ViewLocationFormats = new[] { //themes "~/themes/"+theme+"/views/{1}/{0}.cshtml", "~/Views/{1}/{0}.cshtml", "~/Views/Shared/{0}.cshtml" }; MasterLocationFormats = new[] { //themes "~/themes/"+theme+"/views/Shared/{0}.cshtml", "~/Views/{1}/{0}.cshtml", "~/Views/Shared/{0}.cshtml" }; PartialViewLocationFormats = new[] { //themes "~/themes/"+theme+"/views/Shared/{0}.cshtml", "~/Views/{1}/{0}.cshtml", "~/Views/Shared/{0}.cshtml" }; FileExtensions = new[]{"cshtml"}; } } }}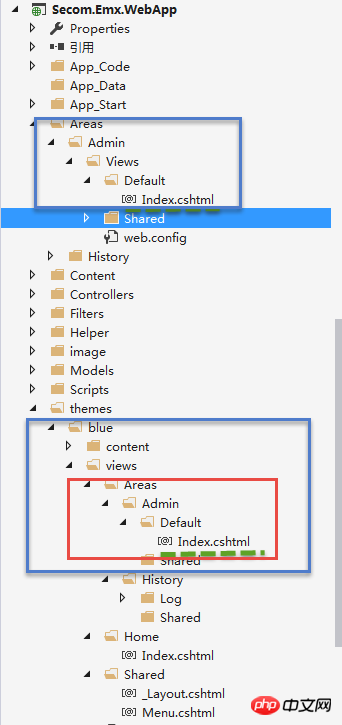
重写后,我们的路由规则将是这样的:当没有选择主题的情况下,沿用原来的路由规则,如果选择了主题,则使用重写后的路由规则。
新的路由规则:在选择了主题的情况下,优先查找thems/主题名称/views/Areas/区域名称/控制器名称/视图名称.cshtml,如果找不到再按照默认的路由规则去寻找,也就是Areas/区域名称/Views/控制器名称/视图名称.cshtml
切换主题View代码:
<p class="btn-group"> <button type="button" class="btn btn-circle btn-outline red dropdown-toggle" data-toggle="dropdown"> <i class="fa fa-plus"></i> <span class="hidden-sm hidden-xs">切换主题 </span> <i class="fa fa-angle-down"></i> </button> <ul class="dropdown-menu" role="menu"> <li> <a href="javascript:setTheme('default')"> <i class="icon-docs"></i> 默认主题 </a> </li> <li> <a href="javascript:setTheme('Blue')"> <i class="icon-tag"></i> 蓝色主题 </a> </li> </ul> </p> <script type="text/javascript"> function setTheme(themeName) { window.location.href = "/Home/SetTheme?themeName=" + themeName + "&href=" + window.location.href; }</script>当用户登录成功的时候,从Cookie中读取所选主题信息,当Cookie中没有读取到主题记录时,则从Web.config配置文件中读取配置的主题名称,如果都没有读取到,则说明是默认主题,沿用原有的视图引擎规则。
在后台管理界面,每次选择了主题,我都将主题名称存储到Cookie中,默认保存一年,这样当下次再登录的时候,就能够记住所选的主题信息了。
using System;using System.Web.Mvc;using Secom.Emx.WebApp.Helper;using System.Web;using Secom.Emx.Common.Controllers;namespace Secom.Emx.WebApp.Controllers{ public class HomeController : BaseController { string themeCookieName = "Theme"; public ActionResult Index() { ViewData["Menu"] = GetMenus(); return View(); } public ActionResult SetTheme(string themeName,string href) { if (!string.IsNullOrEmpty(themeName)) { Response.Cookies.Set(new HttpCookie(themeCookieName, themeName) { Expires = DateTime.Now.AddYears(1) }); } else { themeName = Request.Cookies[themeCookieName].Value ?? "".Trim(); } Utils.ResetRazorViewEngine(themeName); return string.IsNullOrEmpty(href)? Redirect("~/Home/Index"):Redirect(href); } public ActionResult Login() { string themeName = Request.Cookies[themeCookieName].Value ?? "".Trim(); if (!string.IsNullOrEmpty(themeName)) { Utils.ResetRazorViewEngine(themeName); } return View(); } }}Utils类:
using System.Configuration;using System.Web.Mvc;namespace Secom.Emx.WebApp.Helper{ public class Utils { private static string _themeName; public static string ThemeName { get { if (!string.IsNullOrEmpty(_themeName)) { return _themeName; } //模板风格 _themeName =string.IsNullOrEmpty(ConfigurationManager.AppSettings["Theme"])? "" : ConfigurationManager.AppSettings["Theme"]; return _themeName; } } public static void ResetRazorViewEngine(string themeName) { themeName = string.IsNullOrEmpty(themeName) ? Utils.ThemeName : themeName; if (!string.IsNullOrEmpty(themeName)) { ViewEngines.Engines.Clear(); ViewEngines.Engines.Add(new CustomRazorViewEngine(themeName)); } } }}实现方式实在是太简单,简单得我不知道如何表述才好,我还是记下来,方便有需要的人可以查阅,希望可以帮到你们。由于项目引入了庞大的各种相关文件以致文件比较大,网速原因无法上传源码还望见谅!
更多相关文章
- ASP.NET Core Razor页面路由的详细介绍
- golang如何封装路由
- 用go实现路由的链式定义
- 使用XML实现BBS(主题列表篇)的详情介绍
- 单臂路由
- 网关 Spring-Cloud-Gateway 源码解析 —— 路由(1.1)之RouteDefin
- Docker容器跨主机通信之:直接路由方式
- 从无到有,支付路由系统升级打怪之路|原创
- 数据库分库分表中间件 Sharding-JDBC 源码分析 —— SQL 路由(一)