linux下多个mysql5.7.19(tar.gz)安装图文教程
初级第一次在Linux下安装MySQL-5.7.19版本教程请看上一篇,如果已经会安装了,那么请看这篇linux下安装多个mysql-5.7.19
环境:centos 6.5
1-下载

2-跳过登陆

3-1安装多个数据库需要配置自己的my.cnf,如果只安装一个,系统没有安装过直接这个命令就可以
shell> groupadd mysqlshell> useradd -r -g mysql -s /bin/false mysqlshell> cd /usr/localshell> tar zxvf /path/to/mysql-VERSION-OS.tar.gzshell> ln -s full-path-to-mysql-VERSION-OS mysqlshell> cd mysqlshell> mkdir mysql-files查看下有没有data目录如果没有的话增加个命令(mkdir data)shell> chmod 750 mysql-filesshell> chown -R mysql .shell> chgrp -R mysql .shell> bin/mysql_install_db --user=mysql # MySQL 5.7.5shell> bin/mysqld --initialize --user=mysql # MySQL 5.7.6 and upshell> bin/mysql_ssl_rsa_setup # MySQL 5.7.6 and upshell> chown -R root .shell> chown -R mysql data mysql-filesshell> bin/mysqld_safe --user=mysql &# Next command is optionalshell> cp support-files/mysql.server /etc/init.d/mysql.server
下面说安装多个mysql情况:
3-2安装多个数据库需要安照如下命令:
1-增加配置文件 my.cnf (在mysql目录下命令touch my.cnf):
下面配置文件可以直接使用粘贴复制进去
然后创建log文件 /xcxyz/log/mysql/error.log
[mysqld]basedir= /usr/local/mysql-5.7.19-3307datadir = /usr/local/mysql-5.7.19-3307/dataport = 3307character-set-server=utf8server_id = 11#该socket最好指定,不指定的话默认的话 是使用的默认的socket文件 而且登陆数据库的时候会有我下面的问题socket = /tmp/mysql3307.sock log-error = /xcxyz/log/mysql/error.logpid-file = /usr/local/mysql-5.7.19-3307/data/mysql-5.7.19-3307.pid
2-1增加用户 组 我的用户和组都使用的是mysqlosf这个随意
shell> groupadd mysqlshell> useradd -r -g mysql -s /bin/false mysqlshell> cd /usr/localshell> tar zxvf /path/to/mysql-VERSION-OS.tar.gz
shell> ln -s full-path-to-mysql-VERSION-OS mysqlshell> cd mysqlshell> mkdir mysql-files
2-3授权当前目录:
shell> chmod 750 mysql-filesshell> chown -R mysqlosf .shell> chgrp -R mysqlosf .
bin/mysqld --defaults-file=/usr/local/full-path-to-mysql-VERSION-OS/my.cnf --initialize --user=mysqlosf
查看日志输出:vi /xcxyz/log/mysql/error.log
2017-07-24T03:13:47.933684Z 0 [Warning] TIMESTAMP with implicit DEFAULT value is deprecated. Please use --explicit_defaults_for_timestamp server option (see documentation for more details).
2017-07-24T03:13:49.979892Z 0 [Warning] InnoDB: New log files created, LSN=45790
2017-07-24T03:13:50.262941Z 0 [Warning] InnoDB: Creating foreign key constraint system tables.
2017-07-24T03:13:50.330756Z 0 [Warning] No existing UUID has been found, so we assume that this is the first time that this server has been started. Generating a new UUID: 1d702294-701e-11e7-98a1-00163e30bbf6.
2017-07-24T03:13:50.340474Z 0 [Warning] Gtid table is not ready to be used. Table 'mysql.gtid_executed' cannot be opened.
2017-07-24T03:13:50.344419Z 1 [Note] A temporary password is generated for root@localhost: jZpgHhigx5>i(特别重要一会初始化密码)
2-5建立密钥
shell> bin/mysql_ssl_rsa_setup --defaults-file=/usr/local/mysql-5.7.19-3307/my.cnf
2-6重新授权分配
shell> chown -R root .shell> chown -R mysql data mysql-files
bin/mysqld_safe --defaults-file=/usr/local/full-path-to-mysql-VERSION-OS/my.cnf --user=mysqlosf &
shell> cp support-files/mysql.server /etc/init.d/mysql.server
4登陆mysql修改密码使用刚才的临时密码

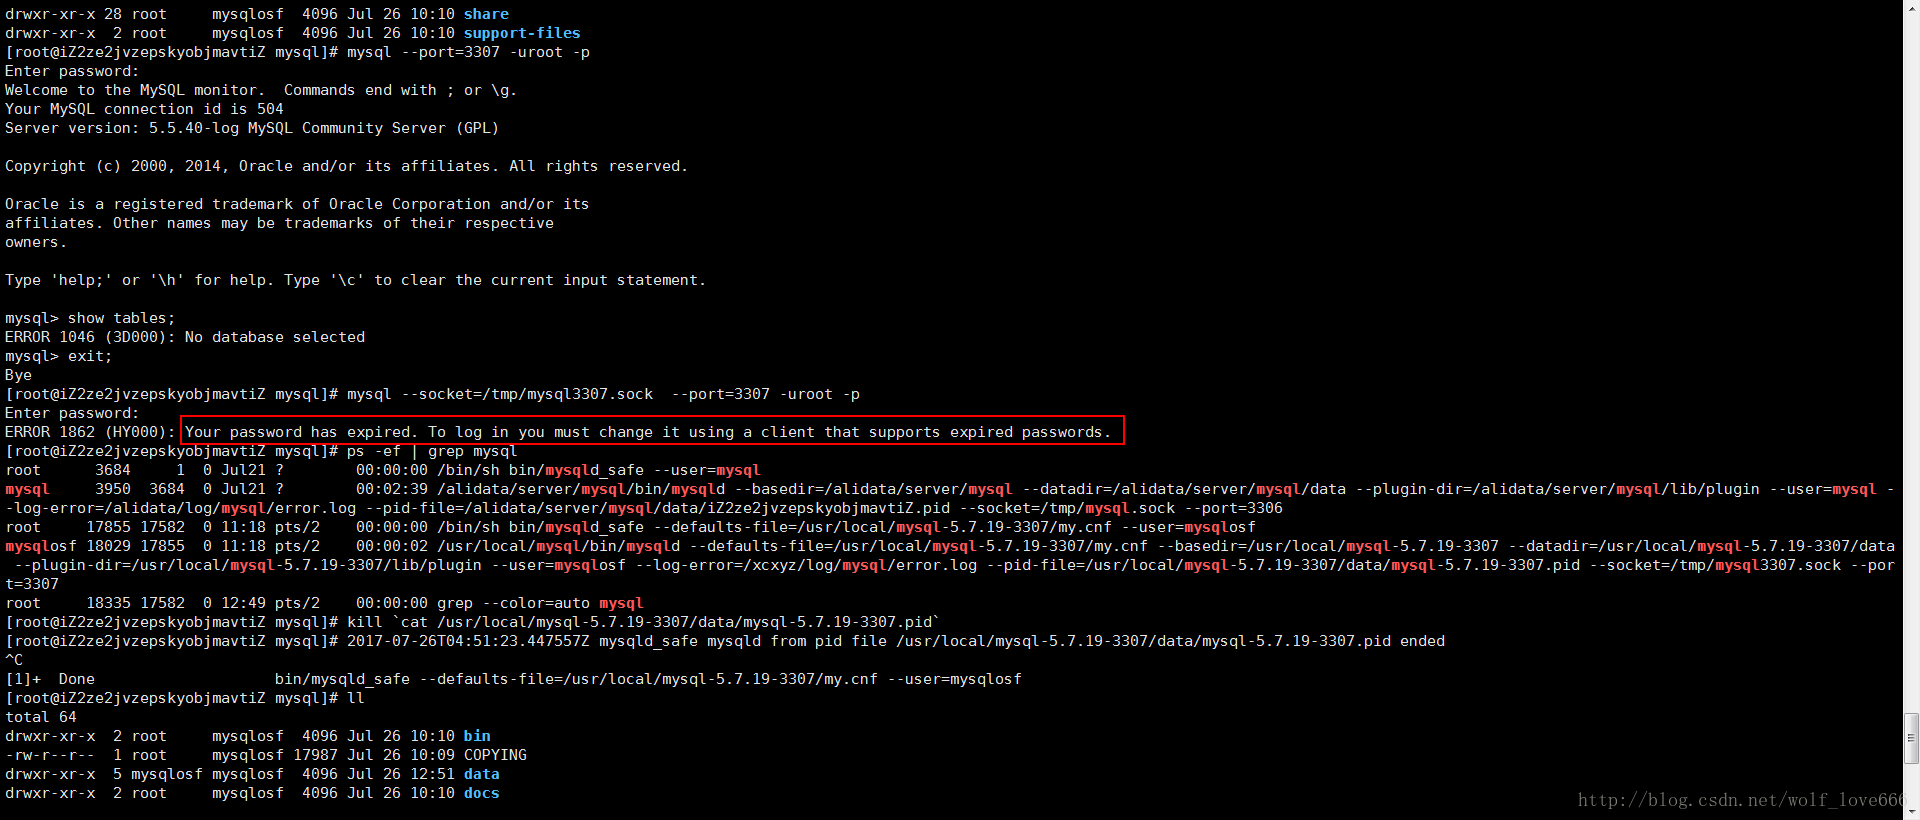
我这里又出问题了哈哈,始终登陆不上去
Access denied for user 'root'@'localhost' (using password:YES)解决方法最下面
如果登陆上去了可以直接使用刚才的临时密码登陆并且设置密码
5-登录MySQL之后,要求立即修改密码,否则不能进行任何操作。执行下面的命令修改'root'@'localhost'的密码:
SET PASSWORD = PASSWORD('root'); ALTER USER 'root'@'localhost' PASSWORD EXPIRE NEVER; flush privileges;grant all privileges on *.* to 'root'@'%' identified by 'root' with grant option;
按照上面的办法,继续解压安装mysql-5.7.19-linux-glibc2.5-x86_64.tar.gz,并且配置为3308,3309端口,就可以安装多个mysql了。
解决方案安装好了登陆不上去:
如果像我上面一样的话
原因是如下红色框内的英文 我的是第二个mysql需要指定socket和port,英文意思就是说 如果你没有指定socket的话那么会选择默认的 因为我们安装多个mysql 所以这个必须指定
mysql --socket=/tmp/mysql3307.sock --port=3307 -uroot -p
5-重置密码:
5-1关闭进程
kill `cat /usr/local/mysql-5.7.19-3307/data/mysql-5.7.19-3307.pid`

5-2-1文件内容
第一种内容:
ALTER USER 'root'@'localhost' IDENTIFIED BY 'mysqlosf';
保存内容之后启动
复制代码 代码如下:
保存内容之后启动
复制代码 代码如下:
精彩专题分享:mysql不同版本安装教程 mysql5.7各版本安装教程 mysql5.6各版本安装教程
更多相关文章
- python list.sort()根据多个关键字排序的方法实现
- android 当系统存在多个Launcher时,如何设置开机自动进入默认的La
- 【android】监听网络变化连续多个广播的问题解决
- android sqlite 一次创建多个表
- android Activity生命周期详解(图文)
- android Activity生命周期详解(图文)
- android Activity生命周期详解(图文)
- android Activity生命周期详解(图文)
- 两分钟彻底让你明白Android中onInterceptTouchEvent与onTouchEve