伪类选择器与盒模型常用属性
16lz
2022-07-09
1.伪类选择器
伪类选择器分为结构伪类和状态伪类1.结构伪类:根据元素的位置来获取元素2.状态伪类:根据元素的状态来获取元素
1.2 结构伪类
nth-of-type(an+b)
1.2.1 单选结构伪类
html+css 代码:
html:<ul class="ceshi"><li>ceshi1</li><li>ceshi2</li><li>ceshi3</li><li>ceshi4</li><li>ceshi5</li><li>ceshi6</li><li>ceshi7</li><li>ceshi8</li></ul>css:.ceshi > li:nth-of-type(1) {background-color: blue;}
实现:

1.2.2 获取前三个结构伪类
HTML+CSS代码:
html:<ul class="ceshi"><li>ceshi1</li><li>ceshi2</li><li>ceshi3</li><li>ceshi4</li><li>ceshi5</li><li>ceshi6</li><li>ceshi7</li><li>ceshi8</li></ul>css:.ceshi > li:nth-of-type(-n + 3) {background-color: yellowgreen;}
实现:

1.2.3 获取最后三个的结构伪类
HTML+CSS代码:
html:<ul class="ceshi"><li>ceshi1</li><li>ceshi2</li><li>ceshi3</li><li>ceshi4</li><li>ceshi5</li><li>ceshi6</li><li>ceshi7</li><li>ceshi8</li></ul>css:.ceshi > li:nth-last-of-type(-n + 3) {background-color: yellowgreen;}
实现:

1.2.4 结构伪类语法糖
1.选中第一个:first-of-type2.选中最后一个:last-of-typeHTML:<ul class="ceshi"><li>ceshi1</li><li>ceshi2</li><li>ceshi3</li><li>ceshi4</li><li>ceshi5</li><li>ceshi6</li><li>ceshi7</li><li>ceshi8</li></ul>css:.ceshi > li:first-of-type {background-color: violet;}.ceshi > li:last-of-type {background-color: turquoise;}
实现:

3.选中偶数行:nth-of-type(even)4.选中奇数行:nth-of-type(odd)HTML:<ul class="ceshi"><li>ceshi1</li><li>ceshi2</li><li>ceshi3</li><li>ceshi4</li><li>ceshi5</li><li>ceshi6</li><li>ceshi7</li><li>ceshi8</li></ul>css:.ceshi > li:nth-of-type(even) {background-color: blueviolet;}.ceshi > li:nth-of-type(odd) {background-color: aqua;}
实现:

1.3 状态伪类
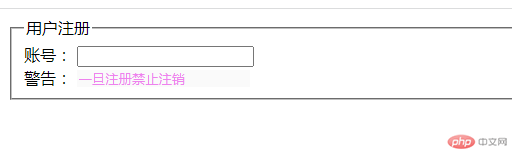
1.3.1 获取被禁用的元素
html:<form action=""><fieldset><legend>用户注册</legend><div><label for="username">账号:</label><input type="text" id="username" /></div><div><label for="tip">警告:</label><input type="text" id="tip" value="一旦注册禁止注销" disabled style="border: none" /></div><div><label for="">性别:</label><input type="radio" name="sex" id="nan" checked /><label for="nan">男</label><input type="radio" name="sex" id="nv" /><label for="nv">女</label></div></fieldset></form>css:<style>input:disabled{color:violet;}</style>
实现:
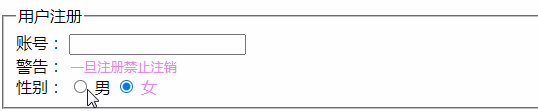
1.3.2 获取被选中的单选按钮
html:<form action=""><fieldset><legend>用户注册</legend><div><label for="username">账号:</label><input type="text" id="username" /></div><div><label for="tip">警告:</label><input type="text" id="tip" value="一旦注册禁止注销" disabled style="border: none" /></div><div><label for="">性别:</label><input type="radio" name="sex" id="nan" checked /><label for="nan">男</label><input type="radio" name="sex" id="nv" /><label for="nv">女</label></div></fieldset></form>css:<style>input:disabled{color:violet;}//获取被选中的单选按钮input:checked + label {color: violet;}</style>
实现:
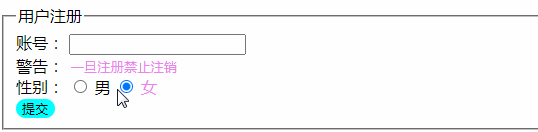
1.3.3 鼠标移入光标的变化
html:<form action=""><fieldset><legend>用户注册</legend><div><label for="username">账号:</label><input type="text" id="username" /></div><div><label for="tip">警告:</label><input type="text" id="tip" value="一旦注册禁止注销" disabled style="border: none" /></div><div><label for="">性别:</label><input type="radio" name="sex" id="nan" checked /><label for="nan">男</label><input type="radio" name="sex" id="nv" /><label for="nv">女</label></div></fieldset></form>css:<style>input:disabled{color:violet;}input:checked + label {color: violet;}button {border-radius: 20px;border: none;background-color: aqua;}//鼠标移入时变化button:hover {cursor: pointer;color: red;}</style>
实现:
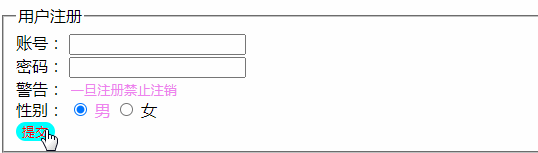
1.3.4 获取焦点时变化
html:<form action=""><fieldset><legend>用户注册</legend><div><label for="username">账号:</label><input type="text" id="username" /></div><div><label for="tip">警告:</label><input type="text" id="tip" value="一旦注册禁止注销" disabled style="border: none" /></div><div><label for="">性别:</label><input type="radio" name="sex" id="nan" checked /><label for="nan">男</label><input type="radio" name="sex" id="nv" /><label for="nv">女</label></div></fieldset></form>css:<style>input:disabled{color:violet;}input:checked + label {color: violet;}button {border-radius: 20px;border: none;background-color: aqua;}button:hover {cursor: pointer;color: red;}//获取焦点时变化input:focus{background-color:violet;}</style>
实现:
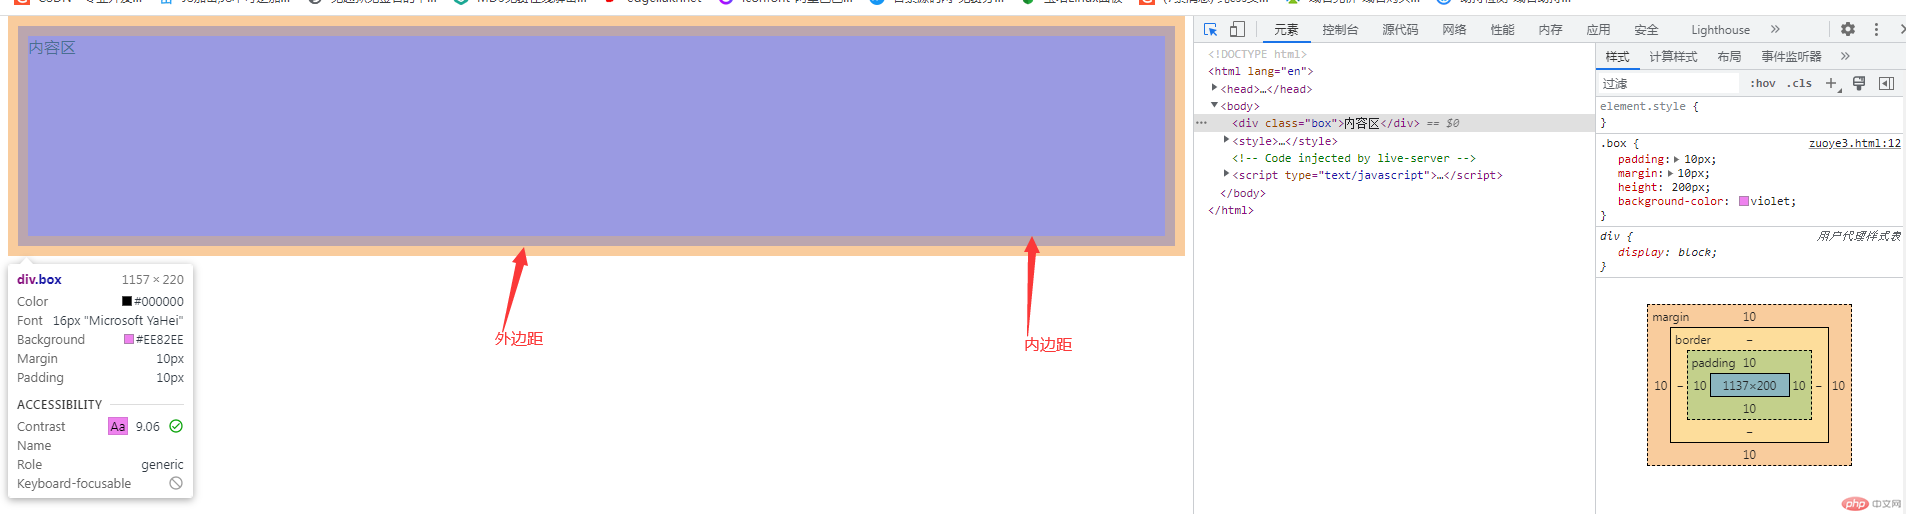
2.盒模型常用属性
盒模型有四属性:margin:外边距;padding:内边距;border:边框;内容区:content
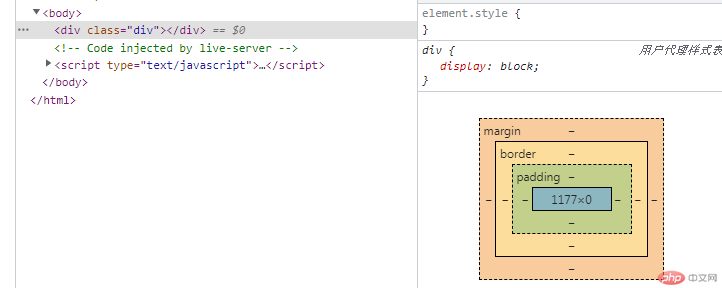
要使盒模型变成可见状态必须设置可见属性,例如:background-color:violet 等;还需要设置盒模型的高度,例如:height="200px"

内边距:是内容区与边框之间的填充物(padding="10px")外边距:是盒子与其他元素之间的间隙(margin="10px")
更多相关文章
- 系出名门Android(10) - HTTP 通信, XML 解析, 通过 Hander 实现
- Android(安卓)Camera SurfaceView 获取预览数据
- [Android] 彻底了解Binder机制原理和底层实现
- Android(安卓)Binder实现浅析-Binder驱动
- Android取消EditText自动获取焦点默认行为
- Android上的手势监听实现
- 基于AOA协议实现Android设备的USB通信
- Android亮度调节的几种实现方法
- [Android] 触屏setOnTouchListener实现图片缩放、移动、绘制和添