【jQuery基础入门】顶级对象$()和jQuery中常用的getter、setter方法详解
什么是jQuery?
jQuery 是一个高效、精简并且功能丰富的 JavaScript 工具库。它提供的 API 易于使用且兼容众多浏览器,这让诸如 HTML 文档遍历和操作、事件处理、动画和 Ajax 操作更加简单。它并不能代替JavaScript
- jquery 是一个javascript库. 对javascript进行封装可以更加优雅的写js代码
- jquery主要是通过操作html中dom 的方式进行代码编写.和设计
- jquery的优点是简单.易用. 能简写很多的javascript代码
- 使用jquery可以很快速的构建前端页面.一些javascript特效.
- jquery是javascript的一个库同时也是对js更加简便操作
jQuery官网地址:https://jquery.com/
jQuery API 中文文档:https://www.jquery123.com/
如何引入jQuery库
- 官网下载通过script引入
注意:我们这里学习中下载未压缩版本即可,实际项目上线中才引入压缩过后的min.js版本<script src="./jquery-3.6.0.js"></script>
- 通过百度的CDN引入在线链接
<script src="http://libs.baidu.com/jquery/2.0.0/jquery.min.js"></script>
初体验原生JS和jQuery对比
<input type="button" value="显示效果" id="btn"><div></div><script>// 原生JavaScriptdocument.querySelector('#btn').addEventListener("click", function() {let divObj = document.querySelector('div');divObj.style.width = "200px";divObj.style.height = "200px";divObj.style.backgroundColor = "red";})// jQuery$('#btn').click(() => {$('div').css({'width': "200px",'height': "200px",'backgroundColor': "pink"})})</script>
jQuery中顶级对象$
- DOM中的顶级对象:document——页面中的顶级对象
- BOM中的顶级对象:window——-浏览器中的顶级对象
- jQuery中的顶级对象:jQuery——$
$是jQuery的顶级对象,相当于原生JavaScript中的window。把元索利用$包装成Query对象,就可以调用jQuery的方法。
$是jQuery的别称,在代码中可以使用jQuery代替$,但一般为了方便,通常都直接使用$。
使用jQuery获取元素选择器为div的对象并隐藏
$('div').hide(); //通过元素选择器获取divjQuery('div').hide();//通过元素选择器获取div
jQuery工厂函数$()的四种使用方式
- $(选择器,上下文) DOM选择,可以指定上下文;
$('li').css('color','blue');$('li','#first').css('color','blue');// $('li','#first') === $('#first li')$('#first li').css('color','red');
- $(JS对象) jQuery包装器,将原生的js对象转为jQuery对象
为什么要转换为jQuery对象,因为想使用jQuery对象上的非常丰富的方法和属性
$(document.body).css('backgroundColor','lightgreen');console.log($(document.querySelectorAll('li')));
$(html文本) 生成创建DOm元素
用jQuery来创建DOM也是常见操作,例如在ul下创建一个li:$('<li>').appendTo($ul);document.body.insertAdjacentHTML('afterEnd','<p>晚上好!</p>');$('<p>hello world!</p>').appendTo( "body" );// 还可以更好玩$( "<div/>", {"class": "test",text: "Click me!",click: function() {$( this ).toggleClass( "test" );}}).appendTo( "body" );
$(callback) DOM加载完成
通常JavaScript需要在DOM加载完成后执行,否则DOM操作可能会失效。jQuery提供了一个方便的方法来监听DOM加载完成:$(function(){// DOM载入后执行});// $(callback)的作用完全相当于$(document).ready(callback)
总结$()的参数的四种类型:
- 选择器
- 原生JS对象(包装器功能)
- html字符串(创建dom元素)
- 回调函数(DOM加载完成自动调用)
jQuery对象和DOM对象
细说为什么要将jQuery对象和DOM对象进行互相转换,要想使用jQuery的方法和属性,就需要将其转换为jQuery的对象才能使用,但jQuery只是封装了一些好用的属性和方法,并不能完全代替JavaScript,这时候就可以将jQuery对象转换为原生的DOM对象,从而来完成一些特定的问题。
jquery对象转成DOM对象
DOM对象才能使用DOM方法,jquery对象不能使用DOM中的方法,但jquery对象提供了一套更加完善的工具用于操作DOM。
jQuery提供了两种方法:[index]和get(index)
// 使用索引let div = $("div"); //jQuery对象console.log(div[0]); //DOM对象// 使用get(index)let div = $("div"); //jQuery对象console.log(div.get[0]); //DOM对象// 使用...restconsole.log([...$('li')]); // jQuery对象转DOM对象

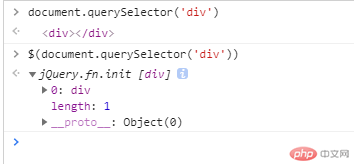
DOM对象转换为jquery对象
对于一个DOM对象,只需要用$()把DOM对象给包装起来,就可以获得一个jquery对象了,方式为$(DOM对象)。$(document.querySelector('div'))
let btnObj = document.getElementById('btn');btnObj.onclick = function(){this.style.backgroundColor = 'red';}// DOM对象转JQuery对象$(btnObj).click(function(){$(this).css('backgroundColor','red');})
// 原生JavaScript循环DOM元素document.querySelectorAll('li').forEach(function(item,key){console.log(key,item.textContent);})// jQuery自带遍历元素的,但也提供了each方法$.each($('li'),(key,item)=>{console.log(key,item.textContent);})
jQuery中常用的getter和setter方法
jQuery 的 setter/getter 共用一个函数,通过是否传参来表明它是何种意义。简单说传参它是 setter,不传它是 getter。即可以获取值也可以设置值
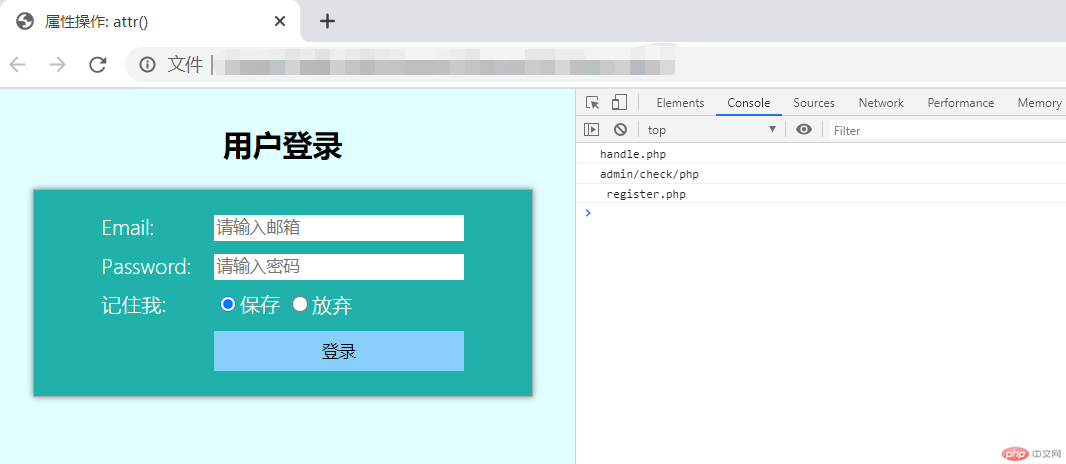
1. attr():获取/设置元素属性
attr()方法是jQuery中用于HTML属性的getter/setter。
<input type="button" name="btn" value="显示效果" id="btn">
// attr():获取和设置元素属性// attr(name):getter// attr(name,value):setter// removeAttr(name): 删除属性$('#btn').attr('type'); // button$('#btn').attr('value'); // "显示效果"$('#btn').attr('type','text'); // 修改成了文本框$('#btn').attr('value','我是一个文本框');
<!DOCTYPE html><html lang="zh-CN"><head><meta charset="UTF-8" /><meta http-equiv="X-UA-Compatible" content="IE=edge" /><meta name="viewport" content="width=device-width, initial-scale=1.0" /><title>属性操作: attr()</title><style>body {display: flex;flex-direction: column;align-items: center;background-color: lightcyan;font-weight: lighter;}#login {width: 400px;padding: 20px 10px;border: 1px solid #aaa;box-shadow: 0 0 5px #888;box-sizing: border-box;background-color: lightseagreen;color: #fff;display: grid;grid-template-columns: 80px 200px;gap: 10px;place-content: center center;}#login input {border: none;outline: none;}button {grid-column: 2 / 3;height: 32px;background-color: lightskyblue;border: none;outline: none;}button:hover {color: white;background-color: coral;color: #fff;/* border: none; */cursor: pointer;}.title {color: #666;font-weight: lighter;}</style></head><body id="main"><h2 class="title">用户登录</h2><form action="handle.php" method="POST" id="login"><label for="email">Email:</label><input type="email" name="email" id="email" autofocus placeholder="请输入邮箱" /><label for="password">Password:</label><input type="password" name="password" id="password" placeholder="请输入密码" /><label for="confirm">记住我:</label><div><input type="radio" name="save" id="confirm" value="1" checked /><label for="confirm">保存</label><input type="radio" name="save" id="cancel" value="0" /><label for="cancel">放弃</label></div><button>登录</button></form><script src="https://cdn.bootcdn.net/ajax/libs/jquery/3.6.0/jquery.js"></script><script>// attr():获取和设置元素属性// attr(name):getter// attr(name,value):setter// removeAttr(name): 删除属性const form = $('form');// 获取action属性console.log(form.attr('action'));// 设置action属性form.attr('action','admin/check/php');console.log(form.attr('action'));// 第二个参数允许使用回调函数// 根据表单请求类型,动态设置不同处理脚本// get: action = query.php?id=2// post action = register.phpform.attr('action',()=>{return form.attr('method').toLocaleLowerCase() === 'post'? ' register.php':'query.php?id=2';});console.log(form.attr('action'));// 删除标题的class属性$('h2').removeAttr('class');$('h2').attr('class');</script></body></html>
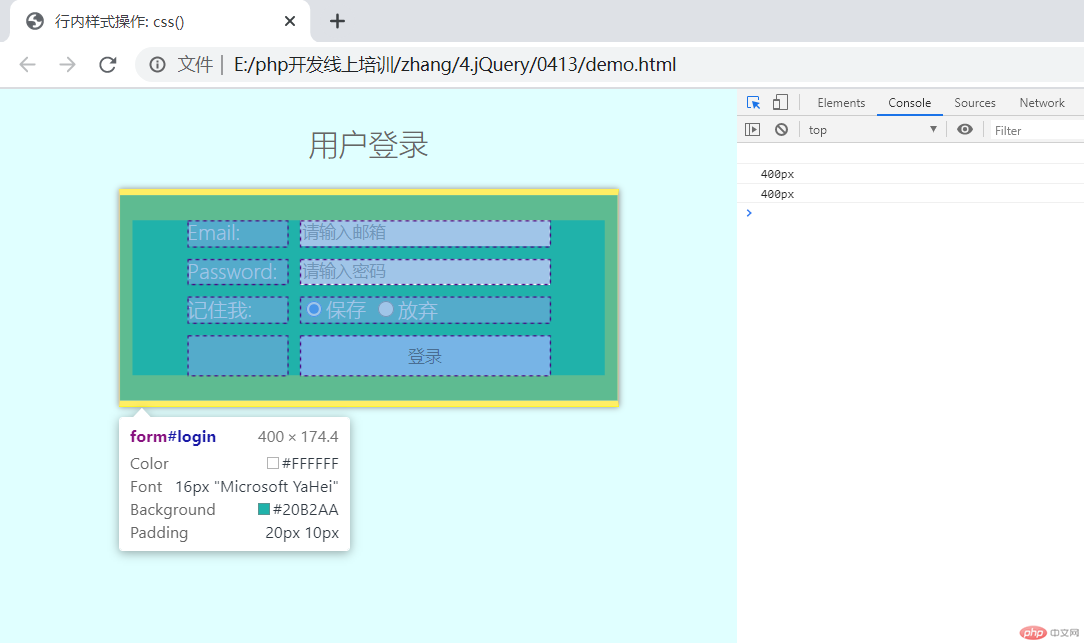
2. css():获取/设置元素的行内样式
css()方法和attr()方法很类似,只是css()方法作用于元素的css样式,而不是元素的HTML属性。
// 使用style只能获取style属性上的行内样式// document.querySelector('#btn').style.width// css样式表的样式是获取不到的,必须使用计算样式才可以window.getComputedStyle(document.querySelector('#btn'),null).getPropertyValue('width');// 使用jQuery的css()方法 ,可以直接获得元素最终的计算样式$('#btn').css('width);// 设置一个属性样式$('#btn').css('backgroundColor','red');// 设置多个属性样式$('#btn').css({'fontSize':'32px','color':'yellow','border':'0'})
<!DOCTYPE html><html lang="zh-CN"><head><meta charset="UTF-8" /><meta http-equiv="X-UA-Compatible" content="IE=edge" /><meta name="viewport" content="width=device-width, initial-scale=1.0" /><title>行内样式操作: css()</title><style>body {display: flex;flex-direction: column;align-items: center;background-color: lightcyan;font-weight: lighter;}#login {width: 400px;padding: 20px 10px;border: 1px solid #aaa;box-shadow: 0 0 5px #888;box-sizing: border-box;background-color: lightseagreen;color: #fff;display: grid;grid-template-columns: 80px 200px;gap: 10px;place-content: center center;}#login input {border: none;outline: none;}button {grid-column: 2 / 3;height: 32px;background-color: lightskyblue;border: none;outline: none;}button:hover {color: white;background-color: coral;color: #fff;/* border: none; */cursor: pointer;}.title {color: #666;font-weight: lighter;}</style></head><body id="main"><h2 class="title">用户登录</h2><form action="handle.php" method="POST" id="login"><label for="email">Email:</label><input type="email" name="email" id="email" autofocus placeholder="请输入邮箱" /><label for="password">Password:</label><input type="password" name="password" id="password" placeholder="请输入密码" /><label for="confirm">记住我:</label><div><input type="radio" name="save" id="confirm" value="1" checked /><label for="confirm">保存</label><input type="radio" name="save" id="cancel" value="0" /><label for="cancel">放弃</label></div><button>登录</button></form><script src="https://cdn.bootcdn.net/ajax/libs/jquery/3.6.0/jquery.js"></script><script>// css() : 包括了行内样式的计算样式// css(name):getter// css(name,value):setter// css(name,callback)// 原生操作cssconsole.log(document.querySelector('form').style.width); // 只能获取行内样式console.log(window.getComputedStyle(document.querySelector('form'),null).getPropertyValue('width')); // 获取计算样式// jQueryconst form = $('#login');// css可以直接获取到元素的计算样式console.log(form.css('width'));// 设置样式// form.css('border-top','5px solid yellow');// form.css('border-bottom','5px solid yellow');form.css({'border-top':'5px solid yellow','border-bottom':'5px solid yellow'});// 表单的背景色随机变换form.css('background',()=>{const colors = ['lightpink','lightblue','lime','wheat','lightgreen'];return colors[Math.floor(Math.random()*colors.length)];})</script></body></html>
3. addClass()和removeClass() 添加和删除类
addClass()方法用来从选中元素中添加类样式
removeClass()方法用来从选中元素中和删除类样式
hasClass()方法用来从选中的元素中判断某类是否存在
toggleClass()方法当元素还没有某些类时,给元素添加这些类;反之,则删除。
$('#btn').addClass('btn'); // 添加类$('#btn').hasClass('btn'); // true$('#btn').removeClass('btn'); // 删除类$('#btn').hasClass('btn'); // false$('#btn').toggleClass('btn'); // 切换类 添加/删除
<!DOCTYPE html><html lang="zh-CN"><head><meta charset="UTF-8" /><meta http-equiv="X-UA-Compatible" content="IE=edge" /><meta name="viewport" content="width=device-width, initial-scale=1.0" /><title>class操作</title><style>.title {color: red;}</style></head><body><h1 class="title">php.cn</h1><script src="https://cdn.bootcdn.net/ajax/libs/jquery/3.6.0/jquery.js"></script><script>// 原生: classList对象// let h1 = document.querySelector("h1");// 添加class// h1.classList.add("title");// 移除class// h1.classList.remove("title");// 切换class// h1.classList.toggle("title");// -------------------------------// jquery// addClass() => classList.add()// removeClass() => classList.remove()// toggleClass() => classList.toggle()const h1 = $("h1");h1.addClass("title");h1.removeClass("title");h1.toggleClass("title");</script></body></html>
4. val() 获取表单元素的值(value)
val()方法用来设置和获取HTML表单元素的value属性,还可用于获取和设置复选框、单选按钮以及<select>元素的选中状态。
// 原生获取document.getElementById('btn').value;$('#btn').val(); // 显示效果
// val():无参,默认就是获取控件元素(input,select...)的value属性的值// val(param): 设置// val(callback)// 原生document.forms.login.email.value = "admin@qq.com";console.log(document.forms.login.email.value);// jqueryconsole.log($("#email").val());// $("#password").val("123456");$("input:password").val("123456");console.log($("input:password").val());console.log($("input:radio:checked").val());$("#email").val(() => "zhang@qq.com");
5. text()和html():获取/设置元素内容
text()和html()方法用来获取和设置元素的纯文本或HTML内容
<ul>列表<li class="item1">item1</li><li class="item2">item2</li><li class="item3">item3</li><li class="item4">item4</li></ul><script>$(function(){// 获取$('ul').text(); // "列表" 获取纯文本$('ul').html();/*列表<li>item1</li><li>item2</li><li>item3</li><li>item4</li>*/$('ul .item2').text(); // item2// 设置$('ul').text("你好");$('ul').html(`<li>item1</li><li>item2</li><li>item3</li><li>item4</li><li>item5</li><li>item6</li>`);})</script>
// text(): 读/写入文本, textContent// html(): 读/写html文本, innerHTML$(".box").text("hello world");// text()不能解析文本中的html,转为实体字符原样输出$(".box").text("<strong style='color:red'>hello world</strong>");// html()$(".box").html("<strong style='color:red'>hello world</strong>");
更多相关文章
- 面向对象、类和对象、封装---------私有private、this关键字
- css实现垂直居中的方式
- 如果使用的库不支持异步,可以使用多进程并将其转化为异步对象
- 一个可能让你的页面渲染速度提升数倍的CSS属性
- 一些鲜为人知的的CSS3属性
- css 中的 content-visitly 提升渲染性能
- 关于获取各种浏览器可见窗口大小的一点点研究
- javascript创建对象几种方式
- 前端170面试题+答案学习整理