Spring Cloud Security:Oauth2实现单点登录
16lz
2021-01-22
Spring Cloud Security 为构建安全的SpringBoot应用提供了一系列解决方案,结合Oauth2可以实现单点登录功能,本文将对其单点登录用法进行详细介绍。
单点登录简介
单点登录(Single Sign On)指的是当有多个系统需要登录时,用户只需登录一个系统,就可以访问其他需要登录的系统而无需登录。
创建oauth2-client模块
这里我们创建一个oauth2-client服务作为需要登录的客户端服务,使用上一节中的oauth2-jwt-server服务作为认证服务,当我们在oauth2-jwt-server服务上登录以后,就可以直接访问oauth2-client需要登录的接口,来演示下单点登录功能。
- 在pom.xml中添加相关依赖:
<dependency>
    <groupId>org.springframework.cloud</groupId>
    <artifactId>spring-cloud-starter-oauth2</artifactId>
</dependency>
<dependency>
    <groupId>org.springframework.cloud</groupId>
    <artifactId>spring-cloud-starter-security</artifactId>
</dependency>
<dependency>
    <groupId>org.springframework.boot</groupId>
    <artifactId>spring-boot-starter-web</artifactId>
</dependency>
<dependency>
    <groupId>io.jsonwebtoken</groupId>
    <artifactId>jjwt</artifactId>
    <version>0.9.0</version>
</dependency>
- 在application.yml中进行配置:
server:
  port: 9501
  servlet:
    session:
      cookie:
        name: OAUTH2-CLIENT-SESSIONID #防止Cookie冲突,冲突会导致登录验证不通过
oauth2-server-url: http://localhost:9401
spring:
  application:
    name: oauth2-client
security:
  oauth2: #与oauth2-server对应的配置
    client:
      client-id: admin
      client-secret: admin123456
      user-authorization-uri: ${oauth2-server-url}/oauth/authorize
      access-token-uri: ${oauth2-server-url}/oauth/token
    resource:
      jwt:
        key-uri: ${oauth2-server-url}/oauth/token_key
- 在启动类上添加@EnableOAuth2Sso注解来启用单点登录功能:
@EnableOAuth2Sso
@SpringBootApplication
public class Oauth2ClientApplication {

    public static void main(String[] args) {
        SpringApplication.run(Oauth2ClientApplication.class, args);
    }

}
- 添加接口用于获取当前登录用户信息:
/**
 * Created by macro on 2019/9/30.
 */
@RestController
@RequestMapping("/user")
public class UserController {

    @GetMapping("/getCurrentUser")
    public Object getCurrentUser(Authentication authentication) {
        return authentication;
    }

}
修改认证服务器配置
修改oauth2-jwt-server模块中的AuthorizationServerConfig类,将绑定的跳转路径为http://localhost:9501/login,并添加获取秘钥时的身份认证。
/**
 * 认证服务器配置
 * Created by macro on 2019/9/30.
 */
@Configuration
@EnableAuthorizationServer
public class AuthorizationServerConfig extends AuthorizationServerConfigurerAdapter {
    //以上省略一堆代码...
    @Override
    public void configure(ClientDetailsServiceConfigurer clients) throws Exception {
        clients.inMemory()
                .withClient("admin")
                .secret(passwordEncoder.encode("admin123456"))
                .accessTokenValiditySeconds(3600)
                .refreshTokenValiditySeconds(864000)
//                .redirectUris("http://www.baidu.com")
                .redirectUris("http://localhost:9501/login") //单点登录时配置
                .scopes("all")
                .authorizedGrantTypes("authorization_code","password","refresh_token");
    }

    @Override
    public void configure(AuthorizationServerSecurityConfigurer security) {
        security.tokenKeyAccess("isAuthenticated()"); // 获取密钥需要身份认证,使用单点登录时必须配置
    }
}
网页单点登录演示
启动oauth2-client服务和oauth2-jwt-server服务;
访问客户端需要授权的接口http://localhost:9501/user/getCurrentUser会跳转到授权服务的登录界面;
- 进行登录操作后跳转到授权页面;
- 授权后会跳转到原来需要权限的接口地址,展示登录用户信息;
- 如果需要跳过授权操作进行自动授权可以添加
autoApprove(true)配置:
/**
 * 认证服务器配置
 * Created by macro on 2019/9/30.
 */
@Configuration
@EnableAuthorizationServer
public class AuthorizationServerConfig extends AuthorizationServerConfigurerAdapter {
    //以上省略一堆代码...
    @Override
    public void configure(ClientDetailsServiceConfigurer clients) throws Exception {
        clients.inMemory()
                .withClient("admin")
                .secret(passwordEncoder.encode("admin123456"))
                .accessTokenValiditySeconds(3600)
                .refreshTokenValiditySeconds(864000)
//                .redirectUris("http://www.baidu.com")
                .redirectUris("http://localhost:9501/login") //单点登录时配置
                .autoApprove(true) //自动授权配置
                .scopes("all")
                .authorizedGrantTypes("authorization_code","password","refresh_token");
    }
}
调用接口单点登录演示
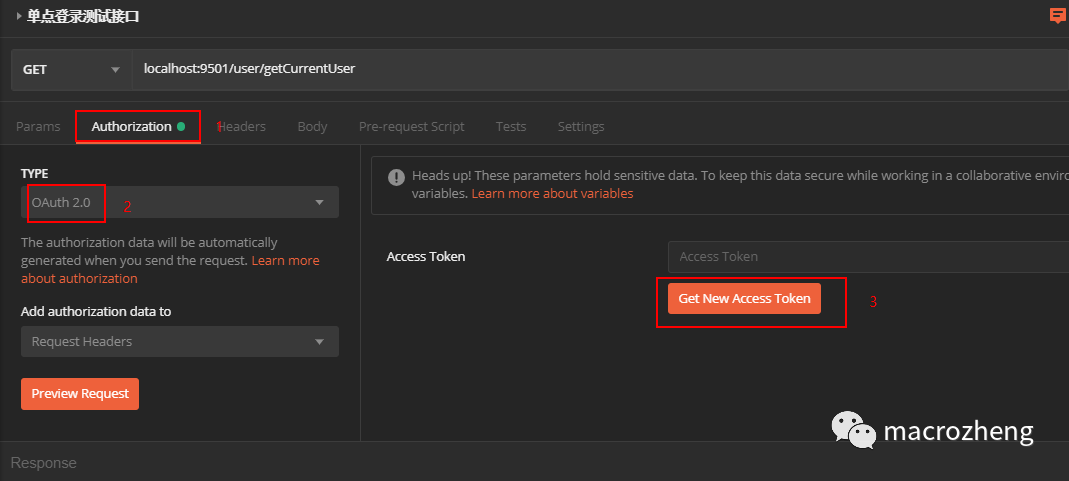
这里我们使用Postman来演示下如何使用正确的方式调用需要登录的客户端接口。
访问客户端需要登录的接口:http://localhost:9501/user/getCurrentUser
使用Oauth2认证方式获取访问令牌:
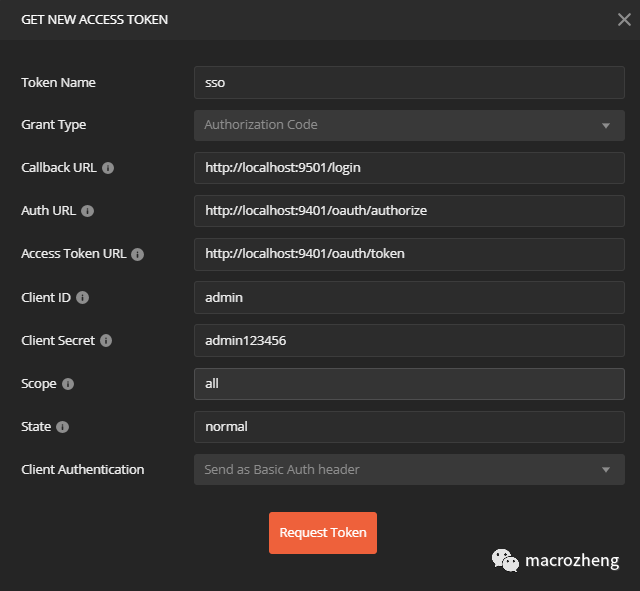
- 输入获取访问令牌的相关信息,点击请求令牌:
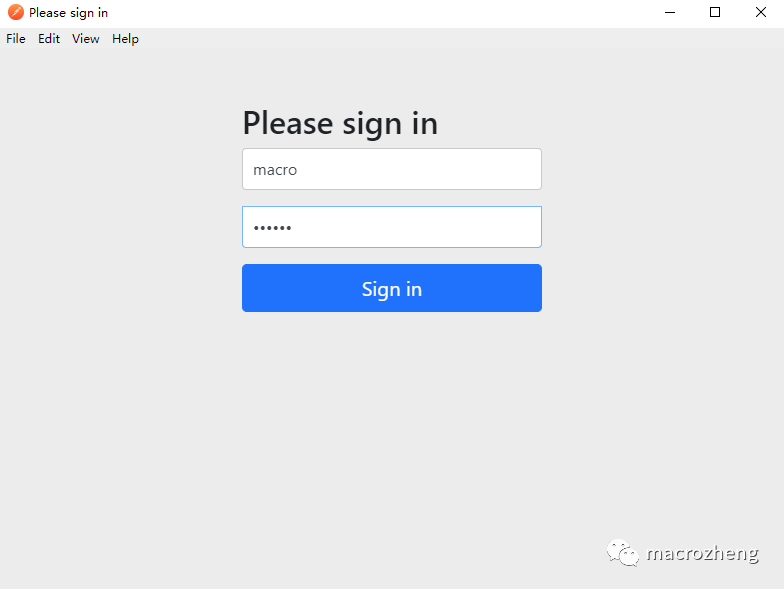
- 此时会跳转到认证服务器进行登录操作:
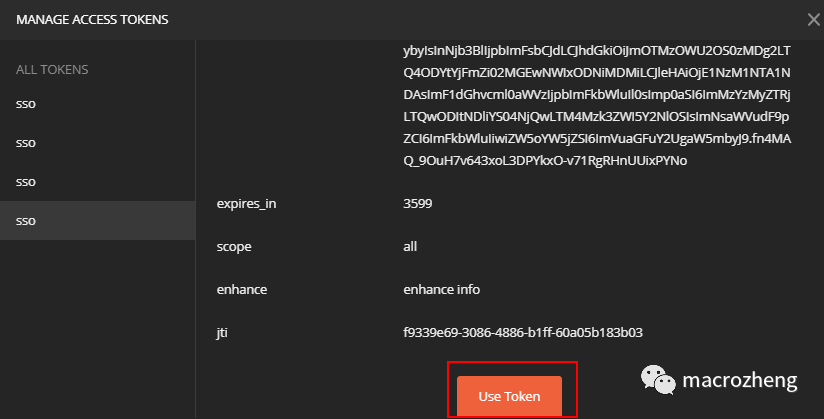
- 登录成功后使用获取到的令牌:
- 最后请求接口可以获取到如下信息:
{
    "authorities": [
        {
            "authority": "admin"
        }
    ],
    "details": {
        "remoteAddress": "0:0:0:0:0:0:0:1",
        "sessionId": "63BB793E35383B2FFC608333B3BF4988",
        "tokenValue": "eyJhbGciOiJIUzI1NiIsInR5cCI6IkpXVCJ9.eyJ1c2VyX25hbWUiOiJtYWNybyIsInNjb3BlIjpbImFsbCJdLCJleHAiOjE1NzI2OTAxNzUsImF1dGhvcml0aWVzIjpbImFkbWluIl0sImp0aSI6IjIwN2U5MTQzLTVjNTUtNDhkMS1iZmU3LTgwMzUyZTQ3Y2QyZCIsImNsaWVudF9pZCI6ImFkbWluIiwiZW5oYW5jZSI6ImVuaGFuY2UgaW5mbyJ9.xf3cBu9yCm0sME0j3UcP53FwF4tJVJC5aJbEj_Y2XcU",
        "tokenType": "bearer",
        "decodedDetails": null
    },
    "authenticated": true,
    "userAuthentication": {
        "authorities": [
            {
                "authority": "admin"
            }
        ],
        "details": null,
        "authenticated": true,
        "principal": "macro",
        "credentials": "N/A",
        "name": "macro"
    },
    "clientOnly": false,
    "oauth2Request": {
        "clientId": "admin",
        "scope": [
            "all"
        ],
        "requestParameters": {
            "client_id": "admin"
        },
        "resourceIds": [],
        "authorities": [],
        "approved": true,
        "refresh": false,
        "redirectUri": null,
        "responseTypes": [],
        "extensions": {},
        "grantType": null,
        "refreshTokenRequest": null
    },
    "principal": "macro",
    "credentials": "",
    "name": "macro"
}
oauth2-client添加权限校验
- 添加配置开启基于方法的权限校验:
/**
 * 在接口上配置权限时使用
 * Created by macro on 2019/10/11.
 */
@Configuration
@EnableGlobalMethodSecurity(prePostEnabled = true)
@Order(101)
public class SecurityConfig extends WebSecurityConfigurerAdapter {
}
- 在UserController中添加需要admin权限的接口:
/**
 * Created by macro on 2019/9/30.
 */
@RestController
@RequestMapping("/user")
public class UserController {

    @PreAuthorize("hasAuthority('admin')")
    @GetMapping("/auth/admin")
    public Object adminAuth() {
        return "Has admin auth!";
    }

}
- 访问需要admin权限的接口:http://localhost:9501/user/auth/admin
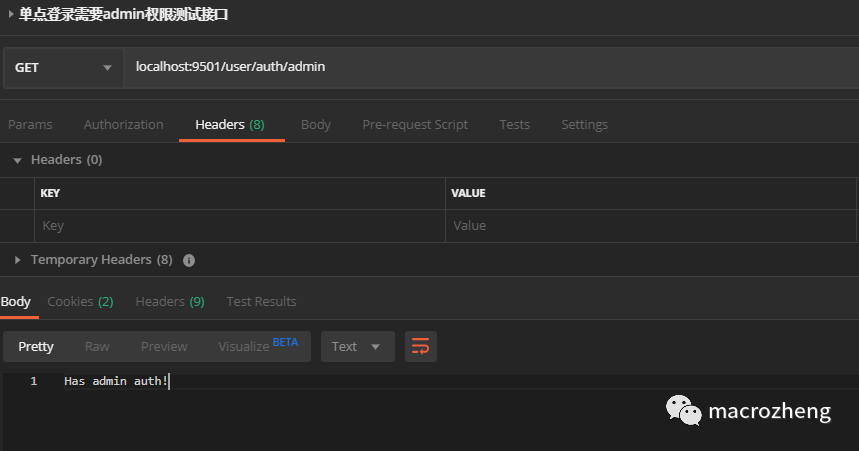
- 使用没有
admin权限的帐号,比如andy:123456获取令牌后访问该接口,会发现没有权限访问。
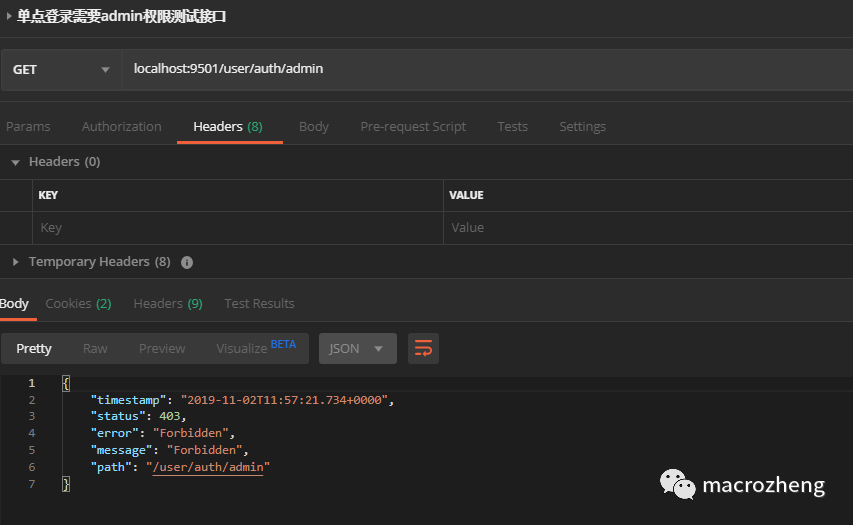
使用到的模块
springcloud-learning
├── oauth2-jwt-server -- 使用jwt的oauth2认证测试服务
└── oauth2-client -- 单点登录的oauth2客户端服务
项目源码地址
https://github.com/macrozheng/springcloud-learning
更多相关文章
- Postman:API接口调试利器
- SpringBoot应用中使用AOP记录接口访问日志
- JAVA中的“抽象接口”
- 【编测编学】接口测试面试题必背(上)
- 你的接口,真的能承受高并发吗?
- 详解第三种创建线程的方式-Callable接口
- 【编测编学】接口测试面试题必背(下)
- 快速测试 API 接口的新技能
- 「Jenkins」- 使用接口批量创建任务
