Spring Cloud Security:Oauth2结合JWT使用
16lz
2021-01-22
Spring Cloud Security 为构建安全的SpringBoot应用提供了一系列解决方案,结合Oauth2还可以实现更多功能,比如使用JWT令牌存储信息,刷新令牌功能,本文将对其结合JWT使用进行详细介绍。
JWT简介
JWT是JSON WEB TOKEN的缩写,它是基于 RFC 7519 标准定义的一种可以安全传输的的JSON对象,由于使用了数字签名,所以是可信任和安全的。
JWT的组成
- JWT token的格式:header.payload.signature;
- header中用于存放签名的生成算法;
{
  "alg": "HS256",
  "typ": "JWT"
}
- payload中用于存放数据,比如过期时间、用户名、用户所拥有的权限等;
{
  "exp": 1572682831,
  "user_name": "macro",
  "authorities": [
    "admin"
  ],
  "jti": "c1a0645a-28b5-4468-b4c7-9623131853af",
  "client_id": "admin",
  "scope": [
    "all"
  ]
}
- signature为以header和payload生成的签名,一旦header和payload被篡改,验证将失败。
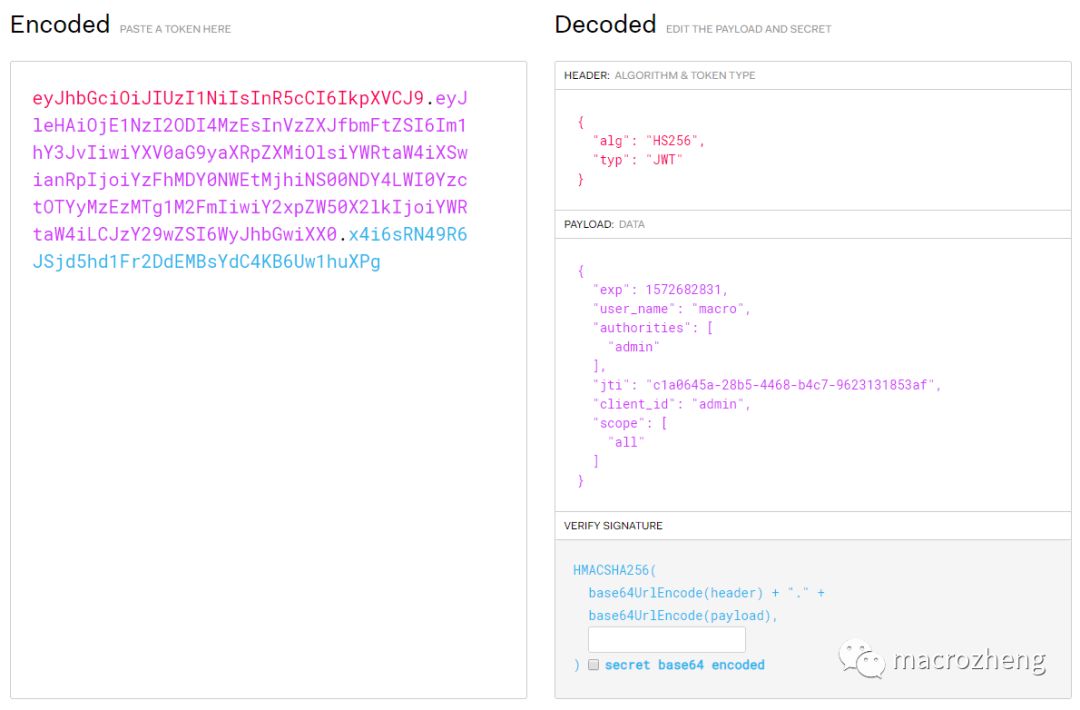
JWT实例
- 这是一个JWT的字符串:
eyJhbGciOiJIUzI1NiIsInR5cCI6IkpXVCJ9.eyJleHAiOjE1NzI2ODI4MzEsInVzZXJfbmFtZSI6Im1hY3JvIiwiYXV0aG9yaXRpZXMiOlsiYWRtaW4iXSwianRpIjoiYzFhMDY0NWEtMjhiNS00NDY4LWI0YzctOTYyMzEzMTg1M2FmIiwiY2xpZW50X2lkIjoiYWRtaW4iLCJzY29wZSI6WyJhbGwiXX0.x4i6sRN49R6JSjd5hd1Fr2DdEMBsYdC4KB6Uw1huXPg
- 可以在该网站上获得解析结果:https://jwt.io/
创建oauth2-jwt-server模块
该模块只是对oauth2-server模块的扩展,直接复制过来扩展下下即可。
oauth2中存储令牌的方式
在上一节中我们都是把令牌存储在内存中的,这样如果部署多个服务,就会导致无法使用令牌的问题。Spring Cloud Security中有两种存储令牌的方式可用于解决该问题,一种是使用Redis来存储,另一种是使用JWT来存储。
使用Redis存储令牌
- 在pom.xml中添加Redis相关依赖:
<dependency>
    <groupId>org.springframework.boot</groupId>
    <artifactId>spring-boot-starter-data-redis</artifactId>
</dependency>
- 在application.yml中添加redis相关配置:
spring:
  redis: #redis相关配置
    password: 123456 #有密码时设置
- 添加在Redis中存储令牌的配置:
/**
 * 使用redis存储token的配置
 * Created by macro on 2019/10/8.
 */
@Configuration
public class RedisTokenStoreConfig {

    @Autowired
    private RedisConnectionFactory redisConnectionFactory;

    @Bean
    public TokenStore redisTokenStore (){
        return new RedisTokenStore(redisConnectionFactory);
    }
}
- 在认证服务器配置中指定令牌的存储策略为Redis:
/**
 * 认证服务器配置
 * Created by macro on 2019/9/30.
 */
@Configuration
@EnableAuthorizationServer
public class AuthorizationServerConfig extends AuthorizationServerConfigurerAdapter {

    @Autowired
    private PasswordEncoder passwordEncoder;

    @Autowired
    private AuthenticationManager authenticationManager;

    @Autowired
    private UserService userService;

    @Autowired
    @Qualifier("redisTokenStore")
    private TokenStore tokenStore;

    /**
     * 使用密码模式需要配置
     */
    @Override
    public void configure(AuthorizationServerEndpointsConfigurer endpoints) {
        endpoints.authenticationManager(authenticationManager)
                .userDetailsService(userService)
                .tokenStore(tokenStore);//配置令牌存储策略
    }

    //省略代码...
}
- 运行项目后使用密码模式来获取令牌,访问如下地址:http://localhost:9401/oauth/token
- 进行获取令牌操作,可以发现令牌已经被存储到Redis中。
使用JWT存储令牌
- 添加使用JWT存储令牌的配置:
/**
 * 使用Jwt存储token的配置
 * Created by macro on 2019/10/8.
 */
@Configuration
public class JwtTokenStoreConfig {

    @Bean
    public TokenStore jwtTokenStore() {
        return new JwtTokenStore(jwtAccessTokenConverter());
    }

    @Bean
    public JwtAccessTokenConverter jwtAccessTokenConverter() {
        JwtAccessTokenConverter accessTokenConverter = new JwtAccessTokenConverter();
        accessTokenConverter.setSigningKey("test_key");//配置JWT使用的秘钥
        return accessTokenConverter;
    }
}
- 在认证服务器配置中指定令牌的存储策略为JWT:
/**
 * 认证服务器配置
 * Created by macro on 2019/9/30.
 */
@Configuration
@EnableAuthorizationServer
public class AuthorizationServerConfig extends AuthorizationServerConfigurerAdapter {

    @Autowired
    private PasswordEncoder passwordEncoder;

    @Autowired
    private AuthenticationManager authenticationManager;

    @Autowired
    private UserService userService;

    @Autowired
    @Qualifier("jwtTokenStore")
    private TokenStore tokenStore;
    @Autowired
    private JwtAccessTokenConverter jwtAccessTokenConverter;
    @Autowired
    private JwtTokenEnhancer jwtTokenEnhancer;

    /**
     * 使用密码模式需要配置
     */
    @Override
    public void configure(AuthorizationServerEndpointsConfigurer endpoints) {
        endpoints.authenticationManager(authenticationManager)
                .userDetailsService(userService)
                .tokenStore(tokenStore) //配置令牌存储策略
                .accessTokenConverter(jwtAccessTokenConverter);
    }

    //省略代码...
}
- 运行项目后使用密码模式来获取令牌,访问如下地址:http://localhost:9401/oauth/token
- 发现获取到的令牌已经变成了JWT令牌,将access_token拿到https://jwt.io/ 网站上去解析下可以获得其中内容。
{
  "exp": 1572682831,
  "user_name": "macro",
  "authorities": [
    "admin"
  ],
  "jti": "c1a0645a-28b5-4468-b4c7-9623131853af",
  "client_id": "admin",
  "scope": [
    "all"
  ]
}
扩展JWT中存储的内容
有时候我们需要扩展JWT中存储的内容,这里我们在JWT中扩展一个key为
enhance,value为enhance info的数据。
- 继承TokenEnhancer实现一个JWT内容增强器:
/**
 * Jwt内容增强器
 * Created by macro on 2019/10/8.
 */
public class JwtTokenEnhancer implements TokenEnhancer {
    @Override
    public OAuth2AccessToken enhance(OAuth2AccessToken accessToken, OAuth2Authentication authentication) {
        Map<String, Object> info = new HashMap<>();
        info.put("enhance", "enhance info");
        ((DefaultOAuth2AccessToken) accessToken).setAdditionalInformation(info);
        return accessToken;
    }
}
- 创建一个JwtTokenEnhancer实例:
/**
 * 使用Jwt存储token的配置
 * Created by macro on 2019/10/8.
 */
@Configuration
public class JwtTokenStoreConfig {

    //省略代码...

    @Bean
    public JwtTokenEnhancer jwtTokenEnhancer() {
        return new JwtTokenEnhancer();
    }
}
- 在认证服务器配置中配置JWT的内容增强器:
/**
 * 认证服务器配置
 * Created by macro on 2019/9/30.
 */
@Configuration
@EnableAuthorizationServer
public class AuthorizationServerConfig extends AuthorizationServerConfigurerAdapter {

    @Autowired
    private PasswordEncoder passwordEncoder;

    @Autowired
    private AuthenticationManager authenticationManager;

    @Autowired
    private UserService userService;

    @Autowired
    @Qualifier("jwtTokenStore")
    private TokenStore tokenStore;
    @Autowired
    private JwtAccessTokenConverter jwtAccessTokenConverter;
    @Autowired
    private JwtTokenEnhancer jwtTokenEnhancer;

    /**
     * 使用密码模式需要配置
     */
    @Override
    public void configure(AuthorizationServerEndpointsConfigurer endpoints) {
        TokenEnhancerChain enhancerChain = new TokenEnhancerChain();
        List<TokenEnhancer> delegates = new ArrayList<>();
        delegates.add(jwtTokenEnhancer); //配置JWT的内容增强器
        delegates.add(jwtAccessTokenConverter);
        enhancerChain.setTokenEnhancers(delegates);
        endpoints.authenticationManager(authenticationManager)
                .userDetailsService(userService)
                .tokenStore(tokenStore) //配置令牌存储策略
                .accessTokenConverter(jwtAccessTokenConverter)
                .tokenEnhancer(enhancerChain);
    }

    //省略代码...
}
- 运行项目后使用密码模式来获取令牌,之后对令牌进行解析,发现已经包含扩展的内容。
{
  "user_name": "macro",
  "scope": [
    "all"
  ],
  "exp": 1572683821,
  "authorities": [
    "admin"
  ],
  "jti": "1ed1b0d8-f4ea-45a7-8375-211001a51a9e",
  "client_id": "admin",
  "enhance": "enhance info"
}
Java中解析JWT中的内容
如果我们需要获取JWT中的信息,可以使用一个叫jjwt的工具包。
- 在pom.xml中添加相关依赖:
<dependency>
    <groupId>io.jsonwebtoken</groupId>
    <artifactId>jjwt</artifactId>
    <version>0.9.0</version>
</dependency>
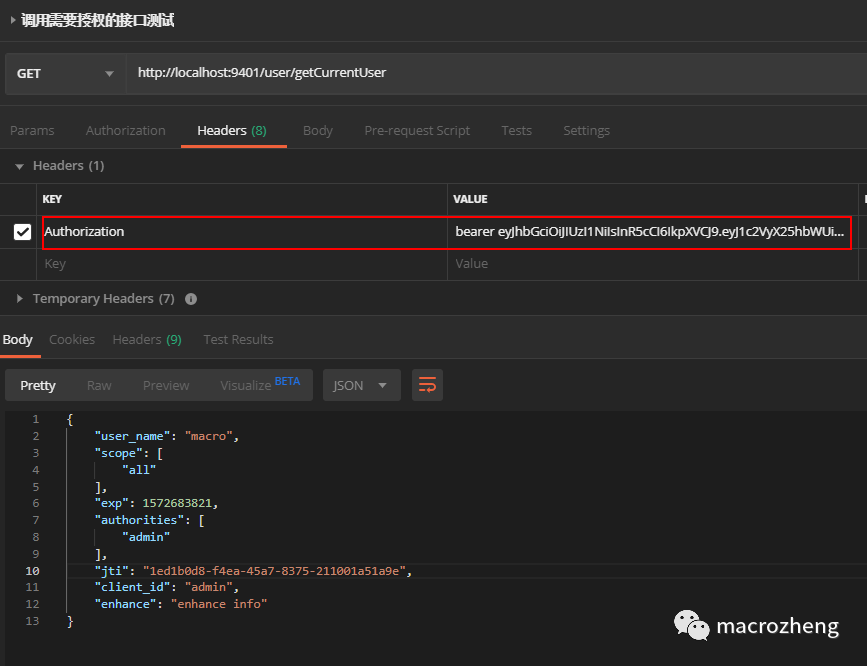
- 修改UserController类,使用jjwt工具类来解析Authorization头中存储的JWT内容。
/**
 * Created by macro on 2019/9/30.
 */
@RestController
@RequestMapping("/user")
public class UserController {
    @GetMapping("/getCurrentUser")
    public Object getCurrentUser(Authentication authentication, HttpServletRequest request) {
        String header = request.getHeader("Authorization");
        String token = StrUtil.subAfter(header, "bearer ", false);
        return Jwts.parser()
                .setSigningKey("test_key".getBytes(StandardCharsets.UTF_8))
                .parseClaimsJws(token)
                .getBody();
    }

}
- 将令牌放入
Authorization头中,访问如下地址获取信息:http://localhost:9401/user/getCurrentUser
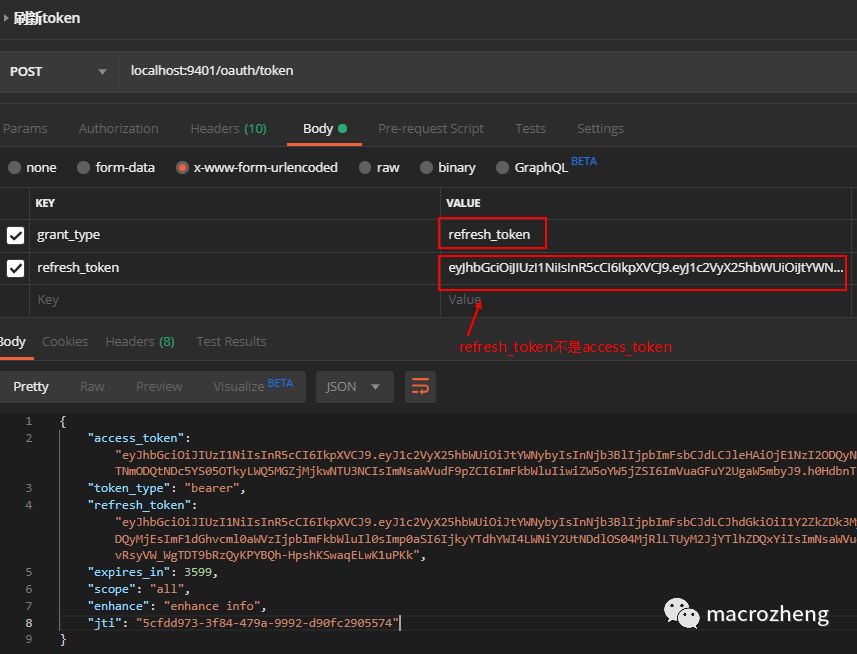
刷新令牌
在Spring Cloud Security 中使用oauth2时,如果令牌失效了,可以使用刷新令牌通过refresh_token的授权模式再次获取access_token。
- 只需修改认证服务器的配置,添加refresh_token的授权模式即可。
/**
 * 认证服务器配置
 * Created by macro on 2019/9/30.
 */
@Configuration
@EnableAuthorizationServer
public class AuthorizationServerConfig extends AuthorizationServerConfigurerAdapter {

    @Override
    public void configure(ClientDetailsServiceConfigurer clients) throws Exception {
        clients.inMemory()
                .withClient("admin")
                .secret(passwordEncoder.encode("admin123456"))
                .accessTokenValiditySeconds(3600)
                .refreshTokenValiditySeconds(864000)
                .redirectUris("http://www.baidu.com")
                .autoApprove(true) //自动授权配置
                .scopes("all")
                .authorizedGrantTypes("authorization_code","password","refresh_token"); //添加授权模式
    }
}
- 使用刷新令牌模式来获取新的令牌,访问如下地址:http://localhost:9401/oauth/token
使用到的模块
springcloud-learning
└── oauth2-jwt-server -- 使用jwt的oauth2认证测试服务
项目源码地址
https://github.com/macrozheng/springcloud-learning
更多相关文章
- 一分钟学会《模板方法模式》
- 三分钟学会门面模式!
- 策略模式原来就这么简单!
- 3.docker网络模式,桥接模式
- 图解 *** 等 6 种前端渲染模式
- 一场函数式思维模式的洗礼
- 阻塞队列实现生产者消费者模式
- 从JDK中,我们能学到哪些设计模式?
- 构造模式实践